How to Create a Vulnerable Windows Virtual Machine for Pentesting Training with scripts!
- Category: CTI
- Source article: https://medium.com/@1200km/how-to-create-a-vulnerable-windows-virtual-machine-for-pentesting-training-with-scripts-6dc39f0b3bb3
- Published: 2024-11-20
- Preserved media: 6 image(s), including cover images, screenshots, diagrams, and infographics where present.
- Preserved technical blocks: 8 code/configuration block(s).
Ecosystem Fit
This page mirrors the original Medium article into the 1200km.com Docusaurus ecosystem. The original article flow, images, screenshots, infographics, and technical blocks are preserved from the export.
Building Your Cybersecurity Playground: Step-by-Step Guide to Creating a Vulnerable Windows VM for Ethical Hacking Practice
Introduction
In the world of ethical hacking and cybersecurity, practical hands-on experience is key to mastering techniques and understanding vulnerabilities. However, testing exploits on live systems can be both unethical and illegal. This is where a safe, isolated environment becomes invaluable — a space where you can explore, learn, and test without risking harm to real-world systems or networks.
Using a virtual machine (VM) is the perfect solution for creating such a secure environment. VMs allow you to simulate real-world scenarios within a controlled and reversible framework. By isolating your vulnerable setup from your host system and external networks, you can ensure that your practice is not only effective but also safe.
The primary goal of creating a deliberately vulnerable Windows VM is to provide a training ground for pentesting and ethical hacking. This setup enables you to:
-
Identify and exploit common vulnerabilities in operating systems and applications.
-
Develop and test security tools in a risk-free environment.
-
Gain hands-on experience with penetration testing methodologies and exploit techniques.
Whether you’re a student, a professional, or simply an enthusiast in cybersecurity, building your own vulnerable VM is an essential step in advancing your skills while adhering to ethical standards.
Step 1: Preparing Your Environment
Before diving into the creation of your vulnerable Windows VM, it’s essential to prepare your environment to ensure a smooth and effective setup. Below are the key requirements and configurations:
1. Hardware Requirements
To run a virtual machine effectively, your system should meet these minimum hardware specifications:
-
Memory (RAM):At least8 GBto allocate sufficient resources to both the VM and the host system.
-
Storage:At least50 GB of free disk spaceto accommodate the VM and additional software installations.
-
**Processor:A modern multi-core CPU withvirtualization support (VT-x/AMD-V)**enabled in the BIOS.
2. Software Needed
Gather the following tools and files before starting the setup:
-
Virtualization Software:
-
Choose from popular platforms such as:
-
VMware Workstation/Player(Windows/Linux)
-
VirtualBox(Open-source and cross-platform)
-
Hyper-V(Included with Windows Pro/Enterprise)
2. Windows ISO File:
-
Obtain a legitimate Windows image for installation:
-
Versions:Windows 7, 8, 10, or Server editions.
-
Use a trial or evaluation version if you do not have a license.
3. Introducing Vulnerabilities
To transform your Windows virtual machine into a vulnerable system for pentesting, you’ll need to deliberately weaken its defenses and install outdated, insecure software. This step involves creating conditions that mirror real-world vulnerabilities, providing an ideal environment for learning and testing.
There is the full script:
# Create the required keys if they don't exist
New-Item -Path
"HKLM:\SOFTWARE\Policies\Microsoft\Windows Defender"
-Force
New-Item -Path
"HKLM:\SOFTWARE\Policies\Microsoft\Windows Defender\Real-Time Protection"
-Force
# Disable Windows Defender
Set
-ItemProperty -Path
"HKLM:\SOFTWARE\Policies\Microsoft\Windows Defender"
-Name
"DisableAntiSpyware"
-Value
1
# Disable Real-Time Monitoring
Set
-ItemProperty -Path
"HKLM:\SOFTWARE\Policies\Microsoft\Windows Defender\Real-Time Protection"
-Name
"DisableRealtimeMonitoring"
-Value
1
# Turn off firewall for Domain, Private, and Public profiles
netsh advfirewall
set
allprofiles state off
# Set UAC to Never Notify
Set
-ItemProperty -Path
"HKLM:\SOFTWARE\Microsoft\Windows\CurrentVersion\Policies\System"
-Name
"EnableLUA"
-Value
0
# Enable SMBv1 in the registry
Set
-ItemProperty -Path
"HKLM:\SYSTEM\CurrentControlSet\Services\LanmanServer\Parameters"
-Name
"SMB1"
-Value
1
Set
-ItemProperty -Path
"HKLM:\SYSTEM\CurrentControlSet\Services\LanmanWorkstation\Parameters"
-Name
"AllowInsecureGuestAuth"
-Value
1
# Enable the SMB server
Start-Process -FilePath
"sc.exe"
-ArgumentList
"config lanmanserver start=auto"
Start-Process -FilePath
"sc.exe"
-ArgumentList
"start lanmanserver"
# Enable the SMB client
Start-Process -FilePath
"sc.exe"
-ArgumentList
"config lanmanworkstation start=auto"
Start-Process -FilePath
"sc.exe"
-ArgumentList
"start lanmanworkstation"
#Creating Users with Weak Passwords
net user user password123 /add
net user Admin2 admin /add
net user osuser
123456
/add
# Optionally, add users to the Administrators group
net localgroup administrators user /add
net localgroup administrators Admin2 /add
net localgroup administrators osuser /add
# Modify Registry to Enable RDP
Set
-ItemProperty -Path
"HKLM:\SYSTEM\CurrentControlSet\Control\Terminal Server"
-Name
"fDenyTSConnections"
-Value
0
# Enable RDP Service
Set
-Service -Name
"TermService"
-StartupType Automatic
Start-Service -Name
"TermService"
# Open RDP Port in Firewall
Write-Host
"Opening RDP port in the firewall..."
netsh advfirewall firewall add rule name=
"Remote Desktop"
dir
=
in
action=allow protocol=TCP localport=
3389
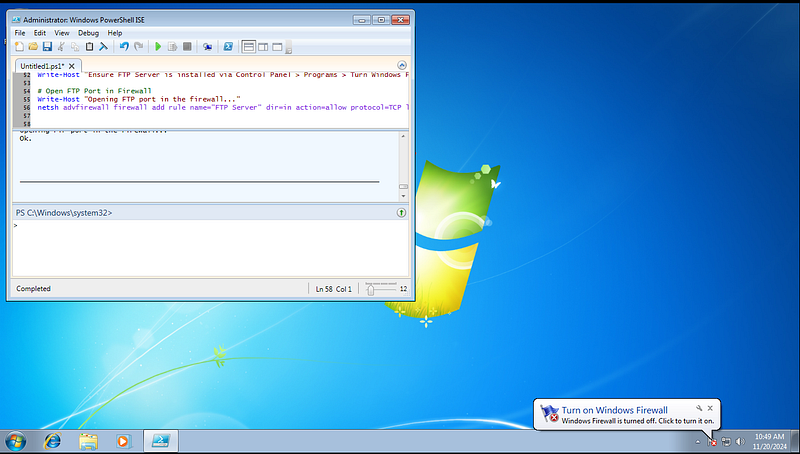
# Install FTP Server via IIS (Manual Step Required on Windows 7)
Write-Host
"Ensure FTP Server is installed via Control Panel > Programs > Turn Windows Features On or Off > IIS > FTP Server."
# Open FTP Port in Firewall
Write-Host
"Opening FTP port in the firewall..."
netsh advfirewall firewall add rule name=
"FTP Server"
dir
=
in
action=allow protocol=TCP localport=
21
Disable Security Features
Turning off built-in security mechanisms creates a less secure environment, simulating common misconfigurations:
Turn Off Windows Defender:
Use next script:
#
Create the required keys
if
 they don
't exist
New-Item -Path "HKLM:\SOFTWARE\Policies\Microsoft\Windows Defender" -Force
New-Item -Path "HKLM:\SOFTWARE\Policies\Microsoft\Windows Defender\Real-Time Protection" -Force
#
Disable Windows Defender
Set-ItemProperty -Path "HKLM:\SOFTWARE\Policies\Microsoft\Windows Defender" -Name "DisableAntiSpyware" -Value 1
#
Disable Real-Time Monitoring
Set-ItemProperty -Path "HKLM:\SOFTWARE\Policies\Microsoft\Windows Defender\Real-Time Protection" -Name "DisableRealtimeMonitoring" -Value 1
Disable Defender Using Group Policy
If you’re on a Windows Pro or Enterprise edition, you can use the Group Policy Editor.
Steps:
-
Press
Win + R, typegpedit.msc, and hit Enter. -
Navigate to:
-
Computer Configuration > Administrative Templates > Windows Components > Microsoft Defender Antivirus
- Double-clickTurn off Microsoft Defender Antivirusand selectEnabled.
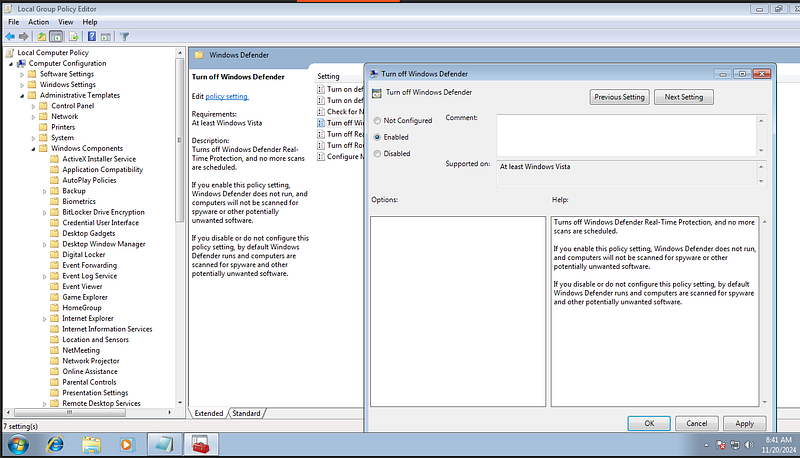
- Restart the system for changes to take effect.
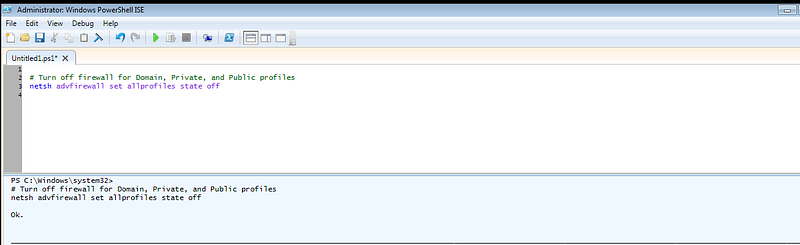
Disable Firewall
netsh advfirewall
set
 allprofiles state
off
Disable Firewall Using Group Policy (GUI Method)
If you have access to the Group Policy Editor (available on Pro/Enterprise editions), you can disable the firewall as follows:
-
Press
Win + R, typegpedit.msc, and press Enter. -
Navigate to:
Computer Configuration > Administrative Templates > Network > Network Connections > Windows Firewall > Standard Profile
- OpenWindows Firewall: Protect all network connections, and set it toDisabled.
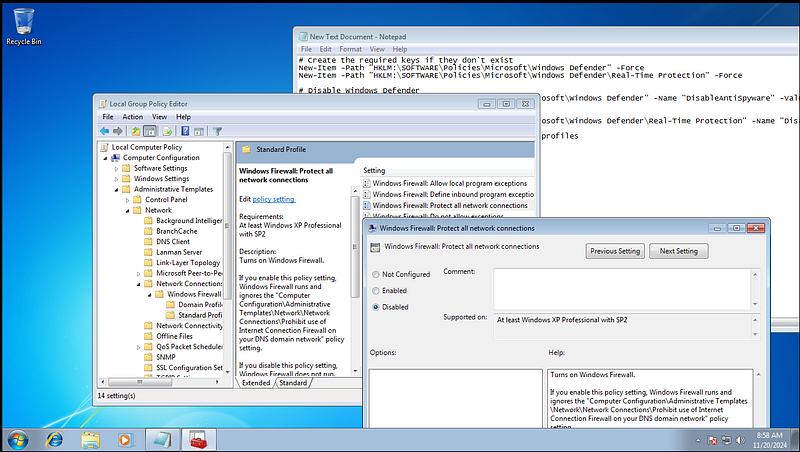
- Do the same for theDomain ProfileandPublic Profile.
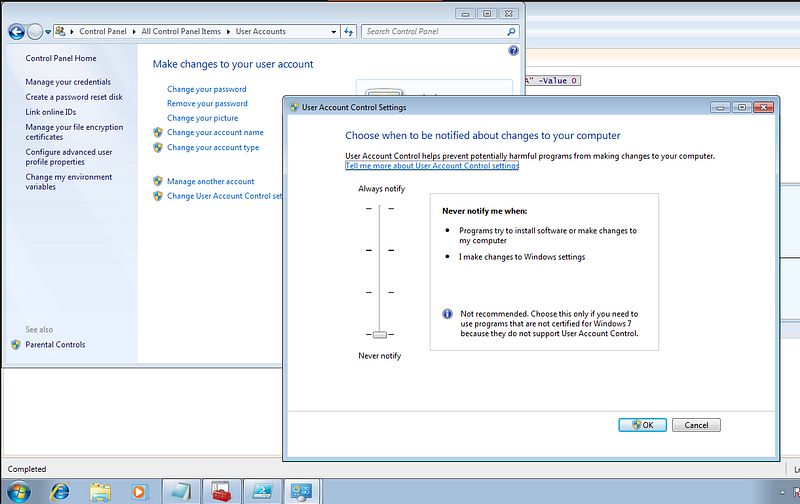
Disable User Account Control (UAC)
#
Set
 UAC
to
 Never Notify
Set
-ItemProperty -Path
"HKLM:\SOFTWARE\Microsoft\Windows\CurrentVersion\Policies\System"
 -Name
"EnableLUA"
 -Value
0
- Navigate toControl Panel > User Accounts > Change User Account Control settings, and set the slider toNever Notify.
Enable SMB Using Command Prompt
-
Open Command Prompt as Administrator:
-
Click Start, type
cmd, right-clickCommand Prompt, and selectRun as Administrator.
2. Run the Following Commands:
- To enable the SMB server:
Start
-
Process
-
FilePath "sc.exe"
-
ArgumentList "config lanmanserver start=auto"
Start
-
Process
-
FilePath "sc.exe"
-
ArgumentList "start lanmanserver"
- To enable the SMB client:
Start
-
Process
-
FilePath "sc.exe"
-
ArgumentList "config lanmanworkstation start=auto"
Start
-
Process
-
FilePath "sc.exe"
-
ArgumentList "start lanmanworkstation"
RDP Configuration:
-
Enable RDP Connections
-
Enable RDP Firewall Rules
-
Configure the RDP Service
FTP Configuration:
-
Install FTP Server Feature
-
Start the IIS Service
-
Open FTP Ports in the Firewall
# Modify Registry to Enable RDP
Set
-ItemProperty -Path
"HKLM:\SYSTEM\CurrentControlSet\Control\Terminal Server"
 -Name
"fDenyTSConnections"
 -Value
0
# Enable RDP Service
Set
-Service -Name
"TermService"
 -StartupType Automatic
Start-Service -Name
"TermService"
# Open RDP Port in Firewall
Write-Host
"Opening RDP port in the firewall..."
netsh advfirewall firewall add rule name=
"Remote Desktop"

dir
=
in
 action=allow protocol=TCP localport=
3389
# Install FTP Server via IIS (Manual Step Required on Windows 7)
Write-Host
"Ensure FTP Server is installed via Control Panel > Programs > Turn Windows Features On or Off > IIS > FTP Server."
# Open FTP Port in Firewall
Write-Host
"Opening FTP port in the firewall..."
netsh advfirewall firewall add rule name=
"FTP Server"

dir
=
in
 action=allow protocol=TCP localport=
21
Create Users, Set Weak Passwords and add them to Admin group:
#Creating Users
with
 Weak Passwords
net
user

user
 password123
/
add
net
user
 Admin2 admin
/
add
net
user
 osuser
123456

/
add
# Optionally,
add
 users
to
 the Administrators
group
net localgroup administrators
user

/
add
net localgroup administrators Admin2
/
add
net localgroup administrators osuser
/
add