Nikto: Uncovering Web Server Vulnerabilities with an Open-Source Scanner

- Category: CTI
- Source article: https://medium.com/@1200km/nikto-uncovering-web-server-vulnerabilities-with-an-open-source-scanner-6d2d2fbc1e21
- Published: 2024-11-12
- Preserved media: 19 image(s), including cover images, screenshots, diagrams, and infographics where present.
- Preserved technical blocks: 33 code/configuration block(s).
Ecosystem Fit
This page mirrors the original Medium article into the 1200km.com Docusaurus ecosystem. The original article flow, images, screenshots, infographics, and technical blocks are preserved from the export.
A Guide to Using Nikto for Identifying Security Flaws and Misconfigurations in Web Servers
Introduction to Nikto
Nikto is a powerful, open-source web server scanner designed to identify potential security vulnerabilities and configuration issues in web servers. As a free tool, it’s widely accessible to cybersecurity professionals and enthusiasts alike, providing essential insights into web server weaknesses without any hidden costs or complex licensing requirements.
Primarily, Nikto scans web servers to detect outdated software, misconfigurations, and potentially dangerous files or scripts that might be overlooked in manual audits. By using Nikto, security analysts can assess how vulnerable a web server is to known threats, which is invaluable in protecting systems against attacks. Its extensive vulnerability database, regularly updated by the open-source community, makes Nikto a reliable first step in web server assessments, helping teams identify and address security issues proactively.
Due to its simplicity and effectiveness, Nikto has become a mainstay in penetration testing toolkits, providing a fast and straightforward way to identify server vulnerabilities and strengthen web security.
Legal Use Disclaimer
Nikto is a security tool intended for authorized testing purposes only. Unauthorized scanning or probing of systems, networks, or web servers without explicit permission from the owner is illegal and may be considered a violation of cybersecurity laws. Users must ensure they have obtained the necessary consent to perform scans and assessments on target systems before using Nikto.
This article and the information provided are intended for educational purposes to promote cybersecurity awareness and best practices. The author and publisher do not endorse or condone illegal activity and are not responsible for any misuse of this information. Always adhere to ethical hacking guidelines and respect privacy and data protection laws.
1. Linux Installation
Most Linux distributions come with Perl pre-installed, which is required for running Nikto.
Step-by-Step Installation:
-
Open a Terminal.
-
Update Package Manager(optional but recommended):
sudo apt
update
sudo apt upgrade
3. Clone the Nikto Repository:
git
clone
 https://github.com/sullo/nikto.git
4. Navigate to the Nikto Directory:
cd
 nikto/program
5. Run Nikto:
perl nikto.pl -h
<
target
>
Note:
To useperl nikto.plas./nikto, you can add the program path to your$PATHor create an alias in your shell configuration.
2. Windows Installation
For Windows, you need to install Perl and Git if you don’t already have them.
Step-by-Step Installation:
-
Install Strawberry Perl:
-
Download Strawberry Perl fromStrawberry Perl’s official siteand follow the installer instructions.
2. Install Git(if it’s not already installed):
- Download and install Git fromGit for Windows.
3. Open Command Prompt or Git Bash.
4. Clone the Nikto Repository:
git
clone
 https://github.com/sullo/nikto.git
5. Navigate to the Nikto Directory:
cd
 nikto/program
6. Run Nikto:
perl nikto.pl -h
<
target
>
3. macOS Installation
macOS users also need Perl (pre-installed) and Git. For convenience, Homebrew can be used to install Nikto directly.
Step-by-Step Installation:
-
Install Homebrew(if not already installed):
-
Open Terminal and run:
/bin/bash -c
"
$(curl -fsSL https://raw.githubusercontent.com/Homebrew/install/HEAD/install.sh)
"
2. Install Nikto Using Homebrew:
brew install nikto
3. Run Nikto:
nikto -h
<
target
>
- Alternative Manual Installation:
Alternatively, you can clone the Git repository like in the Linux steps:
git
clone
 https://github.com/sullo/nikto.git
cd
 nikto/program
perl nikto.pl -h <target>
Post-Installation Check To ensure Nikto is installed and running correctly, use the following command to display the version:
nikto -
Version
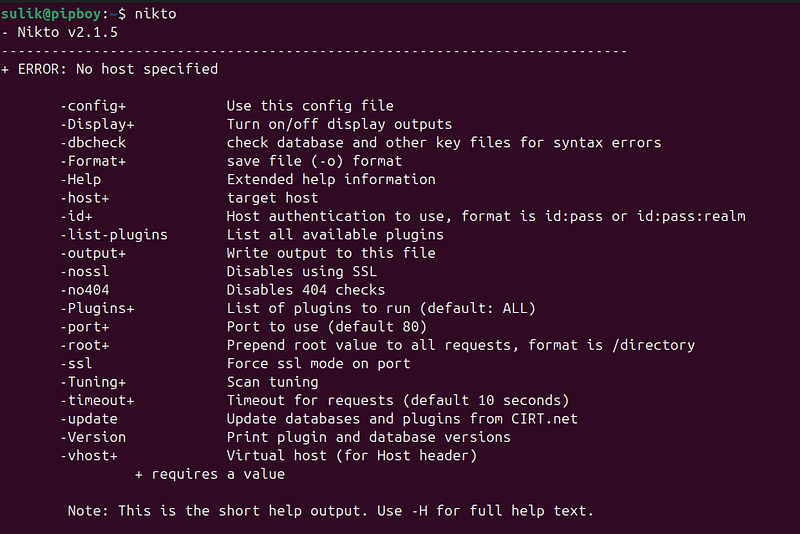
Usage
Basic command
nikto
Single Port
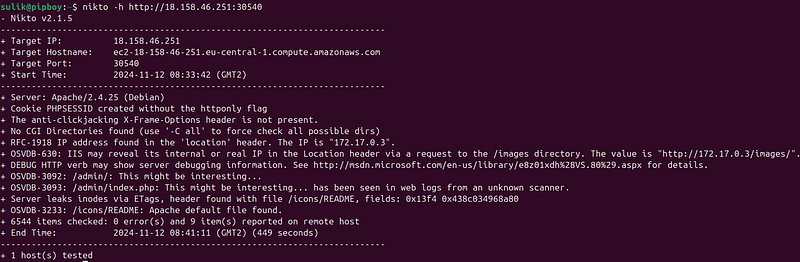
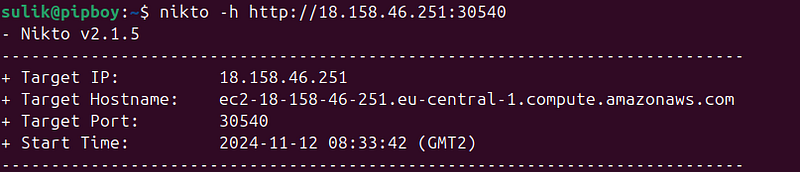
The most basic Nikto scan requires simply a host to target, since port 80 is assumed if none is specified. The host can either be the IP or a hostname of a machine, and is specified using the -h (-host) option. This will scan the IP 192.168.0.1 on TCP port 80:
nikto -h http:
//18.158.46.251:30540
To check on a different port, specify the port number with the -p (-port) option. This will scan the IP 192.168.0.1 on TCP port 443:
perl nikto.pl -h 192.168.0.1 -p 443
Hosts, ports and protocols may also be specified by using a full URL syntax, and it will be scanned:
perl nikto.pl -h[https://192.168.0.1:443/](https://192.168.0.1:443/)
There is no need to specify that port 443 is encrypted, as Nikto will first test regular HTTP and if that fails, HTTPS. If you are sure it is an SSL/TLS server, specifying -s (-ssl) very slightly will speed up the test (this is also useful for servers that respond HTTP on port 443 even though content is only served when encryption is used).
perl nikto.pl -h 192.168.0.1 -p 443 -ssl
Multiple Ports
Nikto can scan multiple ports in the same scanning session. To test more than one port on the same host, specify the list of ports in the -p (-port) option. Ports can be specified as a range (i.e., 80–90), or as a comma-delimited list, (i.e., 80,88,90). This will scan the host on ports 80, 88 and 443.
perl nikto.pl -h 192.168.0.1 -p 80,88,443
Multiple Hosts
Nikto support scanning multiple hosts in the same session via a text file of host names or IPs. Instead of giving a host name or IP for the -h (-host) option, a file name can be provided. A file of hosts must be formatted as one host per line, with the port number(s) at the end of each line. Ports can be separated from the host and other ports via a colon or a comma. If no port is specified, port 80 is assumed.
This is an example of a valid hosts file:
192.168.0.1:80
[http://192.168.0.1:8080/](http://192.168.0.1:8080/)
192.168.0.3
Options:
-config
Description: Specify a custom configuration file for Nikto.
-
Usage: If you want to use a different configuration file than the default.
-
Example:
nikto -
config
 /
path
/to/config_file.conf -h <target>
-Display
Description: Control what gets displayed on the screen during the scan.
- Usage: Adjust display to show only relevant information.
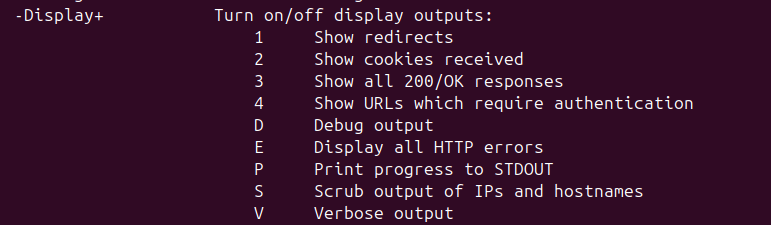
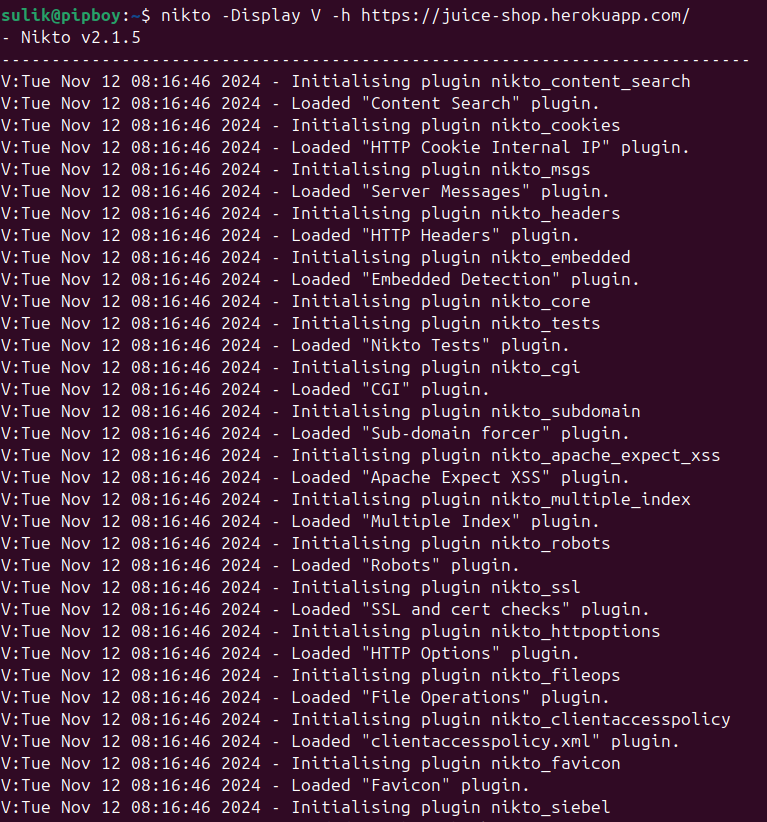
- Example: Verbose output
nikto -
Display
 V -h <target>
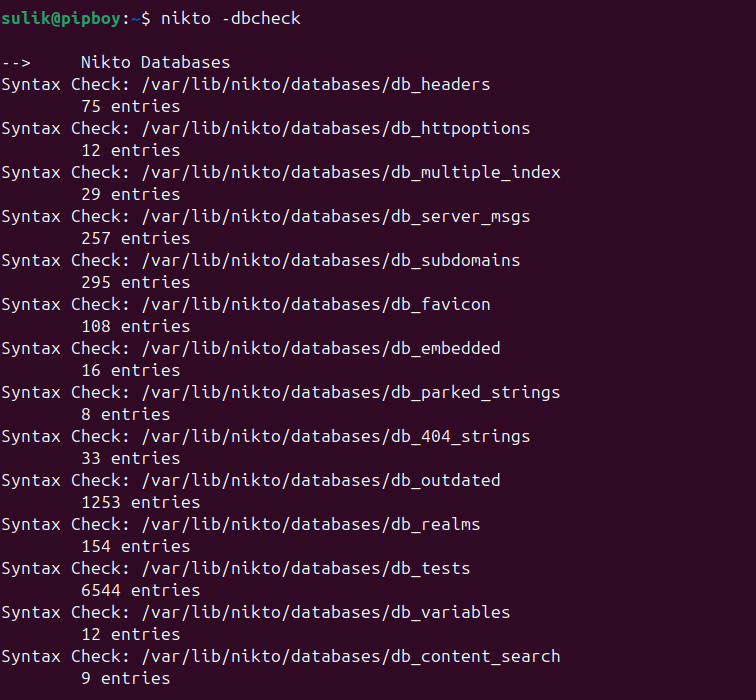
-dbcheck
Description: Checks the Nikto database and key files for syntax errors.
-
Usage: Useful for debugging or verifying integrity before running a scan.
-
Example:
nikto -dbcheck
-Format
Description: Choose the format for the output file specified with-output.
-
Usage: Supported formats are
csv,html,txt,xml, etc. -
Example:
nikto -h <target> -Format
html
 -output results
.html
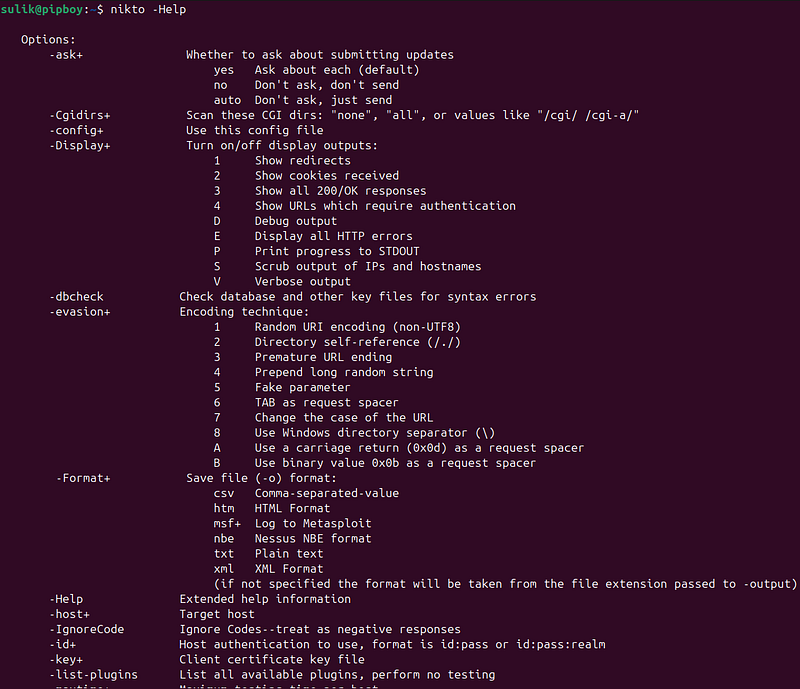
-Help
Description: Displays extended help information for Nikto.
-
Usage: Use it to view all available options and their descriptions.
-
Example:
nikto -Help
-host
Description: Specify the target host to scan.
-
Usage: Required option to set the IP address or hostname.
-
Example:
nikto -host example.
com
-id
Description: Provide HTTP basic authentication credentials (username
).
-
Usage: Useful for scanning resources that require authentication.
-
Example:
nikto -h <target> -
id
 admin:password123
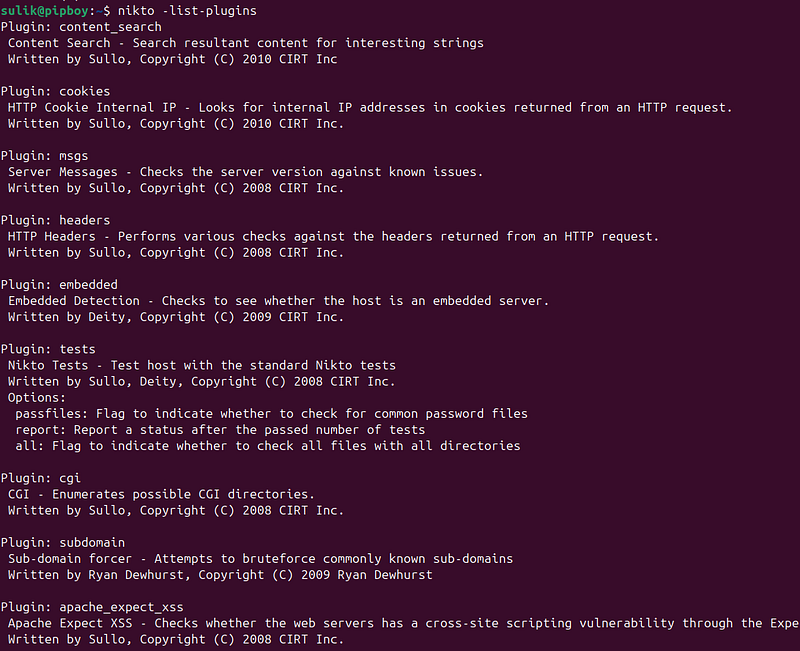
8. -list-plugins
Description: Lists all available plugins in Nikto.
-
Usage: Run this to see the plugins you can use for customized scans.
-
Example:
nikto -list-plugins
-output
Description: Write scan results to a file.
-
Usage: Useful for saving results for reporting or analysis.
-
Example:
-
nikto -h <target> -output results.txt
-nossl
Description: Disable SSL for the scan.
-
Usage: Useful if you know the target does not support SSL.
-
Example:
nikto -h
<
target
>
 -nossl
-no404
Description: Disables Nikto’s 404 checks, which are used to avoid false positives.
-
Usage: Use it if 404 checks are causing issues or slowdowns.
-
Example:
nikto -h
<
target
>
 -no404
-Plugins
Description: Specify a list of plugins to run, instead of running all plugins. By default -ALL
-
Usage: Useful to focus on specific vulnerability types.
-
Example:
nikto -h
<
target
>
 -Plugins myplugin1,myplugin2
-port
Description: Set the port to use for the scan.
-
Usage: Useful if the target server is running on a non-standard port.
-
Example:
-
nikto -h <target> -port 8080
-root
Description: Prepend a directory path to all requests.
-
Usage: Use if you need to scan a specific directory on the server.
-
Example:
nikto -h <target> -root /admin
-ssl
Description: Forces SSL (HTTPS) mode on the specified port.
-
Usage: Useful for forcing secure connections, even on non-standard ports.
-
Example:
nikto -h
<
target
>
 -port 8443 -ssl
16. -Tuning
Description: Control the types of scans by category, like injection flaws or file types.
-
Usage: Use specific numbers to target certain vulnerabilities (e.g., CGI scripts, directories).
-
Example:
nikto -h <target> -Tuning 1
# To scan for interesting file types

nikto -h <target> -Tuning 1
# To scan for interesting file types
-timeout
Description: Set a custom timeout for requests (default is 10 seconds).
-
Usage: Useful when scanning slow servers or to avoid timeouts on busy networks.
-
Example:
nikto -h <target> -
timeout
 20
-update
Description: Updates Nikto’s vulnerability databases and plugins from CIRT.net.
-
Usage: Recommended before scans to ensure the latest information.
-
Example:
nikto
-
update
-Version
Description: Print the current versions of plugins and the database.
-
Usage: Useful for verifying you’re running the latest versions.
-
Example:
nikto -
Version
-vhost
Description: Specify a virtual host for theHostheader, often necessary for sites using name-based virtual hosting.
-
Usage: Useful for targeting specific virtual hosts on a shared IP.
-
Example:
nikto -h <target> -vhost
sub
.example.com
Report reading
Reading a Nikto report effectively involves understanding its structure and interpreting the scan findings to assess the security of a web server. Here’s a breakdown of how to read a typical Nikto report and what to look for in each section.
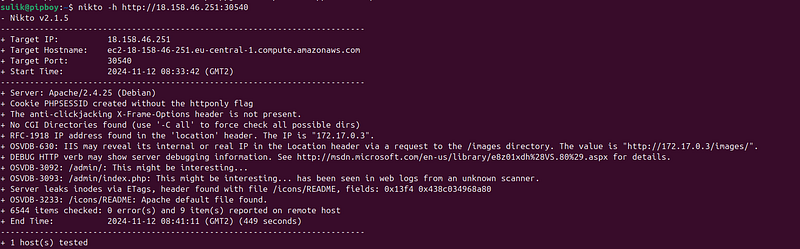
1. Report Header
The report usually begins with a header that includes essential details about the scan:
-
Host: The IP or domain of the target server.
-
Port: The port scanned, typically 80 (HTTP) or 443 (HTTPS).
-
Scan Date: The date and time when the scan was conducted.
-
Nikto Version: The version of Nikto used for the scan.
2. Server Information
This section gives insights into the server’s configuration and the technology stack, such as:
-
Server Software: The web server type (e.g., Apache, Nginx, Microsoft IIS) and its version, if identifiable.
-
Operating System: Sometimes includes the OS information if the server reveals it.

Assessment Tip: Outdated server software is a red flag, as it may contain unpatched vulnerabilities. Check the version information and confirm if it’s still supported by the vendor.
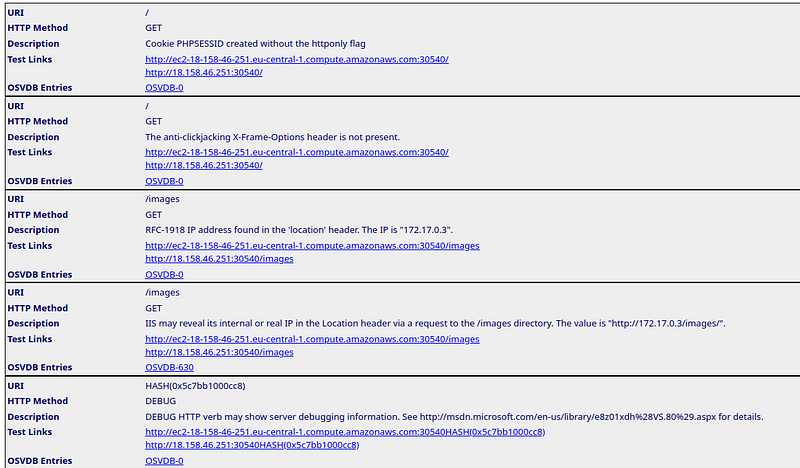
HTML report example:

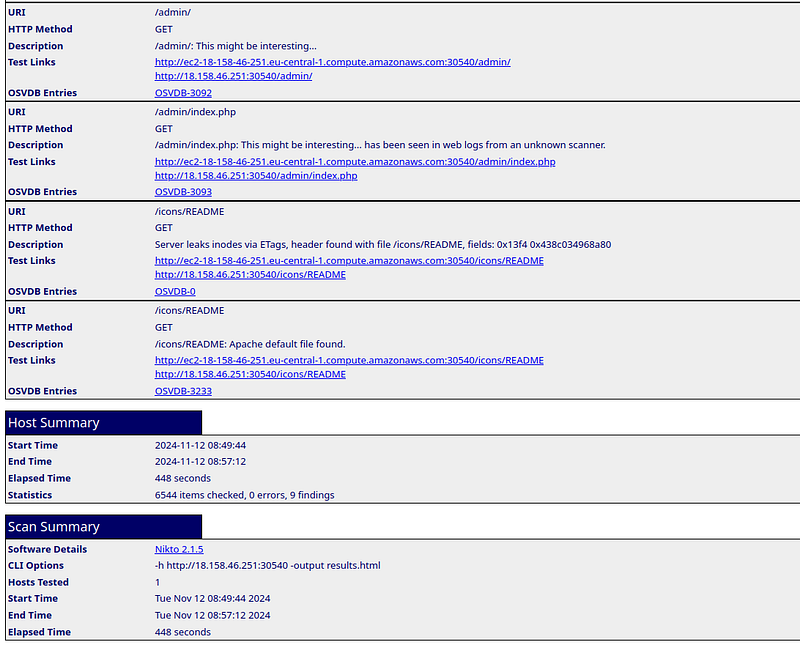
3. Vulnerability Findings
This is the core of the Nikto report, where vulnerabilities, misconfigurations, and potential issues are listed.
Each finding generally includes:
-
Issue Type: Brief description of the issue or vulnerability found.
-
Risk: An indication of the issue’s severity (e.g., Low, Medium, High), though Nikto itself does not always include risk scores.
-
URL/Path: The specific path where the issue was identified.
-
Additional Info: Often contains more technical details, references, or suggestions for mitigation.

HTML report example:
Assessment Tips:
-
Severity: Prioritize addressing vulnerabilities that expose sensitive files or enable unauthorized access.
-
Path Info: Use the paths in the report to verify findings manually. For example,
phpinfo.phpfiles should typically be removed or restricted as they expose configuration details. -
OSVDB References: Nikto often references OSVDB (Open Source Vulnerability Database) IDs. Use these IDs to look up more details about the vulnerabilities if needed.
4. Misconfiguration and Best Practice Checks
Nikto identifies various server misconfigurations or deviations from security best practices, such as:
-
Directory Listings: If directory listing is enabled, an attacker could browse files and potentially discover sensitive data.
-
Default Files/Directories: Presence of default files (e.g.,
/index.html,/admin/) may indicate areas that need better access controls.

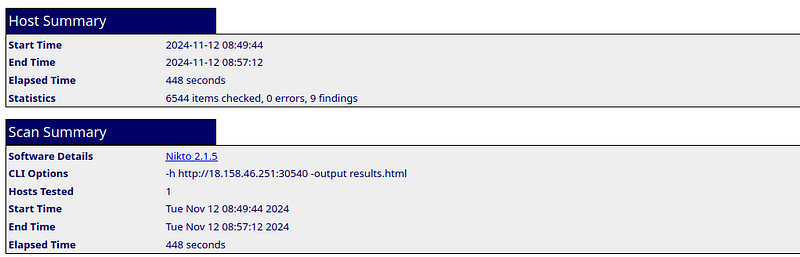
5. Report Summary and Recommendations
After reviewing the vulnerabilities, the report typically includes a summary or closing remarks, though not all Nikto reports have this. It’s useful to:
-
Summarize Key Findings: List the critical vulnerabilities and misconfigurations.
-
Prioritize Recommendations: Address high-severity issues (e.g., file exposure, weak authentication) first

HTML report:
Limitations of Nikto
While Nikto is a valuable tool for quick web server vulnerability scanning, it does have certain limitations that users should be aware of:
-
Not Stealthy: Nikto is designed for transparency and does not attempt to be stealthy. It generates many requests that can easily be detected by intrusion detection systems (IDS) or web application firewalls (WAF), making it unsuitable for covert testing.
-
High Volume of Requests: Due to the nature of its scans, Nikto generates a high volume of requests, which may impact server performance. This can slow down websites or trigger rate-limiting protections on the target server.
-
Limited Focus on Web Applications: Nikto is primarily a server vulnerability scanner and does not delve deeply into web application vulnerabilities (e.g., XSS, SQL injection) as tools like OWASP ZAP or Burp Suite do.
-
No Built-In Exploitation or Post-Exploitation Tools: Nikto only identifies vulnerabilities and does not offer exploitation or post-exploitation tools to verify them further, which means it cannot perform deeper testing or validation of the vulnerabilities it finds.
-
Basic Authentication Only: Nikto only supports basic HTTP authentication and does not handle more complex authentication mechanisms like OAuth or token-based authentication, which are common in modern web applications.
-
Manual Update Process: Although Nikto can be updated, it relies on manually fetching updates from CIRT.net. This means there may be delays in database updates, and there is no automatic syncing with the latest vulnerability feeds.