theHarvester: Your Essential Tool for OSINT and Reconnaissance in Cybersecurity

- Category: CTI
- Source article: https://medium.com/@1200km/theharvester-your-essential-tool-for-osint-and-reconnaissance-in-cybersecurity-10aa6d76f5b3
- Published: 2024-11-07
- Preserved media: 6 image(s), including cover images, screenshots, diagrams, and infographics where present.
- Preserved technical blocks: 10 code/configuration block(s).
Ecosystem Fit
This page mirrors the original Medium article into the 1200km.com Docusaurus ecosystem. The original article flow, images, screenshots, infographics, and technical blocks are preserved from the export.
Learn how to leverage theHarvester to gather emails, subdomains, IPs, and more from open sources
Introduction to theHarvester
theHarvesteris an open-source reconnaissance tool used to gather information about domains, including email addresses, subdomains, IPs, and employee details, by leveraging multiple public data sources. It’s particularly useful in the early stages of penetration testing and OSINT (Open Source Intelligence) investigations.
Disclaimer: theHarvester is a powerful reconnaissance tool intended for ethical and legal use only. Users must have explicit permission from the domain owner or be conducting tests within a legally approved scope, such as a bug bounty program or an authorized penetration test. Unauthorized use of theHarvester or any similar tools to gather information on systems or domains without consent may violate laws and lead to serious legal consequences. Always ensure compliance with local laws and regulations when performing security testing or OSINT activities.
What is theHarvester?
theHarvester is a powerful, open-source reconnaissance tool designed to gather information about a target’s digital footprint, primarily focusing on domains, emails, IPs, and subdomains. Originally developed for ethical hacking and penetration testing, theHarvester has become a staple for cybersecurity professionals conducting OSINT (Open Source Intelligence) investigations.
Purpose and Importance
In the early stages of penetration testing, gathering as much public information as possible is crucial to identifying potential entry points and understanding the attack surface of a target. theHarvester simplifies this process by automating data collection from numerous public sources, including search engines, DNS, and various APIs. This saves time and increases the scope of data collected, helping testers identify vulnerable or forgotten assets like subdomains or public IP addresses.
Popularity in Penetration Testing and OSINT
Due to its comprehensive data-gathering capabilities, theHarvester is widely used in both offensive and defensive security work. It’s especially favored in OSINT investigations, where mapping a target’s online presence is essential. By using publicly available sources, theHarvester is non-intrusive, making it a preferred tool for early-stage information gathering and threat analysis.
Installation and configuration
1. Installation of theHarvester
Step 1: Install theHarvester onKali Linux(already included) or other systems via Git.
On Kali Linux (Pre-installed)
- Verify the installation by running:
theHarvester -h
On Other Systems
- Clone the Repository:
git
clone
 https://github.com/laramies/theHarvester.git
- Navigate to the Directory:
cd
 theHarvester
- Install Required Dependencies:
pip3 install -r requirements.
txt
Now, you should be able to runtheHarvesterfrom within the directory.
2. Setting Up API Keys for Enhanced Searches
theHarvester uses various sources, and some of these sources (such as Bing, GitHub, and VirusTotal) require API keys for expanded and faster searches. You can obtain API keys by signing up with each respective service.
Supported API Sources
-
Bing: For enhanced search capabilities (register with Microsoft Azure).
-
Hunter.io: For discovering email addresses.
-
GitHub: For code-related assets.
-
VirusTotal: For checking IPs and domains.
-
Shodan: For information on internet-connected devices.
-
List of modules that require anAPI key here:
Other sources may also require API keys for extended usage. Each API has its own rate limits, and usage is often restricted in free tiers.
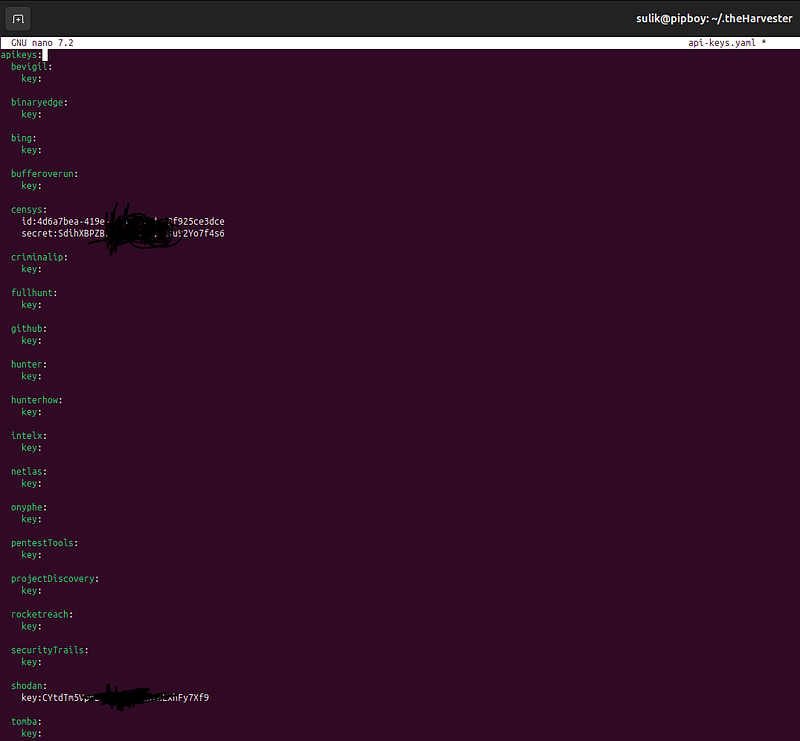
Adding API Keys
Once you have your API keys, configure them in theHarvester’s API key configuration file:
-
Locate the
**api-keys.yaml**File: This file stores API keys for all sources that require one. It’s typically located in theHarvester's main directory. -
Edit the
**api-keys.yaml**File: Open the file with a text editor, such as nano or vim.
nano api-keys.
yaml
3. Add Your API Keys: Update each source section with your API keys. Here’s a sample structure:
bing:
     api_key:
"YOUR_BING_API_KEY"
hunterio:
     api_key:
"YOUR_HUNTER_API_KEY"

shodan:
     api_key:
"YOUR_SHODAN_API_KEY"

github:
     api_key:
"YOUR_GITHUB_API_KEY"

virustotal:
     api_key:
"YOUR_VIRUSTOTAL_API_KEY"
4. Save and Exit: Save the changes and exit the editor (for nano, pressCTRL + Oto save, thenCTRL + Xto exit).
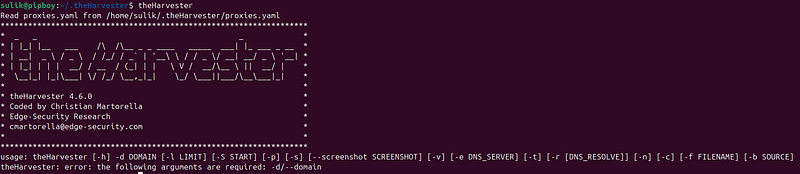
Usage
Basic command:
theHarvester [-h] -d DOMAIN [-l LIMIT] [-S START] [-p] [-s] [--screenshot SCREENSHOT] [-v] [-e DNS_SERVER] [-t] [-r [DNS_RESOLVE]] [-n] [-c] [-f FILENAME] [-b SOURCE]
Options and Arguments
-d / --domain (required)
-
Description: Specifies the target domain to search for.
-
Usage:
-d example.com -
Example:
theHarvester -d example.com
-l / --limit
-
Description: Sets the limit for the number of results to retrieve from each source.
-
Usage:
-l 500 -
Example:
theHarvester -d example.com -l 500
-S / --start
-
Description: Defines the starting result number for search engines (useful for paginated results).
-
Usage:
-S 100 -
Example:
theHarvester -d example.com -S 100
-p
-
Description: Proxies the search traffic through Tor. Ensure Tor is running.
-
Usage:
-p -
Example:
theHarvester -d example.com -p
-s
-
Description: Performs a DNS subdomain search.
-
Usage:
-s -
Example:
theHarvester -d example.com -s
--screenshot
-
Description: Takes screenshots of the resolved IPs, helpful for visual verification.
-
Usage:
--screenshot path/to/save/screenshots -
Example:
theHarvester -d example.com --screenshot /screenshots
-v
-
Description: Enables verbose output, displaying more detailed information.
-
Usage:
-v -
Example:
theHarvester -d example.com -v
-e / --dns-server
-
Description: Specifies a custom DNS server to resolve domains.
-
Usage:
-e 8.8.8.8 -
Example:
theHarvester -d example.com -e 8.8.8.8
-t
-
Description: Performs DNS TLD (Top-Level Domain) expansion to find similar domains (like
example.net,example.org). -
Usage:
-t -
Example:
theHarvester -d example.com -t
-r / --dns-resolve
-
Description: Performs reverse DNS resolution on the IP addresses found.
-
Usage:
-r -
Example:
theHarvester -d example.com -r
-n
-
Description: Avoids DNS resolution of discovered domains or IPs.
-
Usage:
-n -
Example:
theHarvester -d example.com -n
-c
-
Description: Attempts to perform DNS brute-forcing for subdomains.
-
Usage:
-c -
Example:
theHarvester -d example.com -c
-f / --filename
-
Description: Saves results to a specified file in XML or HTML format.
-
Usage:
-f output.xmlor-f output.html -
Example:
theHarvester -d example.com -f report.html
-b / --source
-
Description: Defines the data sources to use, such as
google,bing,linkedin, etc. You can specify multiple sources separated by commas. -
You can use all of sources with flag all
-
Usage:
-
b
 duckduckgo,bing
-
b

all
- Example:
theHarvester -d example.com -b duckduckgo,bing
Example Usage
To perform a search onexample.comwith a limit of 100 results from Google and Bing, output results in HTML format, and save screenshots:
theHarvester -d example
.com
 -l
100
 -
b
 bing -f example_report
.html

--screenshot
 /screenshots
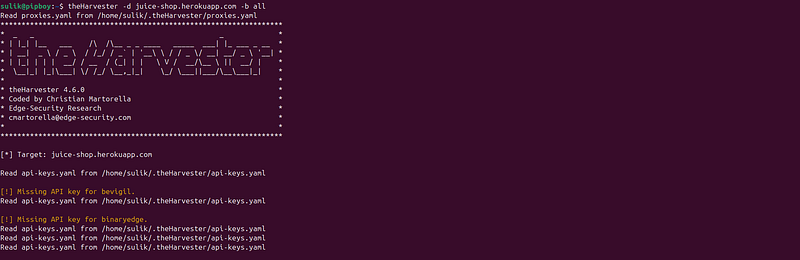
Real life example
Target: juice-shop.herokuapp.com
theHarvester -d juice-shop
.herokuapp
.com
 -
b

all