Mastering Nmap: A Comprehensive Guide to Network Exploration and Security Auditing. Part 3

- Category: CTI
- Source article: https://medium.com/@1200km/mastering-nmap-a-comprehensive-guide-to-network-exploration-and-security-auditing-part-3-450eec6e9db2
- Published: 2024-10-28
- Preserved media: 3 image(s), including cover images, screenshots, diagrams, and infographics where present.
- Preserved technical blocks: 14 code/configuration block(s).
Ecosystem Fit
This page mirrors the original Medium article into the 1200km.com Docusaurus ecosystem. The original article flow, images, screenshots, infographics, and technical blocks are preserved from the export.
This a third part of comprehensive Medium post will delve into the powerful network scanning tool, Nmap, exploring its capabilities from basic to advanced levels. It includes practical tutorials on using Nmap’s various commands, the Nmap Scripting Engine, and integration with other security tools. The guide aims to equip readers with the skills to conduct thorough network explorations and security audits.
Part 1 is here
Part 2 is here
Part 4 is here
About author
Hello and welcome to my article. My name is Andrey, and I am a penetration tester and cybersecurity researcher
Table of contents:
PORT SPECIFICATION AND SCAN ORDER:
-
-p <port ranges>: Only scan specified ports
-
— exclude-ports <port ranges>: Exclude the specified ports from scanning
-
-F: Fast mode — Scan fewer ports than the default scan
-
-r: Scan ports sequentially — don’t randomize
-
— top-ports <number>: Scan <number> most common ports
-
— port-ratio <ratio>: Scan ports more common than <ratio>
SERVICE/VERSION DETECTION:
-
-sV: Probe open ports to determine service/version info
-
— version-intensity <level>: Set from 0 (light) to 9 (try all probes)
-
— version-light: Limit to most likely probes (intensity 2)
-
— version-all: Try every single probe (intensity 9)
-
— version-trace: Show detailed version scan activity (for debugging)
OS DETECTION:
-
-O: Enable OS detection
-
— osscan-limit: Limit OS detection to promising targets
-
— osscan-guess: Guess OS more aggressively
PORT SPECIFICATION AND SCAN ORDER:
-p <port ranges> : Specify Ports to Scan
-
Technical Details: This option allows the user to define explicit ports or ranges for Nmap to scan. It supports single ports, lists of ports separated by commas, and ranges denoted by hyphens. When specifying ports, Nmap directly targets only these ports, significantly narrowing the scan’s focus.
-
Example:
nmap -p 22,80,443 192.168.1.1
# Scans specific ports
nmap -p 1-100 192.168.1.1
# Scans a range of ports
- Strategic Use: Targeted port scanning is crucial for compliance checks or when time constraints require focused assessment on services known to be active on specific ports. It reduces overhead and scan time, making it ideal for routine security audits.
-exclude-ports <port ranges> : Exclude Specific Ports from Scanning
-
Technical Details: This parameter instructs Nmap to omit specific ports or ranges from a broader scan, useful for avoiding known sensitive or non-responsive ports which could trigger security alarms or result in unnecessary traffic.
-
Example:
nmap --exclude-ports 445,3389 192.168.1.1
# Excludes specific ports from the scan
- Strategic Use: Excluding ports can prevent disruptions on production systems, especially for ports associated with critical applications. It also helps tailor security assessments to avoid well-defended or non-essential targets, enhancing operational safety and efficiency.
-F : Fast Mode - Scan Fewer Ports
-
Technical Details: Fast mode limits the scan to the 100 most commonly open ports, based on a built-in list derived from empirical data and widespread service configurations.
-
Example:
nmap
-
F

192.168
.1.1
# Quickly scans the top 100 most common ports
- Strategic Use: This mode is designed for high-level sweeps and preliminary assessments where breadth rather than depth is desired. It’s particularly useful in early phases of a penetration test or routine network maintenance checks.
-r : Sequential Port Scanning
-
Technical Details: By default, Nmap randomizes port order to avoid predictable patterns that could be easily detected by intrusion prevention systems. The
-roption overrides this, scanning ports in numerical order. -
Example:
nmap -r 192.168.1.1
# Scans ports in ascending order from lowest to highest
- Strategic Use: Sequential scanning is beneficial when testing how network devices handle sustained and orderly traffic. It can be particularly revealing in stress-testing environments or when analyzing the performance of network appliances under a systematic scan load.
-top-ports <number> : Scan Top Common Ports
-
Technical Details: This option allows scanning of the most frequently used ports, where
<number>specifies the exact count of top ports to scan, based on their commonality in network traffic. -
Example:
nmap --top-ports 20 192.168.1.1
# Scans the 20 most common ports
- Strategic Use: Scanning the most common ports is an efficient way to quickly identify potential vulnerabilities in the most exposed parts of a network. It’s effective for broad yet shallow security assessments across diverse environments.
-port-ratio <ratio> : Scan Ports Based on Popularity Ratio
-
Technical Details: This scans ports more frequently used than the specified ratio, a value between 0 and 1, with 1 being the most common port only, and lower values including progressively less common ports.
-
Example:
nmap --port-ratio 0.1 192.168.1.1
# Scans ports that are among the top 10% of commonly open ports
- Strategic Use: This approach allows for dynamic adjustment of the scan’s breadth based on network norms and statistical likelihood of port openness, which can be particularly useful in adaptive threat environments or when custom scanning strategies are needed based on prior intelligence.
SERVICE/VERSION DETECTION:
-sV : Probe Open Ports to Determine Service/Version Info
-
Full Explanation: This option instructs Nmap to perform service detection on every open port it finds during the scan. Nmap tries to determine what service is running on the port and, if possible, which version of the service is operational. This is done by sending a series of probes designed to trigger responses from common services. The responses are then analyzed against a database of service signatures.
-
Command Example:
nmap -sV
192.168
.1
.1
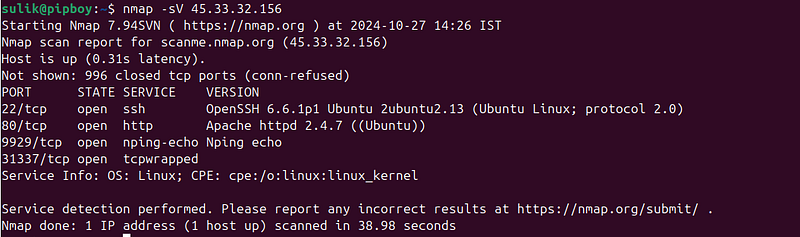
- Typical Usage: Essential for vulnerability assessment and compliance auditing, as knowing the service and version can help identify known vulnerabilities and outdated software.
-version-intensity <level> : Set Probe Intensity Level
-
Full Explanation: This parameter sets the intensity of the version detection process, ranging from 0 (lightest, fewest probes) to 9 (most intense, all available probes). The default intensity is 7, which balances thoroughness with speed.
-
Command Example:
nmap -sV
--version-intensity

5

192.168
.
1.1
- Typical Usage: Adjusting the intensity can speed up scans or increase thoroughness, depending on the security requirements and time constraints of the assessment.
-version-light : Limit to Most Likely Probes
-
Full Explanation: Equivalent to setting
--version-intensity 2, this option limits the scan to the most likely probes, reducing the total number of probes sent and speeding up the scan. -
Command Example:
nmap -sV
--version-light

192.168
.
1.1
- Typical Usage: Useful for quick scans where basic version detection is sufficient, or in high-volume scanning scenarios where speed is a priority.
-version-all : Try Every Single Probe
-
Full Explanation: This setting, equivalent to
--version-intensity 9, configures Nmap to use every single probe in its database, ensuring the most comprehensive service detection. -
Command Example:
nmap -sV
--version-all

192.168
.
1.1
- Typical Usage: Best used in deep-dive investigations where maximum information about the target is required, regardless of scan duration or network noise.
-version-trace : Show Detailed Version Scan Activity
-
Full Explanation: This option provides a verbose output showing all the probes sent and the responses received during a service/version scan. It’s invaluable for debugging and fine-tuning service detection activities.
-
Command Example:
nmap -sV
--version-trace

192.168
.
1.1
- Typical Usage: Ideal for debugging scan configurations, developing new service
OS DETECTION:
Understanding the operating system of a target can provide crucial context for security assessments, helping to tailor approaches based on known vulnerabilities and behaviors of specific OS types. Nmap offers robust OS detection capabilities, powered by advanced TCP/IP stack fingerprinting techniques. Here’s how to effectively leverage Nmap’s OS detection features:
-O: Enable OS Detection
This option triggers Nmap to use its sophisticated TCP/IP stack fingerprinting methods to attempt to identify the operating system running on the machine. Nmap sends a series of TCP and UDP packets to the target and analyzes the responses to match them against its database of known OS fingerprints.
Command Example:
nmap -O
192.168
.1
.1
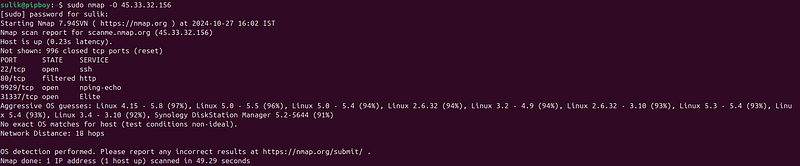
This command will initiate OS detection on the IP address 192.168.1.1, providing detailed information about the operating system if detectable.
-osscan-limit: Limit OS Detection to Promising Targets
Use this option to restrict OS detection efforts to targets that are more likely to be accurately identified. This is particularly useful in large-scale scans where efficiency is crucial. Nmap will only attempt OS detection if at least one open and one closed port are found, which increases the reliability of the results.
Command Example:
nmap -O
--osscan-limit

192.168
.
1.1
This command performs OS detection on 192.168.1.1 but limits the process to hosts that meet the criteria for likely accurate identification.
-osscan-guess: Guess OS More Aggressively
If getting an OS fingerprint is crucial and you’re dealing with a target that doesn’t easily give up this information, use-osscan-guessto force Nmap to make an educated guess. This option lowers the confidence thresholds needed for Nmap to decide on an OS, making it more likely to return a guess.
Command Example:
nmap -O
--osscan-guess

192.168
.
1.1
This command will aggressively guess the OS of the target, which is useful when some information is better than none, especially during preliminary stages of penetration testing.
Tips for Effective OS Detection
-
Combine OS Detection with Other Scans: Running OS detection alongside service version detection (
-sV) can provide a more comprehensive view of the target’s network services and their potential vulnerabilities. -
Interpret Results with Caution: The results from OS detection should be interpreted as hints rather than definitive facts, especially if not confirmed by multiple signals.