Quick‑Start Server Hardening Checklist (all open‑source)

- Category: CTI
- Source article: https://medium.com/@1200km/quick-start-server-hardening-checklist-all-open-source-08e9887b9faa
- Published: 2025-07-27
- Preserved media: 4 image(s), including cover images, screenshots, diagrams, and infographics where present.
- Preserved technical blocks: 20 code/configuration block(s).
Ecosystem Fit
This page mirrors the original Medium article into the 1200km.com Docusaurus ecosystem. The original article flow, images, screenshots, infographics, and technical blocks are preserved from the export.
ISO 27001-Based Server Hardening Plan
1. Access Control (ISO 27001 — A.9)
Disable Root Login via SSH ( PermitRootLogin no )
1. Create a new administrative user
# Replace 'secadmin' with your desired username
adduser secadmin
usermod -aG sudo secadmin
# For Debian/Ubuntu
# OR
usermod -aG wheel secadmin
# For RHEL/CentOS/Fedora
This ensures you have a non-root user with administrative privileges.
2. Set a strong password (or configure SSH key login)
passwd secadmin
Or set up key-based login:
mkdir
 -p /home/secadmin/.ssh
cp
 /root/.ssh/authorized_keys /home/secadmin/.ssh/
chown
 -R secadmin:secadmin /home/secadmin/.ssh
chmod
 700 /home/secadmin/.ssh
chmod
 600 /home/secadmin/.ssh/authorized_keys
3. Test SSH login as the new user
Open anew terminal(do not close the current one!) and run:
ssh secadmin
@your_server_ip
Confirm you can log in and usesudo:
sudo
whoami
# Output should be: root
4. Check all existing users (optional but recommended)
# List all users with login shells
grep
'/bash'
 /etc/passwd
# List all sudo-capable users
getent group sudo      # For Debian/Ubuntu
getent group wheel     # For RHEL/Fedora/CentOS
5. Disable root SSH login
Edit the SSH config:
sudo nano /etc/ssh/sshd_config
Find and change:
PermitRootLogin
no
Also consider:
PasswordAuthentication
no

# if you use keys only
AllowUsers secadmin
# optional: restrict to known users
6. Restart SSH service
sudo systemctl restart sshd
7. Verify it’s working
- Open a new terminal:
ssh root
@your_server_ip

# Should fail: Permission denied
- Try your admin user:
ssh secadmin
@your_server_ip

# Should succeed
To limit SSH login attempts to3 triesandblock further attempts for 30 seconds, you can use**fail2ban**, a common and effective tool for this purpose.
- Install
**fail2ban**:
Debian
sudo apt
update
sudo apt install fail2ban
-
y
Centos7/RH
sudo yum install epel
-
release

-
y
sudo yum install fail2ban
-
y
sudo systemctl
start
 fail2ban
sudo systemctl enable fail2ban
2. Configure SSH jail:
Create a local override config:
sudo nano /etc/fail2ban/jail.local
Paste the following configuration
[sshd]
enabled
 =
true
port
    = ssh
filter
  = sshd
logpath
 = /var/log/auth.log
backend
 = systemd
maxretry
 =
3
findtime
 =
30
bantime
 =
30
-
maxretry = 3: max 3 failed attempts -
findtime = 30: count failures in 30 seconds -
bantime = 30: block IP for 30 seconds
3. Restart**fail2ban**:
sudo systemctl restart fail2ban
sudo systemctl
enable
 fail2ban
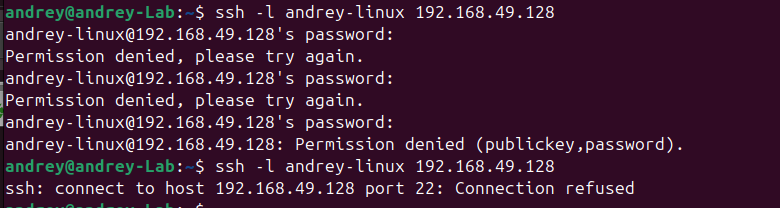
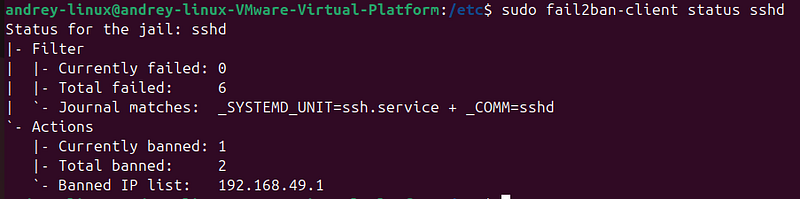
4. Check if jail is working:
sudo fail2ban-client
status
 sshd
2. System & Network Hardening (ISO 27001 — A.13, A.12.6.1)
-
Close all unused ports(use
ufw,iptables) -
Disable unused services:
-
systemctl disable service_name -
Enable firewalls:
ufw,firewalld -
Configure SELinux or AppArmor
3. Remove Unnecessary Software (A.12.1.2)
-
Remove unused packages:
-
apt purge package_name -
Use minimal OS images (
AlmaLinux,Debian Netinstall,Ubuntu Minimal)
4. Patch Management (A.12.6.1)
-
Regular OS & application updates:
-
apt update && apt upgrade -y -
Automate using
unattended-upgrades(Debian/Ubuntu) ordnf-automatic(RHEL)
Automatic Updates
-
Control:
unattended-upgradesenabled -
Purpose: Automatically installssecurity patcheswithout manual intervention, reducing exposure to known vulnerabilities.
-
How it works (Debian/Ubuntu):
-
Package:
unattended-upgrades -
Configuration:
sudo dpkg-reconfigure
--priority=low unattended-upgrades

-
Log file:
/var/log/unattended-upgrades/unattended-upgrades.log -
Verify:
-
sudo systemctl status unattended-upgrades cat /etc/apt/apt.conf.d/20auto-upgrades
5. Logging and Monitoring (A.12.4)
-
Enable audit logging:
auditd -
Central log server:
Syslog-ng,XPLG -
Set up log forwarding and alerts for:
-
Unauthorized login attempts
-
File changes
-
Process monitoring
6. File and Configuration Integrity (A.12.5.1)
-
Use
**AIDE**(Advanced Intrusion Detection Environment) orTripwire -
Configure alerting for:
-
/etc/
-
/var/log/
-
Critical binaries
7. Encryption (A.10)
-
Data at rest: LUKS, dm-crypt
-
Data in transit: TLS, HTTPS (use
Let’s Encryptwith auto-renew) -
Passwords: SHA-512, bcrypt (
/etc/login.defs,pam.d)
8. Malware and Rootkit Detection (A.12.2.1)
-
Install and configure:
-
ClamAV(open-source AV) -
Chkrootkit/RKHunterfor rootkit scanning
9. Backup and Recovery (A.12.3)
-
Automated backups:
rsync,BorgBackup,Restic -
Store offsite or encrypted in cloud
-
Regularly test restore procedures
10. Baseline and CIS Benchmarking
-
UseCIS Benchmarksfor your OS:
-
CIS-CAT tool
-
OpenSCAP
Documentation and Audit (ISO 27001 Requirement)
-
Document each hardening step.
-
Maintain logs of:
-
Patch cycles
-
Admin access
-
Incident reports
-
Periodically review and audit server configurations.