FluentBit on Kubernetes DemonSet Deployment.

- Category: CTI
- Source article: https://medium.com/@1200km/fluentbit-on-kubernetes-demonset-deployment-13c3915113ba
- Published: 2025-07-11
- Preserved media: 3 image(s), including cover images, screenshots, diagrams, and infographics where present.
- Preserved technical blocks: 15 code/configuration block(s).
Ecosystem Fit
This page mirrors the original Medium article into the 1200km.com Docusaurus ecosystem. The original article flow, images, screenshots, infographics, and technical blocks are preserved from the export.
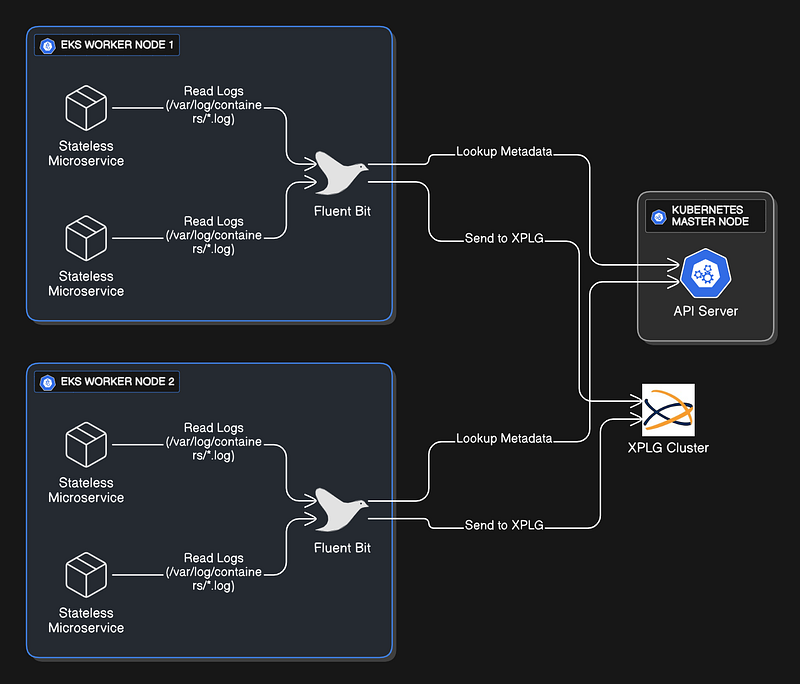
Cluster-wide log collection using Fluent Bit on every node
Description:
This guide explains how to deploy Fluent Bit as a DaemonSet in a Kubernetes cluster to collect container logs from all nodes, enrich them with metadata, and forward them to an external log collector like XPLG.
Official documentation about DemonSet:https://kubernetes.io/docs/concepts/workloads/controllers/daemonset/
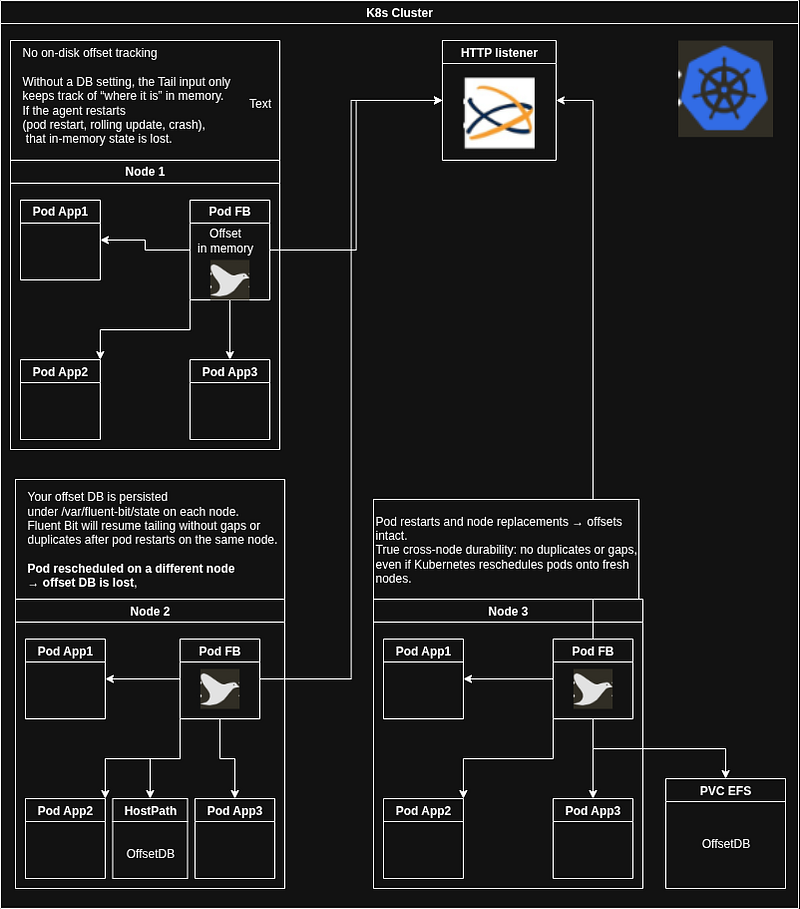
Fluent Bit Offset Persistence
OffsetDB(configured via the DB parameter in the Tail input) is simply a small SQLite file that Fluent Bit uses to rememberwhich byte offsetit last read in each log file. On startup, Fluent Bit opens this DB, loads the saved offsets (path, inode, offset), and resumes tailing from exactly where it left off — so you neither lose logs nor get duplicates when the agent restarts. Without a DB file, Fluent Bit falls back to its default behavior (skipping to new lines or replaying from the start).
For the official definition and all configuration options, see the Fluent Bit Tail input documentation:here
Fluent Bit Offset Persistence Strategies: In-Memory, HostPath, and Shared RWX Storage:
In-Memory Offsets (No On-Disk Tracking)
How it works
- Fluent Bit tails your pod logs and keeps the “last read” position only in RAM(of pod).
Key Characteristics
-
Pod restart or rolling update → offset lost.
-
On restart:
-
If Read_from_Head On, it replays every line (duplicates).
-
If Read_from_Head Off, it skips everything up to the end (gaps).
When to use
-
Short-lived test clustersornon-critical logswhere occasional duplication or gaps are acceptable.
-
Easiest to set up — no volumes required.
Tail | Fluent Bit: Official Manual *The Tail input plugin lets you monitor text files. Its behavior is similar to the tail -f shell command. The plugin…*docs.fluentbit.io
2. HostPath-Backed DB (Per-Node Persistence)
How it works
- Each Fluent Bit pod writes its SQLite offset DB to a directory on the node’s local disk via a hostPath volume (e.g. /var/lib/fluent-bit/state/flb_kube.db).
Key Characteristics
-
Pod restart on thesamenode → offset persisted.
-
Node replacement or eviction → DB lost.
-
No duplicates or gapsas long as the pod stays on its original node.
When to use
-
You need**pod-restart resilience,**but aren’t worried about nodes going away.
-
Useful in environments without shared storage, but where node churn is rare.
Link to official manualhere
Example for configuration file:Here
3. Shared RWX Volume (Cluster-Wide Persistence)
How it works
-
A ReadWriteMany volume (e.g. EFS, NFS, CephFS) is mounted on every node at
/var/fluent-bit/state. -
Each pod writes to its own file, e.g.
/var/fluent-bit/state/flb_<NODE_NAME>.db.
Key Characteristics
-
Pod restarts and node replacements → offsets intact.
-
True cross-node durability: no duplicates or gaps, even if Kubernetes reschedules pods onto fresh nodes.
When to use
-
Production clusterswhere log integrity is critical.
-
Environments with reliable shared storage and moderate performance requirements.
Persistent storage for container logging using Fluent Bit and Amazon EFS | Amazon Web Services
Deploying Fluent Bit with Cluster-Wide Persistence on Kubernetes (EKS + EFS)
Step 1: Create a Namespace
Namespaces help organize resources logically. Creating a separate namespace (likelogging) ensures:
Benefits:
-
**Isolation & Organization:**Keeps Fluent Bit isolated from app workloads.
-
**RBAC Scoping:**Simplifies permission management.
-
**Cleaner Clusters:**Prevents clutter in
defaultnamespace. -
**Future Scaling:**Easier integration with other observability tools.
kubectl create
namespace
 logging
Step 2: Configure RBAC & ServiceAccount
What Is RBAC?
Role-Based Access Control (RBAC) defines what actions users or services can perform in the cluster.
Why Fluent Bit Needs It
To enrich logs with Kubernetes metadata via the Kubernetes filter plugin, Fluent Bit must access pod and namespace metadata.
RBAC YAML
apiVersion:

v1
kind:

ServiceAccount
metadata:

name:

fluent-bit

namespace:

logging
---
apiVersion:

rbac.authorization.k8s.io/v1
kind:

ClusterRole
metadata:

name:

fluent-bit-read
rules:
-

apiGroups:
 [
""
]

resources:
 [
"pods"
,
"namespaces"
]

verbs:
 [
"get"
,
"list"
,
"watch"
]
---
apiVersion:

rbac.authorization.k8s.io/v1
kind:

ClusterRoleBinding
metadata:

name:

fluent-bit-read
roleRef:

apiGroup:

rbac.authorization.k8s.io

kind:

ClusterRole

name:

fluent-bit-read
subjects:
-

kind:

ServiceAccount

name:

fluent-bit

namespace:

logging
kubectl apply -f fluentbit-rbac.
yaml
Step 3: Provision EFS (ReadWriteMany) for Shared Storage
1. Create the EFS Filesystem
aws efs
create
-
file
-
system
 \

--creation-token fluentbit-offsets \

--performance-mode generalPurpose \

--throughput-mode bursting \

--tags Key=Name,Value=fluentbit-offsets
2. Create Mount Targets
Go to EFS Console > File System > Network > Create Mount Targets (1 per AZ). Ensure NFS port 2049 is allowed in SGs.
3. Install EFS CSI Driver
kubectl apply -k
"github.com/kubernetes-sigs/aws-efs-csi-driver/deploy/kubernetes/overlays/stable/ecr/?ref=release-1.5"
4. Define a StorageClass
apiVersion:

storage.k8s.io/v1
kind:

StorageClass
metadata:

name:

efs-rwx
provisioner:

efs.csi.aws.com
parameters:

fileSystemId:

fs-12345678

# Replace with your FileSystemId

directoryPerms:

"700"
mountOptions:

-

tls
reclaimPolicy:

Retain
volumeBindingMode:

Immediate
allowVolumeExpansion:

true
kubectl apply -f aws-efs-sc.
yaml
5. Create the PVC
apiVersion:

v1
kind:

PersistentVolumeClaim
metadata:

name:

fluentbit-state-pvc

namespace:

logging
spec:

accessModes:

-

ReadWriteMany

storageClassName:

efs-rwx

resources:

requests:

storage:

5Gi
kubectl apply -f pvc-fluentbit-state.
yaml
Step 4: Create Fluent Bit ConfigMap
Required Information-Gathering Cheat Sheet
|
 Info Needed
|
 Purpose
|
 Command
/
 Example
|
|

---------------------- | --------------------------------------- | ------------------------------------------------------------------------------------------------------- |
|
 Cluster access
|
 Ensure kubectl works
|
 `kubectl config
current
-
context`
|
|
 Node count
|
 Know how many DaemonSet pods
|
 `kubectl
get
 nodes`
|
|
 Namespace
|
 Decide
where

to
 deploy
|
 `kubectl
get
 namespaces`
|
|
 Pod labels
|
 Needed
for
 Service.selector
|
 `kubectl
get
 pods
--show-labels`                                                                        |
|
 Container port
|

For
 Port
in
 Output
|
 `kubectl
describe
 pod
<
name
>
`
|
|
 App logs path
|

For
 Fluent Bit input path
|
 `
/
var
/
log
/
containers
/*.log`                                                                             |
| Log format             | To choose the correct parser            | Inspect sample logs                                                                                     |
| RBAC resources/actions | For metadata enrichment (Fluent Bit)    | `get`, `list`, `watch` on pods, namespaces                                                              |
| ServiceAccount name    | Needed for RBAC bindings                | Defined in your Fluent Bit YAML                                                                         |
| PersistentVolume info  | Persistent volume details               | `kubectl get pv; kubectl describe pv <pv-name>; kubectl get pvc -n <namespace>`                         |
| Internal DNS           | Use instead of hardcoded IPs for “Host” | `<SERVICE>.<NAMESPACE>.svc.cluster.local`                                                               |
| DNS test               | Validate service DNS                    | `kubectl run test --image=busybox -it --rm -- sh -c "nslookup <SERVICE>.<NAMESPACE>.svc.cluster.local"` |
| URI & HTTP listener    | URI field for output plugin             | Retrieve from the HTTP listener in the XpoLog UI                                                        |
fluentbit-config.yaml
apiVersion: v1
kind: ConfigMap
metadata:
  name: fluent-bit-config
  namespace: logging
data:
  fluent-bit.conf: |
    [SERVICE]
        Flush
5
        Daemon       Off
        Log_Level    info
        Parsers_File parsers.conf
        storage.path /var/fluent-bit/
state
        storage.type filesystem
        HTTP_Server  On
        HTTP_Listen
0
.
0
.
0
.
0
        HTTP_Port
2020
    @INCLUDE inputs.conf
    @INCLUDE filters.conf
    @INCLUDE outputs.conf
  inputs.conf: |
    [INPUT]
        Name             tail
        Tag              kube.*
        Path             /var/
log
/containers/*.log
        Parser           docker
        Mem_Buf_Limit
5
MB
        Skip_Long_Lines  On
        Refresh_Interval
10
        DB               /var/fluent-bit/
state
/flb
_
${NODE_NAME}.db
        storage.type     filesystem
  filters.conf: |
    [FILTER]
        Name            kubernetes
        Match           kube.*
        Kube_Tag_Prefix kube.var.log.containers.
        Merge_Log       On
        Merge_Log_Key
log
        Keep_Log        Off
  outputs.conf: |
    [OUTPUT]
        Name              http
        Match             *
        Host              xpolog-service.default.svc.cluster.local
        Port
30303
        URI               /logeye/api/logger.jsp?token=
5693
be
0
-bd51-
41
f5-
8968
-
15
f6f946af53
        Format            json_lines
        Json_date_key
time
        Json_date_format  iso8601
        Header            X-Xpolog-Sender
local
-k8s
        Retry_Limit
5
  parsers.conf: |
    [PARSER]
        Name             docker
        Format           json
        Time_Key
time
        Time_Format      %Y-%m-%dT%H:%M:%S.%L%z
        Time_Keep        On
        Decode_Field_As  escaped
log
 do_next
        Decode_Field_As  json
log
kubectl apply -f fluentbit-
config
.yaml
Step 5: Deploy Fluent Bit DaemonSet
fluent-bit-daemonset.yaml
apiVersion:

apps/v1
kind:

DaemonSet
metadata:

name:

fluent-bit

namespace:

logging

labels:

app.kubernetes.io/name:

fluent-bit
spec:

selector:

matchLabels:

app.kubernetes.io/name:

fluent-bit

updateStrategy:

type:

RollingUpdate

template:

metadata:

labels:

app.kubernetes.io/name:

fluent-bit

spec:

serviceAccountName:

fluent-bit

tolerations:

-

operator:

Exists

containers:

-

name:

fluent-bit

image:

fluent/fluent-bit:2.2.2

resources:

requests:

cpu:

"50m"

memory:

"100Mi"

limits:

cpu:

"100m"

memory:

"200Mi"

env:

-

name:

NODE_NAME

valueFrom:

fieldRef:

fieldPath:

spec.nodeName

volumeMounts:

-

name:

config

mountPath:

/fluent-bit/etc

-

name:

varlog

mountPath:

/var/log

readOnly:

true

-

name:

varlibdockercontainers

mountPath:

/var/lib/docker/containers

readOnly:

true

-

name:

state

mountPath:

/var/fluent-bit/state

livenessProbe:

httpGet:

path:

/api/v1/health

port:

2020

initialDelaySeconds:

10

periodSeconds:

60

volumes:

-

name:

config

configMap:

name:

fluent-bit-config

-

name:

varlog

hostPath:

path:

/var/log

type:

DirectoryOrCreate

-

name:

varlibdockercontainers

hostPath:

path:

/var/lib/docker/containers

type:

DirectoryOrCreate

-

name:

state

persistentVolumeClaim:

claimName:

fluentbit-state-pvc
kubectl apply -f fluent-bit-daemonset.
yaml
Step 6: Verify Deployment
kubectl
get
 pods -n logging
kubectl logs -n logging <fluent-bit-pod-name>