Android Emulation & Virtualisation

- Category: CTI
- Source article: https://medium.com/@1200km/android-emulation-and-virtualisation-2f6b33fcc4aa
- Published: 2026-04-07
- Preserved media: 24 image(s), including cover images, screenshots, diagrams, and infographics where present.
- Preserved technical blocks: 47 code/configuration block(s).
Ecosystem Fit
This page mirrors the original Medium article into the 1200km.com Docusaurus ecosystem. The original article flow, images, screenshots, infographics, and technical blocks are preserved from the export.
Complete Research Lab Guide. From Zero to a Fully Instrumented Android Research Environment
> Who this is for: Security researchers, bug bounty hunters, and pentesters who need a reliable, repeatable Android lab. Assumes basic Linux comfort; no prior Android development experience required.
> What you will have at the end: Two configured AVDs (standard + writable-system), ADB working across all connection modes, Frida attached and scripting, and a snapshot workflow that lets you reset to a clean state in under five seconds.
> Scope: Official Android Emulator (primary), physical rooted device (secondary), third-party emulators (reference). Linux/Ubuntu focus with macOS and Windows notes.
Table of Contents
-
Introduction
-
Concepts: Emulation vs Virtualisation on Android
-
Host Prerequisites
-
Android SDK & Command-Line Tools Setup
-
System Image Selection
-
AVD Creation & Management
-
Emulator Launch Variants
-
ADB Connection Modes
-
Frida Integration
-
Physical Device Setup
-
Third-Party Emulators
-
Snapshots & Lab Hygiene
-
Common Failure Cases & Fixes
-
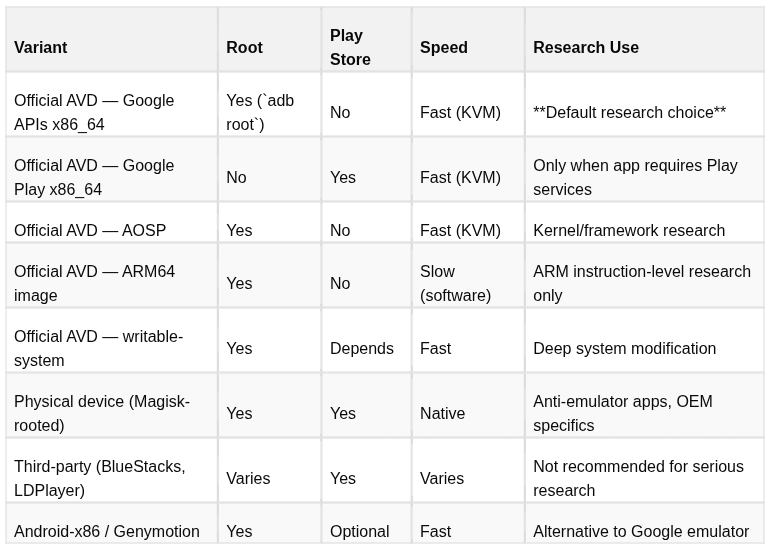
Decision Matrix
-
Quick-Reference Cheat Sheet
Introduction
Building an Android research lab sounds straightforward — install Android Studio, press Play, done. In practice, researchers hit a wall the first time they try to intercept HTTPS traffic, hook a method with Frida, or modify a system file: the default emulator setup blocks all of these. Understandingwhyeach limitation exists andwhich configuration removes itsaves hours of debugging.
What “Android emulation” actually means

The practical consequence:always use x86_64 images. KVM turns QEMU from a software interpreter into a thin hypervisor shim, giving you an emulator that feels as fast as a real device. ARM images are only necessary when you need to observe actual ARM instruction behaviour (e.g., ROP gadget research, JIT compiler bugs).
The two decisions that shape every other choice
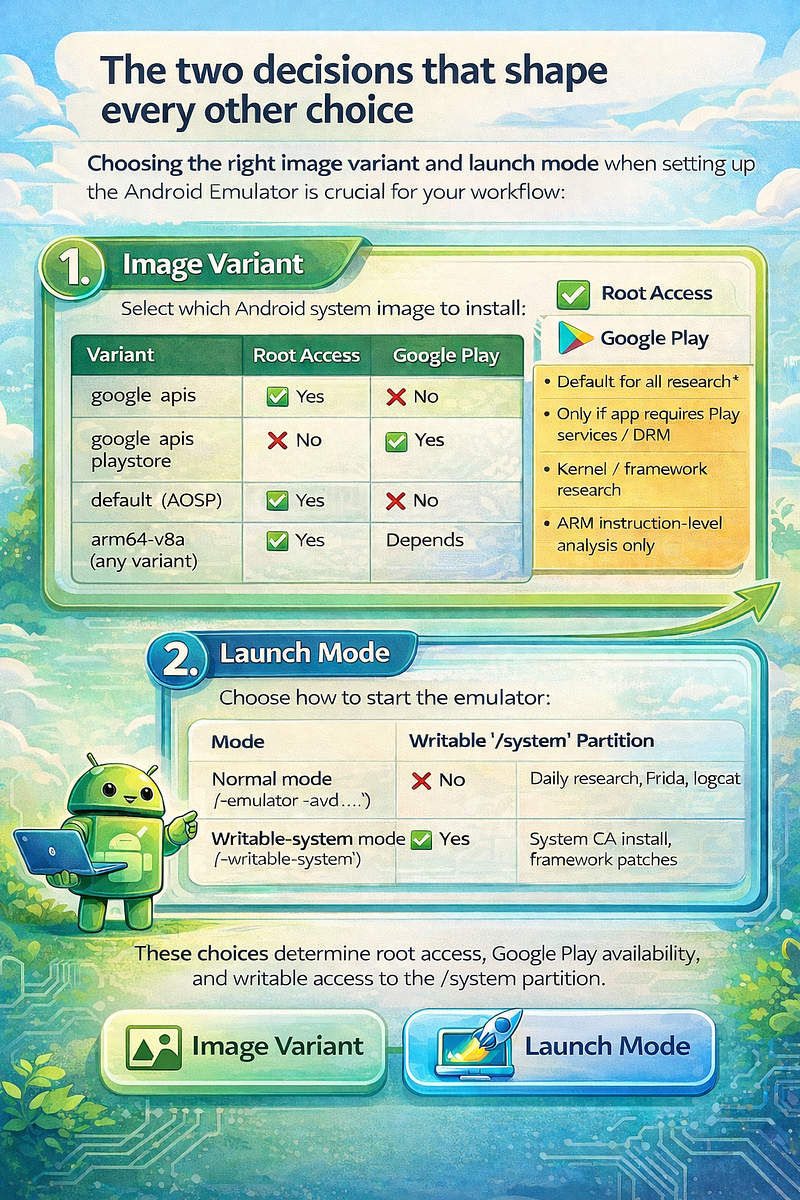
- Image variant— which Android system image you install:
2. Launch mode— how you start the emulator:

These two decisions — image variant and launch mode — determine what is possible in a given session. Everything else (Frida, Burp, ADB root) flows from them.
How this guide is structured
The guide follows the natural setup sequence: host prerequisites → SDK → images → AVDs → launch modes → ADB → Frida → physical devices → snapshots. Each section is self-contained so you can jump directly to a specific topic. The Decision Matrix at the end maps any research scenario to the right configuration in one glance.
Concepts: Emulation vs Virtualisation on Android
1. How the Android Emulator Works Internally
The Android Emulator isnot pure emulation— it is a layered hybrid:
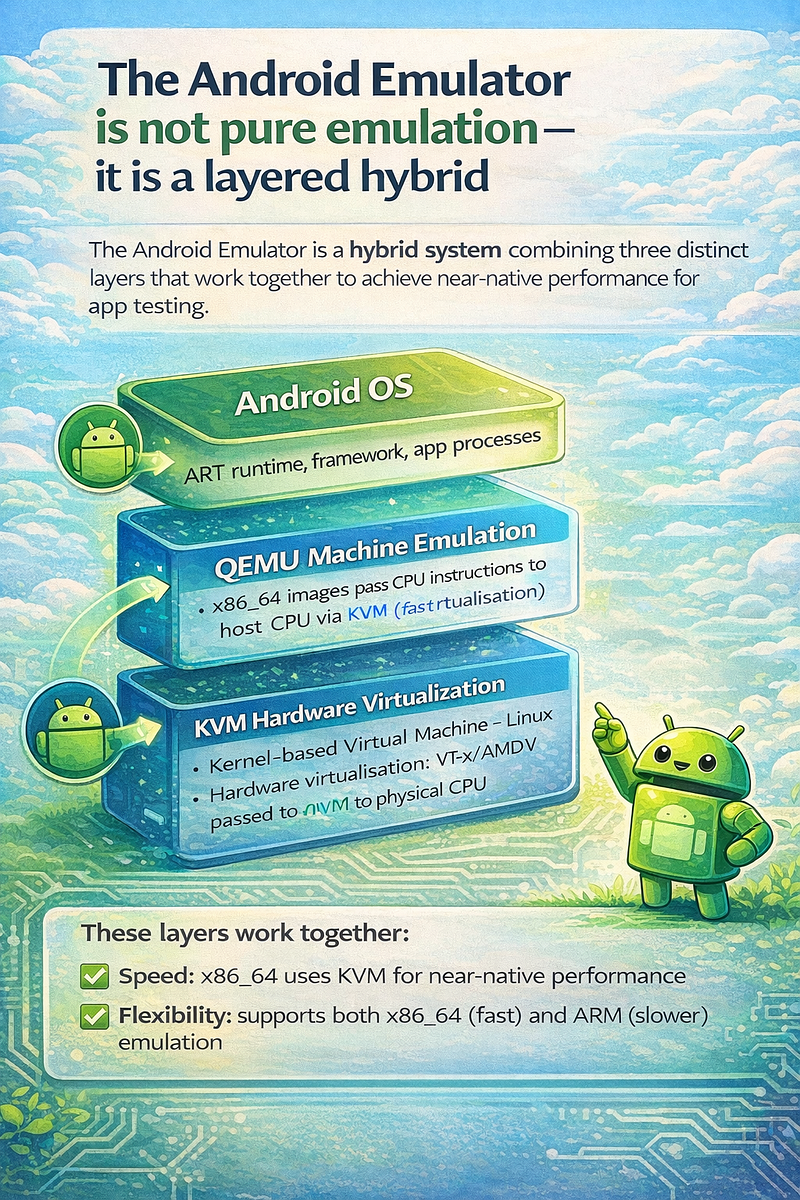
**Key insight:**x86_64 images + KVM = near-native speed. ARM images = full software emulation = slow. For research, always use x86_64 images unless you specifically need ARM instruction-level behaviour.
2. Emulation Variants at a Glance
3. The Writable-System Distinction
The same AVD can be booted in two modes:
Normal boot:                    Writable
-
system
 boot:
/
system

=
 read
-
only

/
system

=
 read
-
write
adb remount → fails             adb remount →
succeeds
Cannot install
system
 CAs       Can install
system
 CAs
Cannot modify framework         Can modify framework files
This is not a different image — it is the same image launched with-writable-system. Changes to/systemonly persist for that session unless you snapshot after.
Host Prerequisites
[Building an Android App Analysis Lab on Ubuntu: A Practical Setup Guide A practical step-by-step guide to building an Android malware analysis and security testing lab on Ubuntu
1. Linux (Ubuntu 22.04 / 24.04 — Recommended)
# ── Core system packages ──────────────────────────────────────────────────
sudo apt update && sudo apt install -y \
  openjdk-17-jdk \
  unzip \
  wget \
  curl \
  git \
  python3 \
  python3-pip \
  libpulse0 \
  libxcb-icccm4 \
  libxcb-image0 \
  libxcb-keysyms1 \
  libxcb-render-util0 \
  libxcb-xinerama0 \
  libxkbcommon-x11-0
# ── KVM (hardware acceleration - critical for x86_64 performance) ─────────
sudo apt install -y \
  qemu-kvm \
  libvirt-daemon-system \
  libvirt-clients \
  bridge-utils \
  cpu-checker
# ── Add your user to kvm group ────────────────────────────────────────────
sudo usermod -aG kvm
$USER
# Log out and back in (or run: newgrp kvm)
# ── Verify KVM is available ───────────────────────────────────────────────
kvm-ok
# Expected output:
# INFO: /dev/kvm exists
# KVM acceleration can be used
egrep -c
'(vmx|svm)'
 /proc/cpuinfo
# > 0 means hardware virtualisation is available
2. macOS
# macOS uses Hypervisor.framework instead of KVM — no extra setup needed
# Install Homebrew if not present, then:
brew install android-platform-tools
# for adb
# Install Android Studio for full SDK, or use cmdline-tools
# Verify adb
adb version
3. Windows
-
Enable Hyper-V or HAXM in BIOS: VT-x must be on
-
Install Android Studio (includes all SDK tools)
-
Or: use WSL2 with usbipd for USB device passthrough
Android SDK & Command-Line Tools Setup
1. Headless (No Android Studio)
# ── 1. Create SDK directory ───────────────────────────────────────────────
mkdir
 -p
$HOME
/Android/Sdk/cmdline-tools
# ── 2. Download command-line tools ───────────────────────────────────────
# From: https://developer.android.com/studio#command-tools
# File: commandlinetools-linux-*.zip
wget
"https://dl.google.com/android/repository/commandlinetools-linux-11076708_latest.zip"
 \
  -O cmdline-tools.zip
unzip cmdline-tools.zip
mv
 cmdline-tools
$HOME
/Android/Sdk/cmdline-tools/latest
# ── 3. Environment variables - add to ~/.bashrc or ~/.zshrc ──────────────
cat
 >> ~/.bashrc <<
'EOF'
# Android SDK
export
 ANDROID_HOME=
$HOME
/Android/Sdk
export
 ANDROID_SDK_ROOT=
$HOME
/Android/Sdk
export
 PATH=
$PATH
:
$ANDROID_HOME
/cmdline-tools/latest/bin
export
 PATH=
$PATH
:
$ANDROID_HOME
/platform-tools
export
 PATH=
$PATH
:
$ANDROID_HOME
/emulator
export
 PATH=
$PATH
:
$ANDROID_HOME
/build-tools/34.0.0
EOF
source
 ~/.bashrc
# ── 4. Verify sdkmanager is available ─────────────────────────────────────
sdkmanager --version
# ── 5. Install core packages ──────────────────────────────────────────────
sdkmanager --install \

"platform-tools"
 \

"emulator"
 \

"platforms;android-33"
 \

"build-tools;34.0.0"
# ── 6. Accept all licenses ────────────────────────────────────────────────
yes
 | sdkmanager --licenses
# ── 7. Verify adb is available ────────────────────────────────────────────
adb version
2. With Android Studio
Android Studio installs the full SDK automatically. The SDK is placed at:
-
Linux:
~/Android/Sdk/ -
macOS:
~/Library/Android/sdk/ -
Windows:
%LOCALAPPDATA%\Android\Sdk\
Set the same environment variables as above, pointing to this path.
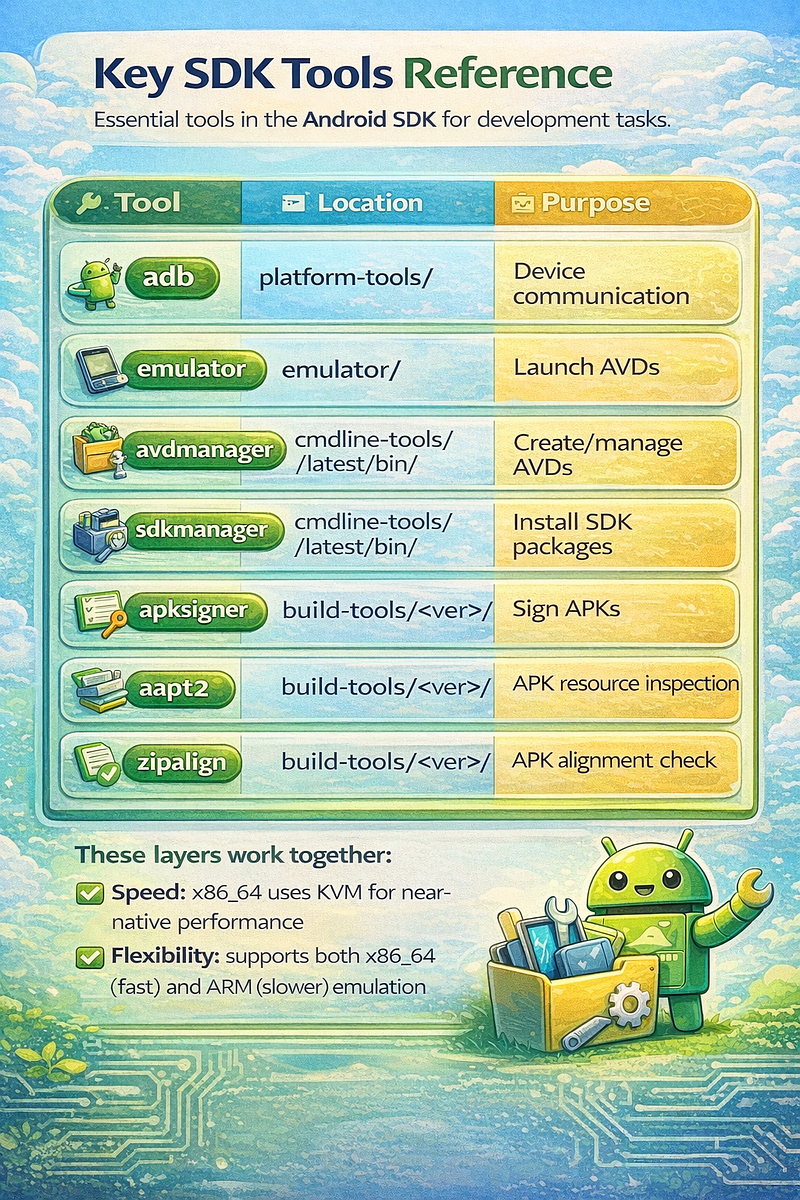
3. Key SDK Tools Reference
System Image Selection
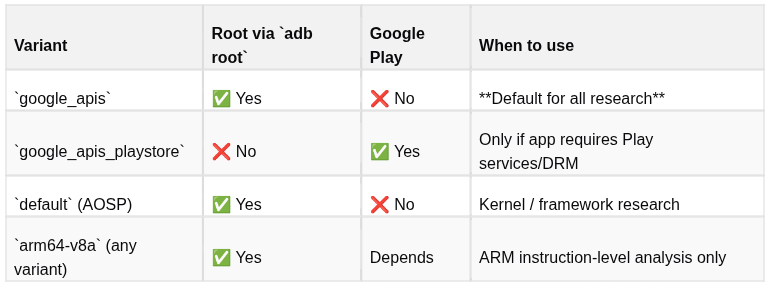
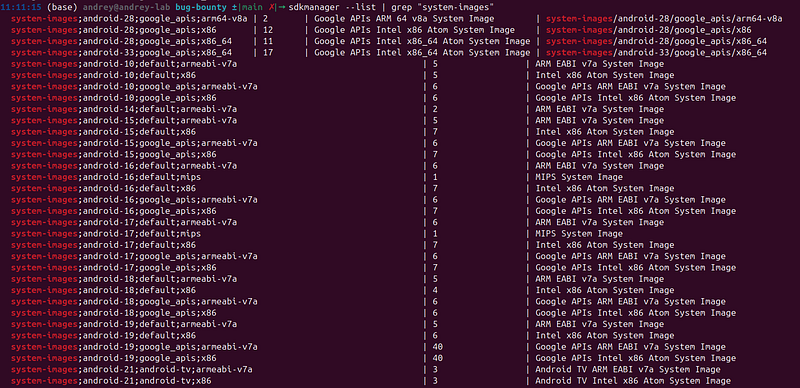
1. Available Image Types
# List all available system images
sdkmanager --list |
grep

"system-images"
# Key patterns:
# system-images;android-{API};{variant};{abi}
#
# Variants:
#   google_apis          - Google APIs, rootable, no Play Store
#   google_apis_playstore - Google APIs + Play Store, NOT rootable
#   default              - AOSP only, no Google services
#   android-tv           - Android TV
#   android-wear         - Wear OS
2. Recommended Images for Research
# ── Primary research image (recommended) ─────────────────────────────────
sdkmanager
"system-images;android-33;google_apis;x86_64"
# ── If you need API 34 (Android 14) ──────────────────────────────────────
sdkmanager
"system-images;android-34;google_apis;x86_64"
# ── If app requires Play Store ────────────────────────────────────────────
sdkmanager
"system-images;android-33;google_apis_playstore;x86_64"
# ── ARM64 (for instruction-level research - slow) ─────────────────────────
sdkmanager
"system-images;android-33;google_apis;arm64-v8a"
# ── Older API for legacy app testing ─────────────────────────────────────
sdkmanager
"system-images;android-28;google_apis;x86_64"
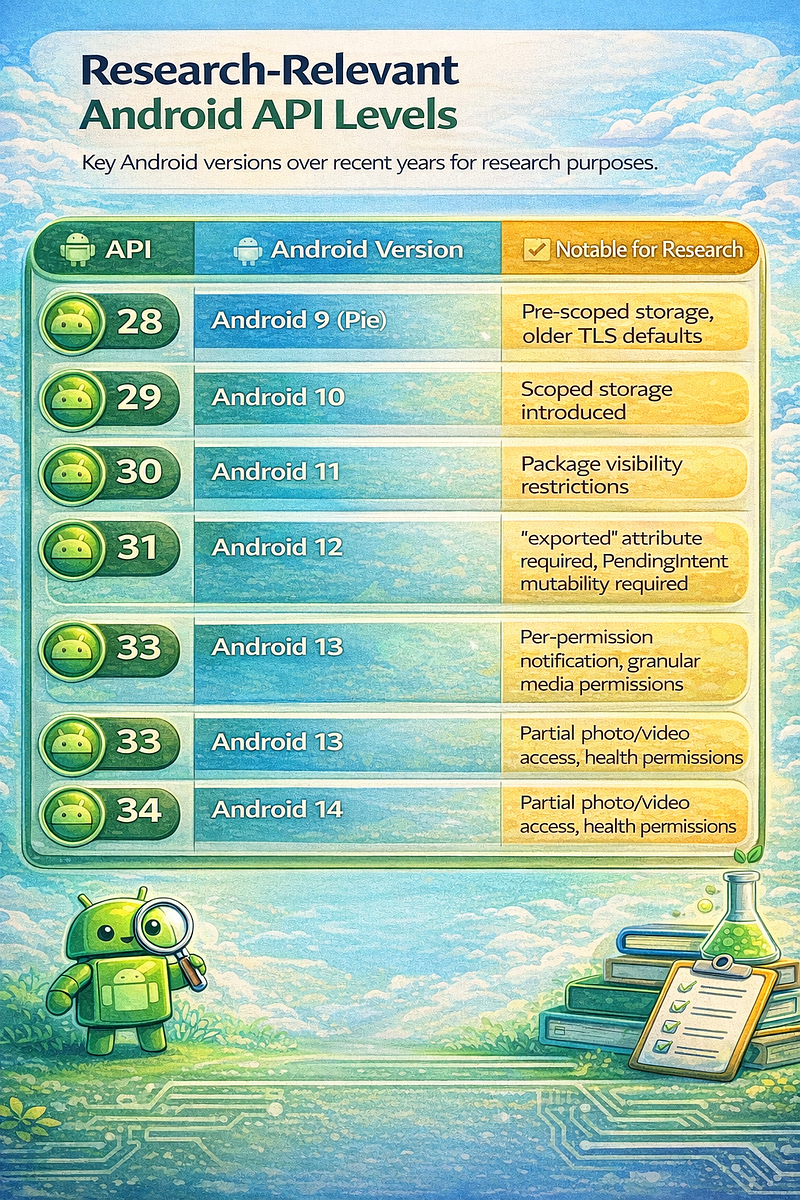
3. API Level Reference
AVD Creation & Management
1. Create AVDs
# ── Baseline research AVD ─────────────────────────────────────────────────
avdmanager create avd \
  --name
"research_api33"
 \
  --abi
"google_apis/x86_64"
 \
  --
package

"system-images;android-33;google_apis;x86_64"
 \
  --device
"pixel_5"
# ── Writable-system research AVD (separate instance) ─────────────────────
avdmanager create avd \
  --name
"research_api33_rw"
 \
  --abi
"google_apis/x86_64"
 \
  --
package

"system-images;android-33;google_apis;x86_64"
 \
  --device
"pixel_5"
# ── Legacy API for older app testing ──────────────────────────────────────
avdmanager create avd \
  --name
"research_api28"
 \
  --abi
"google_apis/x86_64"
 \
  --
package

"system-images;android-28;google_apis;x86_64"
 \
  --device
"pixel_3"
# ── Play Store AVD (when app requires it) ─────────────────────────────────
avdmanager create avd \
  --name
"research_api33_play"
 \
  --abi
"google_apis_playstore/x86_64"
 \
  --
package

"system-images;android-33;google_apis_playstore;x86_64"
 \
  --device
"pixel_5"
2. Manage AVDs
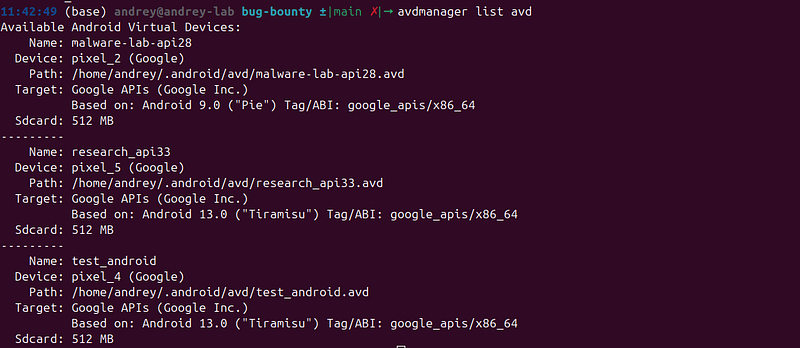
# List all AVDs
emulator -list-avds
avdmanager list avd
# Delete an AVD
avdmanager delete avd --name
"research_api33"
# AVD files location (Linux)
ls
 ~/.android/avd/
# research_api33.avd/     ← data directory (userdata, snapshots)
# research_api33.ini      ← config pointer file
# View AVD config
cat
 ~/.android/avd/research_api33.avd/config.ini
3. Customising AVD config.ini
Edit~/.android/avd/research_api33.avd/config.inito tune:
# RAM size
hw.ramSize
=
4096
# Disk size
disk.dataPartition.size
=
8
G
# CPU cores
hw.cpu.ncore
=
4
# Screen resolution
skin.name
=pixel_5
hw.lcd.density
=
440
hw.lcd.height
=
2340
hw.lcd.width
=
1080
# Disable device authentication (useful for automation)
hw.mainKeys
=
no
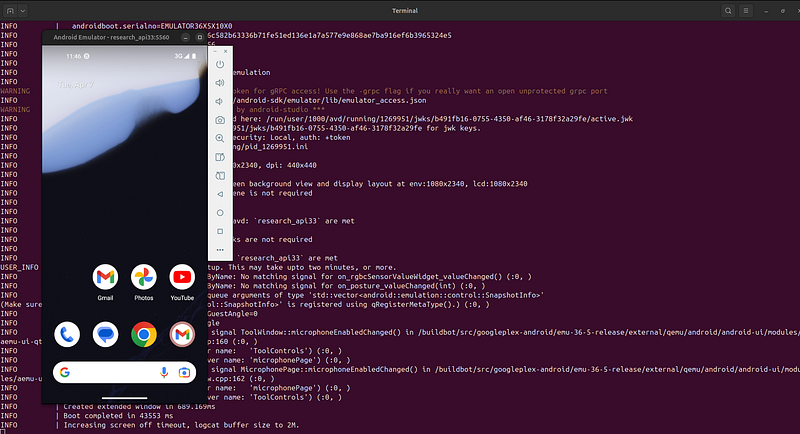
Emulator Launch Variants
1. Variant A — Standard Baseline Boot
**Use for:**APK testing, logcat, basic ADB + Frida, repeatable automated runs.
emulator -avd research_api33 -
no
-snapshot -
no
-boot-anim &
# Wait for boot
adb
wait
-
for
-device
until
 [
"$(adb shell getprop sys.boot_completed 2>/dev/null)"
 =
"1"
 ];
do

sleep

1
done
echo
"[+] Emulator ready"
2. Variant B — Writable-System Boot
**Use for:**installing system CA certs, modifying/system, framework research.
emulator -avd research_api33_rw -writable-
system
 -
no
-snapshot -
no
-boot-anim &
adb
wait
-
for
-device
until
 [
"$(adb shell getprop sys.boot_completed)"
 =
"1"
 ];
do

sleep

1
; done
adb root
adb remount
# Verify
adb shell whoami
# → root
adb shell mount |
grep

system

# → should show rw
3. Variant C — Fast/Deterministic Research Boot
**Use for:**rapid iterations, scripted test pipelines, CI-style repetitive runs.
emulator -avd research_api33 \
  -writable-
system
 \
  -
no
-snapshot \
  -
no
-boot-anim \
  -netspeed full \
  -netdelay none \
  -
no
-audio \
  -skin
1080
x234
0
 &
4. Variant D — GPU Fallback (Headless / Remote Server)
**Use for:**when running on a remote server without GPU, or if graphics crash the emulator.
# Software rendering — slow graphics but stable
emulator -avd research_api33 \
  -gpu swiftshader_indirect \
  -
no
-snapshot \
  -
no
-window &
# completely headless
# OR: off = no GPU emulation at all (fastest headless)
emulator -avd research_api33 \
  -gpu off \
  -
no
-snapshot \
  -
no
-window &
5. Variant E — Snapshot-Based (Repeatable Clean State)
# First run: set up the environment, then save snapshot
emulator -avd research_api33 -
no
-snapshot &
# ... install tools, push frida-server, configure ...
# Then from another terminal:
adb emu avd snapshot save clean_setup
# Subsequent runs: boot directly from clean snapshot
emulator -avd research_api33 -snapshot clean_setup &
# Boots in ~3 seconds to exactly the saved state
6. Emulator Command-Line Options Reference
emulator -avd <name>
# AVD to launch (required)
-
no
-snapshot
# ignore existing snapshot, cold boot
-snapshot <name>
# load specific named snapshot
-writable-
system

# make /system partition writable
-
no
-boot-anim
# skip boot animation (faster)
-
no
-audio
# disable audio (useful headless)
-
no
-window
# headless mode (no display window)
-netspeed full
# maximum simulated network speed
-netdelay none
# no simulated network delay
-gpu swiftshader_indirect
# software GPU rendering
-gpu off
# no GPU rendering
-port
5554

# ADB port (default 5554)
-tcpdump <file>
# capture all network traffic to pcap
-http-proxy <host>:<port>
# route emulator traffic through proxy
-dns-server <ip>
# custom DNS server
-prop ro.debuggable=
1

# set system property at boot
-verbose
# verbose logging
-logcat *:V
# enable logcat output to terminal
ADB Connection Modes
1. The ADB Architecture
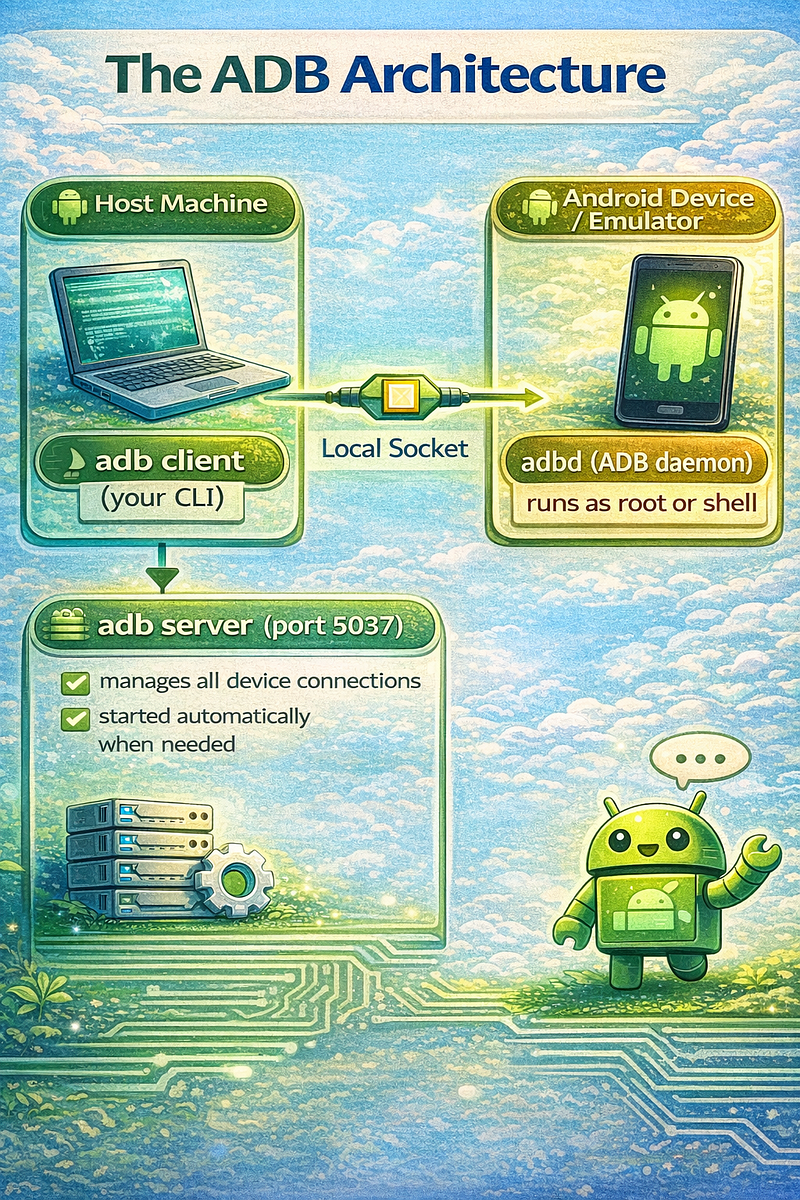
The server runs on port 5037 on the host. Multiple clients (terminal windows) all talk to the same server instance.
2. Mode A — Local Emulator (Default)
The Android Emulator registers itself with the ADB server automatically on startup.
# List connected devices
adb devices -l
# emulator-5554   device   product:sdk_gphone64_x86_64 model:sdk_gphone64_x86_64
# If multiple emulators running simultaneously:
adb devices -l
# emulator-5554   device   ...
# emulator-5556   device   ...
# Target a specific one
adb -s emulator-5554 shell
adb -s emulator-5556 install app.apk
# Shorthand: target the only emulator
adb -e shell
Emulator ports:
emulator-
5554
 → ADB port
5554
 (first emulator)
emulator-
5556
 → ADB port
5556
 (second emulator)
emulator-
5558
 → ADB port
5558
 (third emulator)
3. Mode B — USB Physical Device
# ── On the device ─────────────────────────────────────────────────────────
# Settings → About Phone → tap Build Number 7 times  (enables Developer Options)
# Settings → Developer Options:
#   USB Debugging:         ON
#   Install via USB:       ON
#   USB debugging (Security settings): ON  (some Xiaomi/Samsung)
#   Stay Awake:            ON (optional)
#   Default USB config:    File Transfer (not Charging-only)
# ── On the host ───────────────────────────────────────────────────────────
adb devices -l
# If it shows "unauthorized": unlock screen → tap "Trust this computer" dialog
# Target USB device specifically (when emulator also running)
adb -d shell
adb -d install app.apk
# Check device serial
adb get-serialno
4. Mode C — Wi-Fi (TCP) Connection
Android 10 and below — requires USB first
# 1. Connect device via USB, then promote to TCP
adb tcpip
5555
# 2. Find device IP
adb shell ip route |
grep
 wlan
# or: adb shell ifconfig wlan0
# 3. Connect over Wi-Fi
adb
connect

192.168
.
1.50
:
5555
# 4. Disconnect USB - adb over Wi-Fi persists
adb devices -l
# 5. Disconnect when done
adb disconnect
192.168
.
1.50
:
5555
# 6. Revert to USB-only mode
adb usb
Android 11+ — Wireless Debugging (no USB needed after first pair)
# On device: Settings → Developer Options → Wireless Debugging → ON
# Note the IP:port shown
# First time: pair with one-time code
# On device: Wireless Debugging → Pair device with pairing code
# Note the pairing port and 6-digit code
adb pair
192.168
.
1.50
:PAIRING_PORT
# Enter code when prompted
# Then connect using the main port (different from pairing port)
adb connect
192.168
.
1.50
:MAIN_PORT
adb devices -l
5. Mode D — Multiple Devices Simultaneously
# Always check what's connected
adb devices -l
# Run command on all devices at once (shell loop)
for
 SERIAL
in
 $(adb devices | grep -v List | awk
'{print $1}'
);
do

echo

"===
$SERIAL
 ==="
  adb -s
$SERIAL
 shell getprop ro.product.model
done
# Install on all devices
for
 SERIAL
in
 $(adb devices | grep -v List | awk
'{print $1}'
);
do
  adb -s
$SERIAL
 install -r app.apk
done
6. Mode E — Remote ADB (SSH Tunnel)
When the device is on a remote machine:
# On remote host: forward ADB server port
ssh -L
5037
:localhost
:
5037
 user
@remote
-host
# On local host: use adb normally - it connects through the tunnel
adb devices -l
7. ADB Server Management
# Kill and restart ADB server (fixes most connection issues)
adb kill-server
adb start-server
# Check ADB server is running
adb version
# ADB server log (for debugging connection issues)
ADB_TRACE
=
all adb devices
2
>&
1

|
 head -
50
Frida Integration

1. How Frida Connects to Android
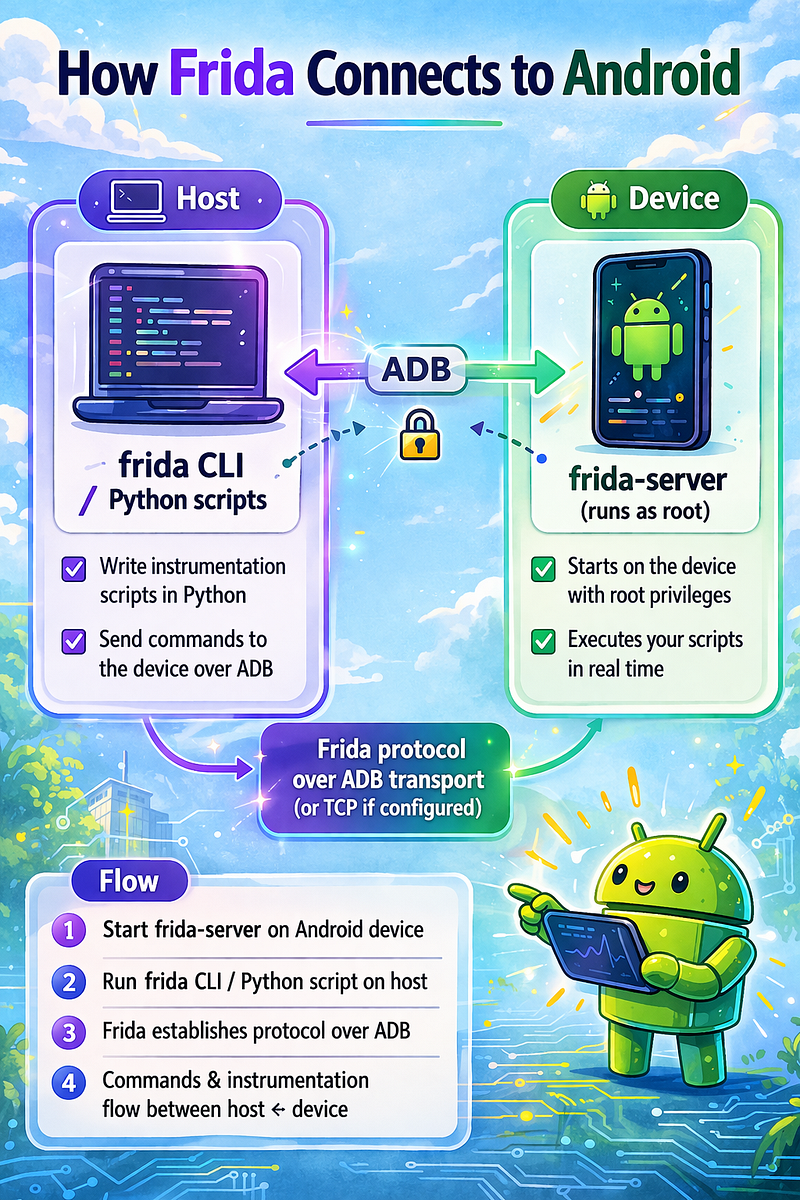
Three rules:
-
adbmust see the device before Frida can connect -
frida-serveron-device version must matchfrida-toolson host exactly -
frida-serverABI must match the device architecture
2. Host Installation
# Install / upgrade frida-tools
python3 -m pip install -U frida-tools
# Install objection (Frida-powered exploration toolkit)
python3 -m pip install -U objection
# Check version (you need this to download the right server)
frida --version
# e.g.: 16.3.3

3. Downloading frida-server
# ── Determine device ABI ──────────────────────────────────────────────────
adb shell getprop ro.product.cpu.abi
# x86_64   → emulator standard
# arm64-v8a → modern physical device / ARM emulator
# armeabi-v7a → older 32-bit physical device
# ── Map ABI to frida-server filename ─────────────────────────────────────
# x86_64    → frida-server-{VERSION}-android-x86_64.xz
# arm64-v8a → frida-server-{VERSION}-android-arm64.xz
# x86       → frida-server-{VERSION}-android-x86.xz
# armeabi-v7a → frida-server-{VERSION}-android-arm.xz
# ── Download (replace VERSION with your frida --version output) ───────────
VERSION=$(frida --version)
ABI=
"x86_64"

# change to arm64 for physical device
wget
"https://github.com/frida/frida/releases/download/
${VERSION}
/frida-server-
${VERSION}
-android-
${ABI}
.xz"
xz -d frida-server-
${VERSION}
-android-
${ABI}
.xz
mv
 frida-server-
${VERSION}
-android-
${ABI}
 frida-server
chmod
 +x frida-server
4. Frida Setup Variants
Variant 1 — Standard Google APIs Emulator
cd
~
adb root
adb push /home/andrey/frida-server /data/local/tmp/frida-server
adb shell
chmod
755 /data/local/tmp/frida-server
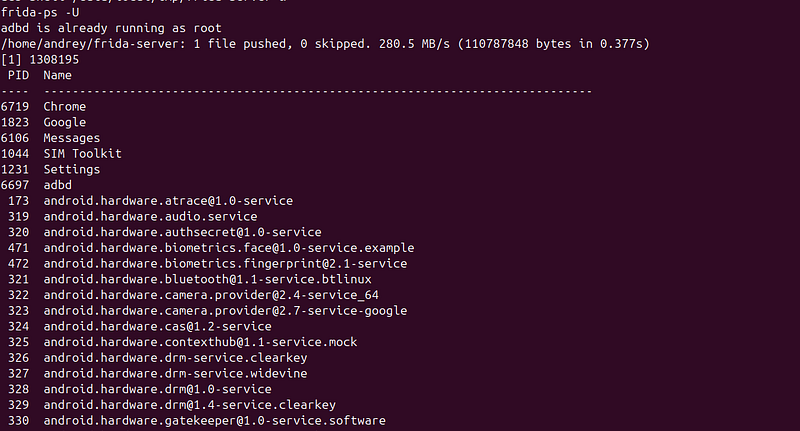
adb shell /data/local/tmp/frida-server &
# 4. Verify from host
frida-ps -U
# Clean shutdown when done
adb shell pkill frida-server
Verification:
adb shell
ls
 -l /data/local/tmp/frida-server

Variant 2 — Writable-System Emulator (Persistent Across Reboots)
emulator -avd research_api33_rw -writable-
system
 -
no
-snapshot &
adb root && adb remount
# Push to /system/bin so it survives app installs/clears
adb
push
 frida-server /
system
/bin/frida-server
adb shell
chmod

755
 /
system
/bin/frida-server
# Start
adb shell /
system
/bin/frida-server &
frida-ps -U
Variant 3 — Rooted Physical Device (su -c path)
adb rootfails on production builds. Usesu:
# Push server
adb
push
 frida-server /data/
local
/tmp/frida-server
# Set permissions via su
adb shell
"su -c 'chmod 755 /data/local/tmp/frida-server'"
# Start via su (background)
adb shell
"su -c 'nohup /data/local/tmp/frida-server > /dev/null 2>&1 &'"
# Verify
frida-ps -U
Variant 4 — Wi-Fi / TCP Device
Frida uses the ADB transport regardless of whether the ADB connection is USB or TCP:
# Connect device via TCP ADB (see §7.4)
adb
connect

192.168
.
1.50
:
5555
adb devices -l
# Push + start frida-server as normal
adb -s
192.168
.
1.50
:
5555

push
 frida-server /data/
local
/tmp/frida-server
adb -s
192.168
.
1.50
:
5555
 shell
"su -c 'chmod 755 /data/local/tmp/frida-server'"
adb -s
192.168
.
1.50
:
5555
 shell
"su -c '/data/local/tmp/frida-server &'"
# Frida sees the device through the ADB transport
frida-ps -U
Variant 5 — Frida Gadget (No Root Required)
For apps you can repackage, embedfrida-gadgetdirectly into the APK:
# Using objection's patchapk (automates the embedding)
objection patchapk --
source
 target.apk
# Install patched APK
adb install -r target.objection.apk
# Launch the app - gadget starts automatically, waits for connection
# Connect from host:
frida -U -n Gadget
This is useful when:
-
Device is not rooted
-
You cannot use Magisk
-
You want a portable self-contained test APK
5. Core Frida Commands
# ── Process listing ───────────────────────────────────────────────────────
frida-ps -U
# all processes
frida-ps -U -a
# installed apps only
frida-ps -U |
grep
 -i target
# filter by name
# ── Attaching ─────────────────────────────────────────────────────────────
frida -U -n
"com.target.app"

# attach to running process
frida -U -f com.target.app --
no
-pause
# spawn + attach (catches init)
frida -U -p $(adb shell pidof com.target.app)
# attach by PID (no ambiguity)
# ── Loading scripts ───────────────────────────────────────────────────────
frida -U -f com.target.app --
no
-pause -l script.js
# Auto-reload on script change:
frida -U -f com.target.app --
no
-pause -l script.js --enable-repl
# ── frida-trace ───────────────────────────────────────────────────────────
# Trace all methods in a Java class
frida-trace -U -n com.target.app -j
"com.target.app.SomeClass!*"
# Trace a specific method
frida-trace -U -n com.target.app -j
"com.target.app.Auth!login"
# Trace native functions in a library
frida-trace -U -n com.target.app -I
"libssl.so"
frida-trace -U -n com.target.app -i
"SSL_write"
 -i
"SSL_read"
# Trace all calls to any function matching a pattern
frida-trace -U -n com.target.app -i
"open*"

# all open* native functions
# ── Objection (Frida-powered interactive shell) ───────────────────────────
objection -g com.target.app explore
# Inside the REPL:
#   android sslpinning disable
#   android root disable
#   android hooking list classes
#   android hooking watch class com.target.app.LoginManager
#   android filesystem list
#   env
6. Automating frida-server Start
# Helper script: start_frida.sh
#!/bin/bash
set
 -e
ABI=$(adb shell getprop ro.product.cpu.abi 2>/dev/null |
tr
 -d
'\r'
)
echo

"[*] Device ABI:
$ABI
"
# Kill any existing frida-server
adb shell pkill frida-server 2>/dev/null ||
true
# Start
adb shell
"nohup /data/local/tmp/frida-server > /dev/null 2>&1 &"
sleep
 1
# Verify
if
 frida-ps -U > /dev/null 2>&1;
then

echo

"[+] frida-server running"
  frida-ps -U |
head
 -5
else

echo

"[-] frida-server failed to start"

exit
 1
fi
Physical Device Setup
1. Enabling Research Mode
Settings → About Phone → Build Number (tap
7
 times) → Developer Options unlocked
Settings → Developer Options:
  USB Debugging:
ON
  Wireless Debugging:
ON
  (Android
11
+)
  Install via USB:
ON
  USB debugging (Security):
ON
  (Xiaomi, some Samsung)
  Mock location app:           (
optional
,
for
 location spoofing)
  Disable adb authorization timeout:
ON
  (so you don
't re-approve daily)

Default
 USB config:          File Transfer
2. Rooting with Magisk
# General flow (device-specific details vary):
# 1. Unlock bootloader (wipes device): adb reboot bootloader → fastboot oem unlock
# 2. Install custom recovery (TWRP) or use Magisk boot patch method
# 3. Extract boot.img from stock firmware for your exact build
# 4. Patch with Magisk app: Magisk → Install → Patch a file → select boot.img
# 5. Flash patched boot: fastboot flash boot magisk_patched.img
# 6. Reboot → Magisk is installed
# Verify root
adb shell su -c
id
# uid=0(root) gid=0(root)
3. Magisk Modules for Research
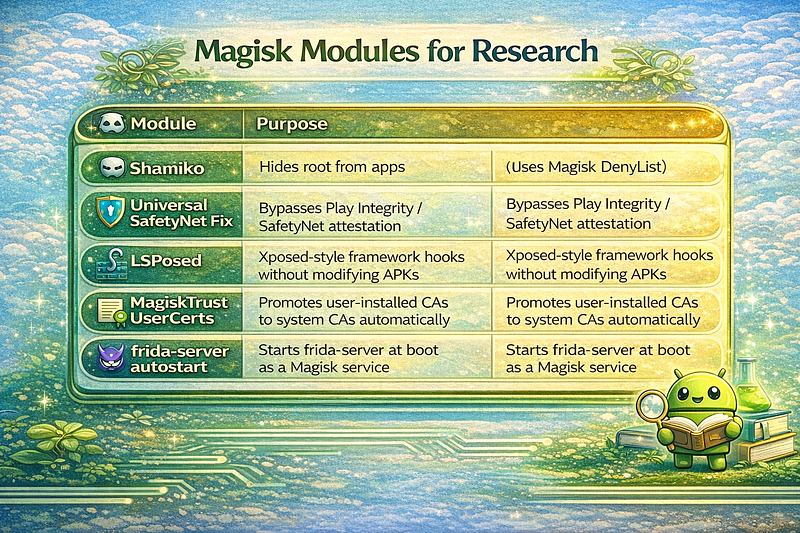
4. MagiskTrustUserCerts (Easiest System CA Method for Physical Device)
# Install the module from Magisk → Modules → Search
# Then: install Burp CA as a user cert (normal Android method)
# After reboot: Burp CA is automatically moved to system store
# No manual certificate hash commands needed
Third-Party Emulators
1. Overview
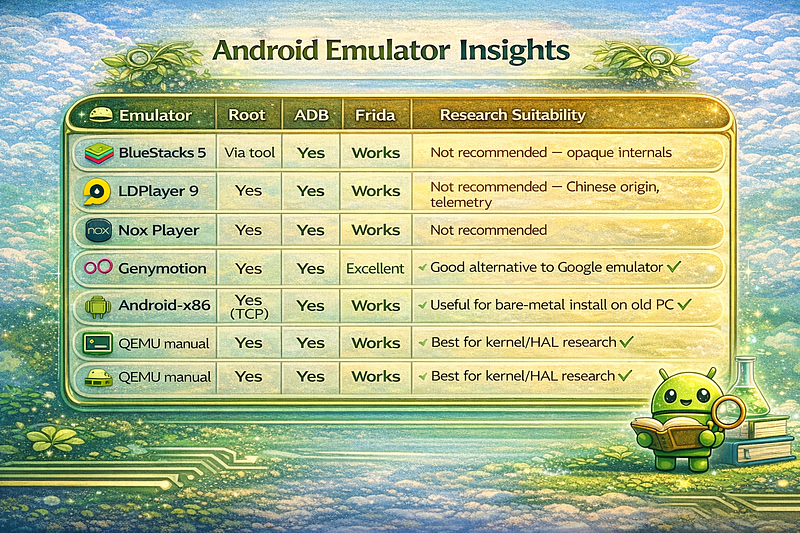
2. Genymotion (Best Third-Party Option)
Genymotion uses VirtualBox or its own hypervisor. Useful when:
-
You need a specific old Android version
-
You want a more realistic device fingerprint
-
You’re doing SaaS testing (Genymotion Cloud)
# ADB connection to Genymotion:
adb connect
192.168
.
56.101
:
5555

# default Genymotion IP
adb devices -l
# Frida works the same way - push server, start, connect
3. Android-x86 on Bare Metal / KVM
For kernel-level research, running Android-x86 directly on KVM gives full access:
#
Create
 KVM VM
with
 Android
-
x86 ISO
virt
-
install \

--name android-x86 \

--ram 4096 \

--vcpus 4 \

--disk path=/var/lib/libvirt/images/android.qcow2,size=20 \

--cdrom android-x86_64-9.0-r2.iso \

--graphics vnc \

--os-variant generic
# ADB
over
 TCP after boot
#
In
 Android
-
x86: enable USB debugging
in
 developer options
#
Get
 IP: Settings → About → Network
adb
connect

<
android
-
x86
-
ip
>
:
5555
Snapshots & Lab Hygiene
1 Snapshot Workflow
Snapshots save the complete state of the emulator (memory, storage, running processes) so you can return to a known-good state instantly.
# ── Save a snapshot ───────────────────────────────────────────────────────
# While emulator is running:
adb emu avd snapshot save
"frida_ready"
adb emu avd snapshot save
"burp_configured"
adb emu avd snapshot save
"app_installed_v3.5"
# List snapshots
adb emu avd snapshot list
# Load a snapshot (while emulator is running)
adb emu avd snapshot load
"frida_ready"
# Delete a snapshot
adb emu avd snapshot
delete

"old_state"
# ── Boot directly from a snapshot ────────────────────────────────────────
emulator -avd research_api33 -snapshot frida_ready &
# Boots in ~2–3 seconds to exactly the saved state
2. Recommended Snapshot Strategy
Snapshot:

"clean_boot"
  ↓  Install frida-server
  ↓  Configure Burp proxy
  ↓  Install system CA cert
Snapshot:

"lab_ready"
  ↓  Install target app v3.
5
  ↓  Log
in

with
 test account
Snapshot:

"app_baseline"
  ↓  Run research / exploit attempts
  ↓  (always revert
to
 app_baseline between tests)
3. Multiple Emulator Instances
# Launch emulators on different ports to avoid conflict
emulator -avd research_api33 -port 5554 &
emulator -avd research_api28 -port 5556 &
# Target each by serial
adb -s emulator-5554 shell
adb -s emulator-5556 shell
# Or use a helper
alias
 adb33=
"adb -s emulator-5554"
alias
 adb28=
"adb -s emulator-5556"
4. Clean Research Practice
# Before testing a new app: revert to clean snapshot
adb emu avd snapshot load
"lab_ready"
# Clear app data between test runs (without reinstalling)
adb shell pm clear com.target.app
# Completely remove and reinstall
adb uninstall com.target.app
adb install -r target.apk
# Reset network proxy between sessions
adb shell settings put
global
 http_proxy
":0"
# Stop frida-server cleanly
adb shell pkill frida-server
Common Failure Cases & Fixes
1. ADB Issues
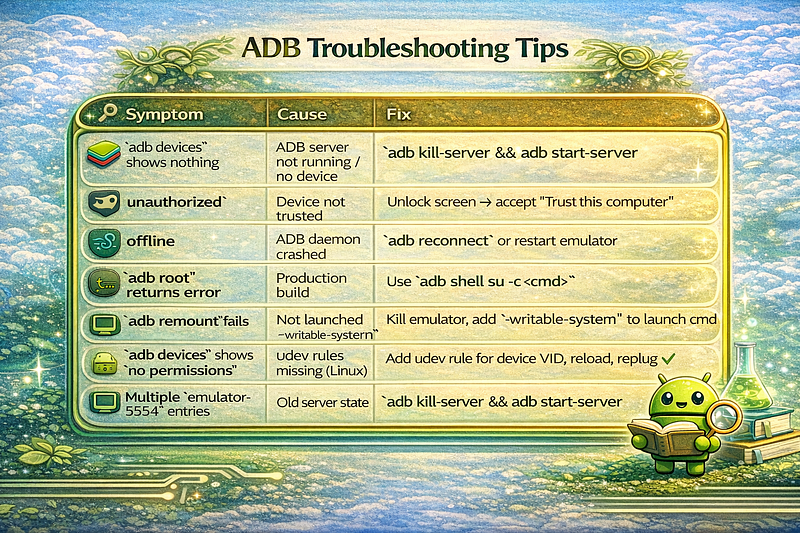
udev rules fix for Linux:
# Find USB vendor ID of device
lsusb | grep -i android
# note idVendor (e.g. 18d1 for Google)
# Create rule
echo

'SUBSYSTEM=="usb", ATTR{idVendor}=="18d1", MODE="0666", GROUP="plugdev"'
 \
  | sudo
tee
 /etc/udev/rules.d/51-android.rules
sudo udevadm control --reload-rules
sudo udevadm trigger
# Replug device
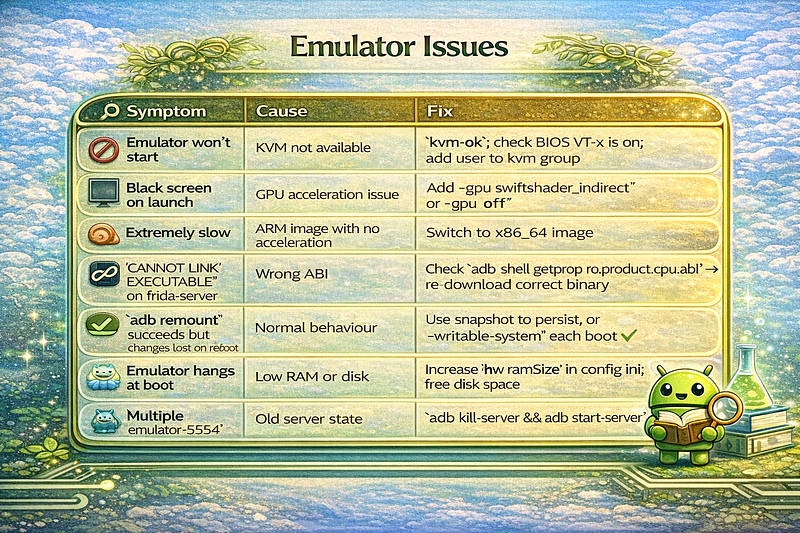
2. Emulator Issues
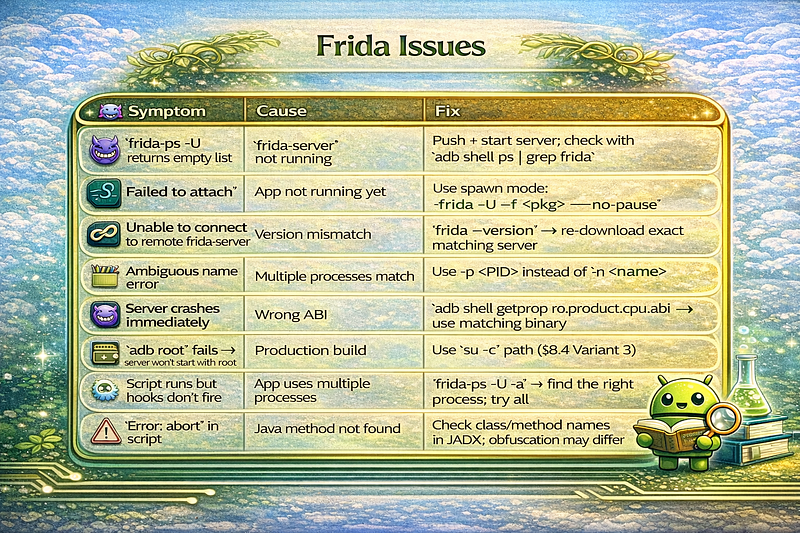
3. Frida Issues
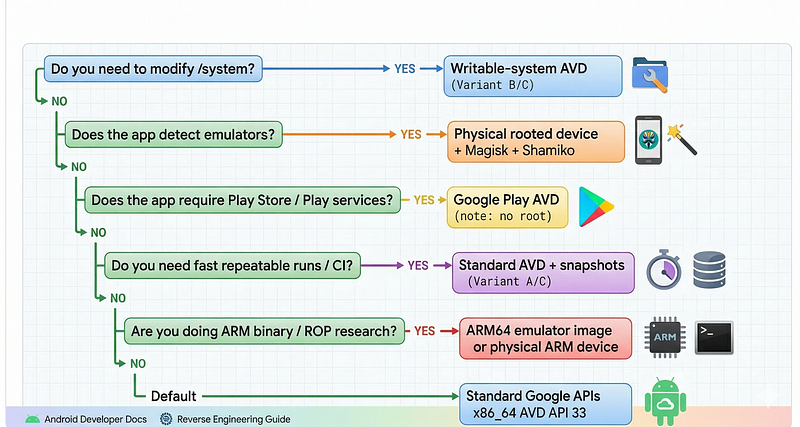
Decision Matrix
Quick-Reference Cheat Sheet
SDK Setup
sdkmanager
"system-images;android-33;google_apis;x86_64"
yes | sdkmanager
--licenses
avdmanager
create
 avd
--name "research_api33" \

--abi "google_apis/x86_64" \

--package "system-images;android-33;google_apis;x86_64" \

--device "pixel_5"
Emulator Launch
# Standard
emulator -avd research_api33 -
no
-snapshot -
no
-boot-anim &
# Writable-system
emulator -avd research_api33_rw -writable-
system
 -
no
-snapshot -
no
-boot-anim &
adb root && adb remount
# Headless
emulator -avd research_api33 -
no
-window -gpu off -
no
-snapshot &
ADB Essentials
adb devices -l
# list devices
adb
wait
-
for
-device
# wait for emulator boot
adb root && adb remount
# root + writable system
adb -s emulator-
5554
 shell
# target specific device
adb tcpip
5555
 && adb
connect
 <ip>:
5555

# Wi-Fi mode
adb
kill
-server && adb start-server
# fix connection issues
Frida Essentials
# Download frida-server matching: frida --version
# x86_64 emulator: frida-server-{VER}-android-x86_64.xz
# arm64 device:    frida-server-{VER}-android-arm64.xz
# Deploy
adb
push
 frida-server /data/
local
/tmp/frida-server
adb shell
chmod

755
 /data/
local
/tmp/frida-server
adb shell /data/
local
/tmp/frida-server &
# emulator (adb root)
adb shell
"su -c '/data/local/tmp/frida-server'"
 &
# physical device
# Use
frida-ps -U
frida -U -f com.target.app --
no
-pause -l script.js
frida-trace -U -n com.target.app -j
"com.target.app.Auth!*"
objection -g com.target.app explore
Follow for practical cybersecurity research
If you’re interested in**Offensive security,**AI security, real-world attack simulations, CTI, and detection engineering— this is exactly what I focus on.
Stay connected:
→Subscribe on Medium:medium.com/@1200km →Connect on LinkedIn:andrey-pautov →GitHub — tools & labs:github.com/anpa1200 →Contact:1200km@gmail.com