How to Build a Safe Malware Analysis Lab with FLARE-VM, REMnux, and INetSim
This guide turns lessons 2–4 of TrainSec's Malware Analyst Professional — Level 1 into a repeatable lab-preparation procedure. The course demonstrates the topology and deployment process; this version adds explicit containment gates, current upstream installation guidance, validation tests, and recovery steps.
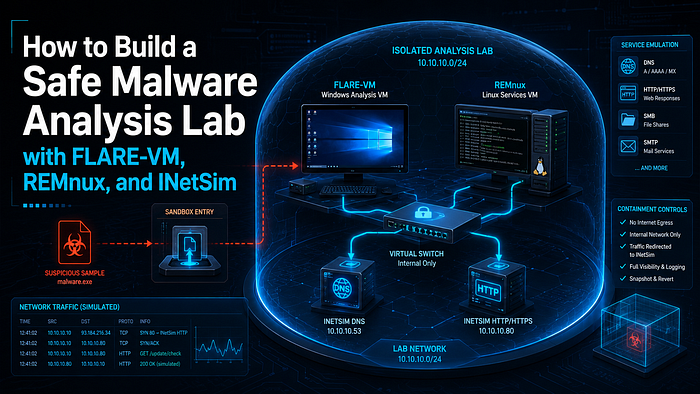
- Category: Malware Analysis
- Topics: Lab, Malware Analysis, FLARE-VM, REMnux, INetSim, VMware, Network Isolation
- Course context: TrainSec — Malware Analyst Professional Level 1, lessons 2–4
- Source article: Medium publication
- Published: 2026-08-07
- Preserved media: 17 image(s), including the cover, architecture diagrams, screenshots, checklists, and infographics.
- Preserved technical blocks: 13 code/configuration block(s).
Ecosystem Fit
This article is part of the 1200km Cyber Knowledge ecosystem. It connects the Malware Analysis knowledge base, Short Guides library, Labs index, and TrainSec course learning record.
This independent article may be used as supplementary material for TrainSec's Malware Analyst Professional – Level 1. It is not part of the official course. See my complete course review.
Safety boundary: Build and validate the environment with harmless test traffic first. Do not introduce or execute a live malware sample until the analysis VM is isolated, host integrations are disabled, snapshots exist, and every readiness check in this guide passes. Only analyze samples you are legally authorized to possess and examine.
Table of contents
- Target architecture
- Requirements and address plan
- Prepare the host and hypervisor
- Create the Windows analysis VM
- Install FLARE-VM
- Import and prepare REMnux
- Build the isolated analysis network
- Configure INetSim
- Validate containment and simulation
- Snapshot strategy
- Troubleshooting
- Pre-detonation checklist
- Safe session workflow
- Lesson mapping and references
1. Target architecture
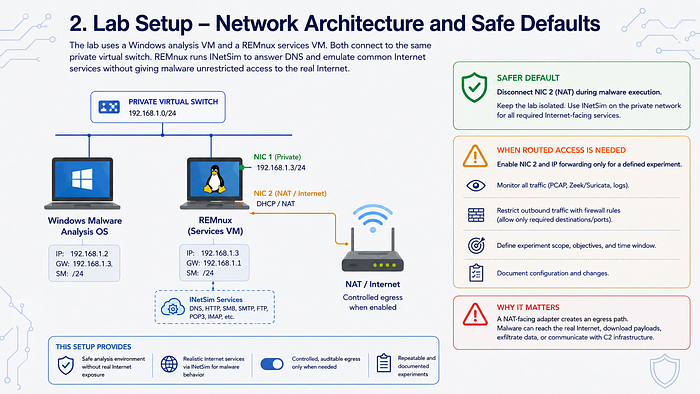
The lab uses a Windows analysis VM and a REMnux services VM. Both connect to the same private virtual switch. REMnux runs INetSim to answer DNS and emulate common Internet services without giving malware unrestricted access to the real Internet.
                         INSTALLATION MODE ONLY
                                  Internet
                                      |
                               [temporary NAT]
                                      |
                    +-----------------+-----------------+
                    |                                   |
              Windows VM                           REMnux VM
              FLARE-VM tools                      updates only


                         ANALYSIS MODE

      Host computer             isolated virtual switch (LABNET)
   no shared lab folders       10.0.0.0/24; no host DHCP; no NAT
            X                               |
            |                    +----------+----------+
            |                    |                     |
            |             Windows / FLARE-VM      REMnux / INetSim
            |                10.0.0.20             10.0.0.30
            |             gateway: 10.0.0.30    simulated DNS/HTTP
            |             DNS: 10.0.0.30        packet observation
            +----------------------------------------------------X Internet
The course also demonstrates REMnux with a second, NAT-facing adapter and IP forwarding. That arrangement is useful for controlled experiments, but it creates an egress path. The safer default is to disconnect that adapter during malware execution. Enable routed access only for a defined experiment, with monitoring and restrictive firewall rules.
2. Requirements and address plan
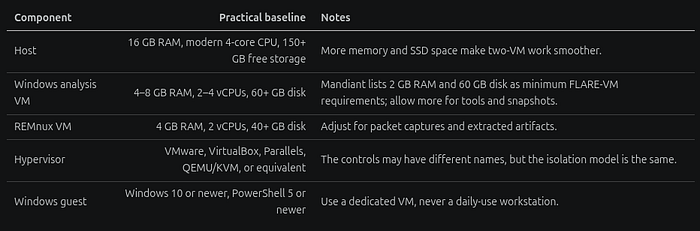
Host and VM requirements
| Component | Practical baseline | Notes |
|---|---|---|
| Host | 16 GB RAM, modern 4-core CPU, 150+ GB free storage | More memory and SSD space make two-VM work smoother. |
| Windows analysis VM | 4–8 GB RAM, 2–4 vCPUs, 60+ GB disk | Mandiant lists 2 GB RAM and 60 GB disk as minimum FLARE-VM requirements; allow more for tools and snapshots. |
| REMnux VM | 4 GB RAM, 2 vCPUs, 40+ GB disk | Adjust for packet captures and extracted artifacts. |
| Hypervisor | VMware, VirtualBox, Parallels, QEMU/KVM, or equivalent | The controls may have different names, but the isolation model is the same. |
| Windows guest | Windows 10 or newer, PowerShell 5 or newer | Use a dedicated VM, never a daily-use workstation. |
Example address plan
| System | Analysis NIC | IPv4 | Gateway | DNS |
|---|---|---|---|---|
| FLARE-VM | LABNET | 10.0.0.20/24 | 10.0.0.30 | 10.0.0.30 |
| REMnux | LABNET | 10.0.0.30/24 | none on this NIC | local services |

These are lab examples, not mandatory addresses. Pick any unused RFC 1918 subnet and apply it consistently. Do not overlap with the host's home, office, VPN, or cloud network.
3. Prepare the host and hypervisor
- Update the host OS and hypervisor before building the lab.
- Create a dedicated private network named
LABNET. - Configure it as host-only/internal/private, with no NAT and no bridge to a physical adapter.
- Disable the virtual network's DHCP service so addresses remain predictable.
- In both VMs, disable shared folders, shared clipboard, drag-and-drop, automatic USB attachment, host filesystem mounting, and unnecessary guest-integration features.
- Do not store the only copy of evidence inside a VM. Keep hashes and case notes in a controlled location, but never expose a writable host folder to an active sample.
- Download Windows, FLARE-VM, and REMnux only from their official sources. Record filenames, versions, source URLs, and published hashes where available.
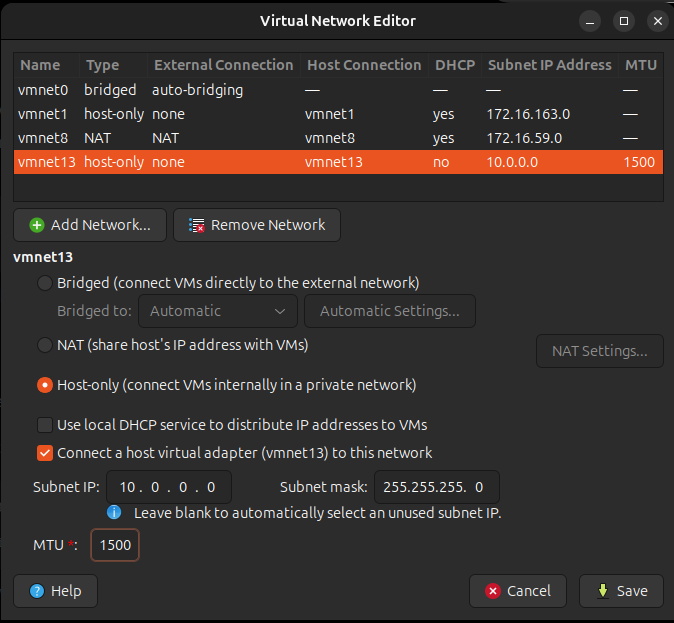
Bridged networking is not appropriate for malware execution. It places the guest on the same network as real devices. A temporary NAT adapter is acceptable while installing trusted software, but disconnect it before importing a sample.
4. Create the Windows analysis VM
- Create a clean Windows VM with the resources from the requirements table.
- Use a local analyst account whose username has no spaces or special characters; this is a current FLARE-VM requirement.
- Install hypervisor guest tools only if necessary. After setup, disable their clipboard, file-sharing, and drag-and-drop features.
- Show file extensions and hidden files. Set Windows Explorer to expose the details an analyst needs.
- Record the baseline OS version, hostname, local account, time zone, and installed software.
- Shut down the VM and take a cold snapshot named
00-clean-windows.
The TrainSec lesson reduces privacy permissions and unnecessary services such as Xbox and Fax services. Treat these as optional lab minimization, not as a substitute for network isolation. Document each change so you can distinguish deliberate configuration from malware-induced changes.
5. Install FLARE-VM
FLARE-VM is Mandiant's Windows-based reverse-engineering environment. Follow the current upstream README if it differs from the commands below.
Installation phase
- Connect the Windows VM to temporary NAT.
- Confirm that no malware samples are present in the VM.
- Meet the official prerequisites. The current project documentation requires Windows 10+, PowerShell 5+, at least 60 GB of disk, a compatible username, and temporary changes to Windows Update and anti-malware controls during installation.
- Take another cold snapshot:
01-pre-flare-install. - Open PowerShell as Administrator and run the official installer workflow:
(New-Object net.webclient).DownloadFile(
  'https://raw.githubusercontent.com/mandiant/flare-vm/main/install.ps1',
  "$([Environment]::GetFolderPath('Desktop'))\install.ps1"
)

Set-Location "$([Environment]::GetFolderPath('Desktop'))"
Unblock-File .\install.ps1
Set-ExecutionPolicy Unrestricted -Scope CurrentUser -Force
.\install.ps1
- Select the required tool set in the installer. Expect reboots and a long installation.
- Review the FLARE-VM and Chocolatey logs if a package fails. Do not assume every best-effort package update is tested.
- When installation is complete, restore the previous execution policy if your environment permits it:
Set-ExecutionPolicy RemoteSigned -Scope CurrentUser -Force
- Shut down Windows, remove the NAT adapter, and attach only
LABNET. - Take a cold snapshot named
02-flare-installed-isolated.
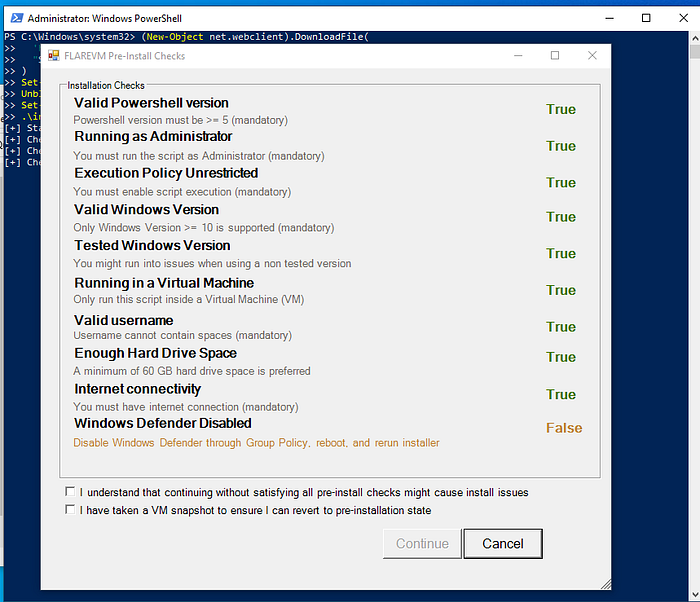
Disabling anti-malware controls weakens the guest by design. Keep that weakness inside the isolated VM. It is never a reason to weaken the host.
6. Import and prepare REMnux
- Download the official REMnux virtual appliance and verify its published integrity information.
- Import the OVA into the hypervisor. Keep the original appliance file unchanged so the VM can be rebuilt.
- During the trusted setup phase, attach temporary NAT and update REMnux according to its current documentation.
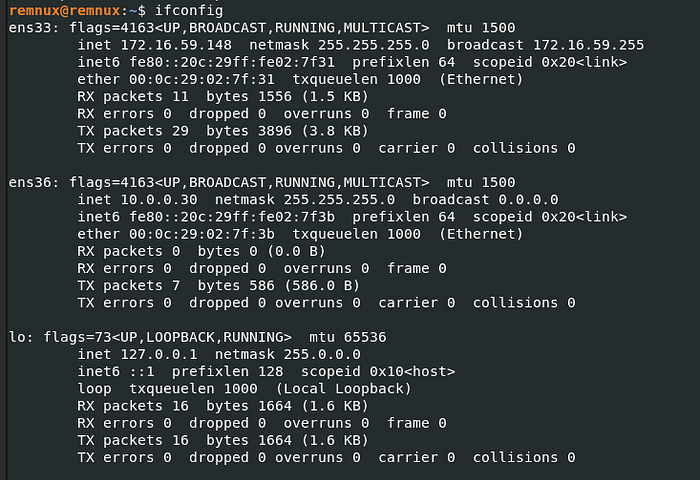
- Identify interfaces rather than copying a lesson's device names:
ip -br address
ip route

Names such as ens33 and ens36 depend on the hypervisor and import order. In this guide, <LAB_IFACE> means the interface connected to LABNET.
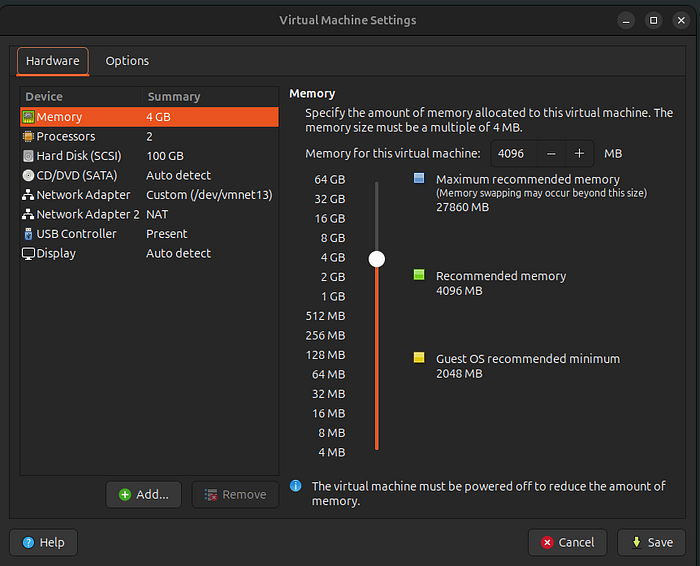
- Shut down REMnux. Configure its adapters:
- Adapter 1:
LABNET, always present. - Adapter 2: temporary NAT, disconnected in analysis mode.
- Adapter 1:
- Start REMnux and assign
10.0.0.30/24to<LAB_IFACE>using the network manager supplied by the current appliance. Do not set a default gateway on the isolated interface. - Verify the result:
ip -br address show <LAB_IFACE>
ip route
Take a cold snapshot named 01-remnux-updated before changing INetSim.
7. Build the isolated analysis network
Configure Windows
Open ncpa.cpl, identify the LABNET adapter, and assign:
- IP address:
10.0.0.20 - Subnet mask:
255.255.255.0 - Default gateway:
10.0.0.30 - Preferred DNS server:
10.0.0.30
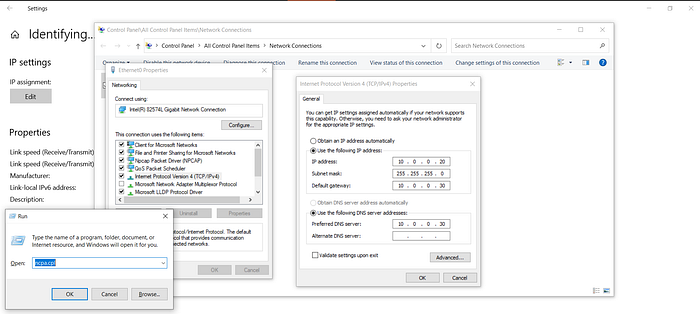
Disable every other Windows network adapter during analysis. Renaming adapters to LABNET and INSTALL-NAT reduces mistakes.
Confirm the same virtual switch
From Windows:
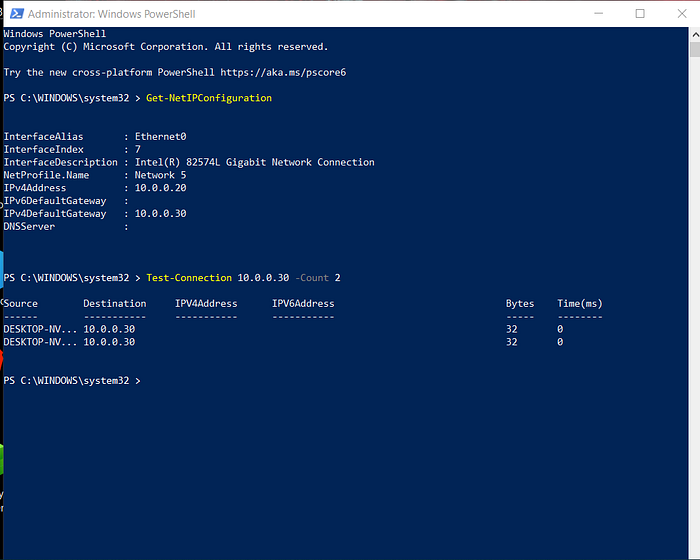
Get-NetIPConfiguration
Test-Connection 10.0.0.30 -Count 2
From REMnux:
ping -c 2 10.0.0.20
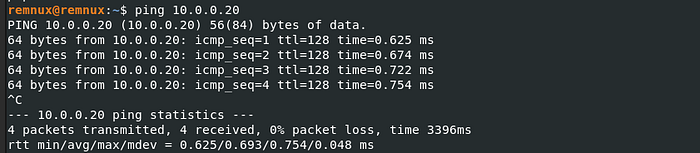
If these tests fail, stop here. Do not add routing or temporarily bridge the VMs; correct the switch membership, subnet, firewall, and interface state.
About accept-all-ips
REMnux includes accept-all-ips, which helps a service host respond to traffic addressed to arbitrary external IPs. Confirm the interface before using it:
sudo accept-all-ips start <LAB_IFACE>
Use the corresponding stop action after the session. This command supports simulation; it does not create safe containment by itself.
8. Configure INetSim
INetSim emulates services such as DNS, HTTP/HTTPS, SMTP, FTP, IRC, and NTP and records the interactions. On REMnux, edit the packaged configuration rather than reinstalling INetSim from an unrelated repository.
- Back up the active configuration:
sudo cp /etc/inetsim/inetsim.conf /etc/inetsim/inetsim.conf.lab-backup
sudoedit /etc/inetsim/inetsim.conf
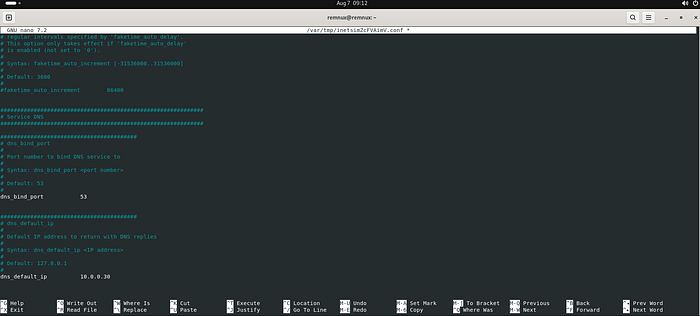
- Set or uncomment the core values:
service_bind_address 10.0.0.30
dns_bind_port 53
dns_default_ip 10.0.0.30
- Enable only the simulated services required for the experiment. A smaller service set produces clearer logs and reduces ambiguity.
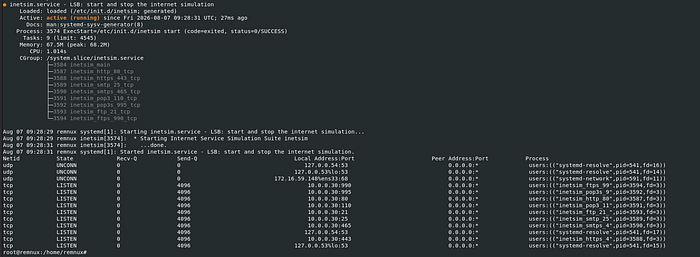
 4. Start INetSim and inspect its state:
sudo systemctl start inetsim
sudo systemctl status inetsim --no-pager
sudo ss -lntup
- If you want it to start automatically in this dedicated VM:
sudo systemctl enable inetsim
- Monitor the service logs and reports under the paths documented by the installed package. Confirm the actual paths with:
systemctl cat inetsim
inetsim --help
man inetsim
man inetsim.conf
The upstream INetSim documentation states that low ports require root during startup; the services drop privileges after binding. Do not run unrelated analysis tools as root merely because INetSim starts that way.
9. Validate containment and simulation
Perform these tests with harmless commands before importing a sample.
| Test | Command or action | Expected result |
|---|---|---|
| Windows reaches REMnux | Test-Connection 10.0.0.30 -Count 2 | Replies from 10.0.0.30. |
| DNS uses INetSim | Resolve-DnsName example.com | The answer is the configured fake IP, normally 10.0.0.30. |
| HTTP is simulated | Open http://example.com/ | INetSim's simulated response appears and a request is logged. |
| Listener inventory | sudo ss -lntup on REMnux | Only expected services listen on the lab address. |
| No Windows bypass | Inspect Get-NetIPConfiguration | Only LABNET is active. No Wi-Fi, VPN, bridge, or NAT path exists. |
| No REMnux egress | Disconnect REMnux NAT, then inspect ip route | No default route to the Internet exists. |
| Host integration blocked | Try clipboard, drag/drop, and shared folders with a harmless text file | Transfers fail as designed. |
| Snapshot recovery | Revert a disposable validation snapshot | Both VMs return to the expected state. |
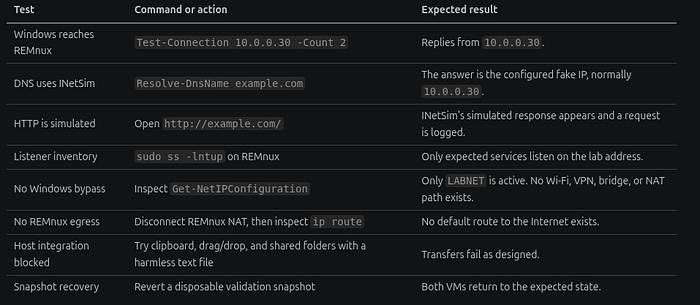
Do not use successful access to a real public IP as the primary readiness test. In strict analysis mode, failure to reach the public Internet is the desired result.
Optional controlled egress
Some advanced analyses require real network access. That is a separate operating mode, not a default feature:
- Define the exact destination, protocol, time window, and research justification.
- Route through an instrumented gateway that denies all traffic except the allowlist.
- Capture DNS and network traffic and prevent access to private, local, metadata, management, and organizational address ranges.
- Never expose inbound ports from the Internet to the analysis VM.
- Disconnect egress immediately after the experiment and revert both VMs.
Generic IP forwarding and unrestricted masquerading are intentionally omitted: they can silently turn the simulated lab into a real egress path.

10. Snapshot strategy
Prefer cold snapshots—taken after a clean shutdown—for stable long-term checkpoints.
| Snapshot | VM | Purpose |
|---|---|---|
00-clean-windows | Windows | Fresh OS before tool installation. |
01-pre-flare-install | Windows | Recovery point for installer failures. |
02-flare-installed-isolated | Windows | Clean analysis baseline. |
01-remnux-updated | REMnux | Current trusted appliance. |
02-inetsim-configured | REMnux | Validated simulation baseline. |
case-<id>-pre-run | both | Disposable per-analysis start point. |
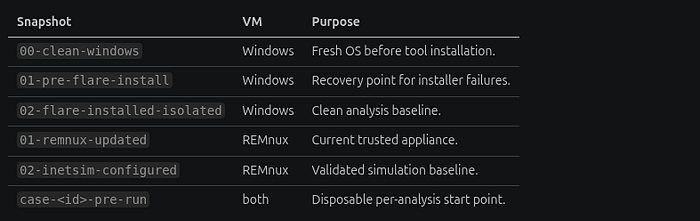
A snapshot is a recovery mechanism, not a security boundary. If containment may have failed, stop both VMs, preserve authorized evidence, and rebuild from trusted media rather than assuming a revert repaired the host or network.
11. Troubleshooting
| Symptom | Likely cause | Check and correction |
|---|---|---|
| Windows cannot reach REMnux | Different virtual switches, wrong mask, disabled NIC, guest firewall | Compare hypervisor network names, run ip -br address, and inspect Get-NetIPConfiguration. |
| DNS requests time out | Windows DNS is wrong, INetSim is stopped, port 53 conflict | Confirm DNS is 10.0.0.30, inspect systemctl status inetsim and sudo ss -lnup. |
| DNS resolves but HTTP fails | HTTP service disabled or wrong bind address | Review inetsim.conf, service status, listeners, and logs. |
| REMnux interface name differs from lesson | Predictable interface naming varies | Discover the interface with ip -br address; never assume ens33 or ens36. |
| FLARE-VM package fails | Download timeout, blocked source, anti-malware interference, changed upstream hash | Read %VM_COMMON_DIR%\log.txt, Chocolatey, and Boxstarter logs; retry only from a clean snapshot and current installer. |
| Windows still reaches the Internet | NAT/bridged adapter active, host Internet sharing, or REMnux forwarding | Power off immediately; disconnect extra NICs and inspect routes on both VMs. |
| INetSim will not bind | Address not assigned, port already in use, or insufficient startup privileges | Verify the lab IP and listeners; use the packaged service unit. |
| Behavior persists after revert | Wrong snapshot, linked clone dependency, or state outside the VM | Stop analysis and rebuild from verified installation media. |
12. Pre-detonation checklist
- I am authorized to analyze this sample.
- The host and hypervisor are patched.
- Both VMs use the same isolated
LABNETswitch. - No VM is bridged to a physical network.
- Windows has no active adapter except
LABNET. - REMnux's NAT adapter is disconnected.
- Shared folders, clipboard, drag-and-drop, USB auto-connect, and host mounts are disabled.
- Windows uses REMnux as its gateway and DNS server.
- INetSim DNS and HTTP tests produce simulated responses and logs.
- No public default route exists in analysis mode.
- Clean cold snapshots exist for both VMs.
- The sample hash and provenance are recorded before execution.
- Packet capture, process monitoring, file monitoring, and notes are ready.
- A stop condition and recovery plan are defined.
If any answer is no, the lab is not ready.
13. Safe session workflow
- Revert both VMs to their validated clean baselines.
- Start REMnux, confirm
LABNET, start INetSim, and begin packet capture. - Start Windows and repeat the containment tests.
- Record the sample hash and transfer it using a controlled, temporary mechanism that does not expose the host during execution.
- Take synchronized
case-<id>-pre-runsnapshots if the analysis method requires them. - Run the authorized experiment while recording time, processes, files, registry changes, DNS, connections, and analyst actions.
- Stop on unexpected egress, host integration, hypervisor instability, or scope violation.
- Export only the permitted evidence through a controlled process after the sample is stopped.
- Power off and revert or destroy the disposable VM state.
- Verify the clean network state before beginning another case.
14. Lesson mapping and references
How this guide maps to TrainSec
| Lesson | Material incorporated |
|---|---|
| 2 — Lab Setup: Intro | Two-VM topology, hypervisor choice, Windows analysis VM, and REMnux as the network-services system. |
| 3 — Deploying FLARE-VM | Clean Windows VM, service/privacy minimization, official installation script, installer recovery snapshot, and post-install tooling. |
| 4 — Connecting to INetSim | REMnux OVA deployment, shared private virtual switch, static addressing, REMnux as Windows gateway/DNS, INetSim binding, service checks, and troubleshooting. |
Primary references
- Mandiant FLARE-VM repository and current installation requirements
- REMnux documentation: network-interaction services
- REMnux documentation
- INetSim official documentation
- INetSim official feature overview
- Published Medium article: How to Build a Safe Malware Analysis Lab
- TrainSec Malware Analyst Professional — Level 1 learning record on 1200km
- Malware Analysis field guide
- Cyber Knowledge Helping Materials
- AI Agent vs. Human with Wireshark — six-PCAP analysis experiment
Editorial note: This is an independent study aid derived from the author's course learning. TrainSec owns its course content; the safety additions, structure, validation gates, and operational recommendations here are original editorial work. Commands and requirements were checked against the primary project documentation on 6 August 2026 and should be rechecked before use.