Building a Vulnerable GCP Pentest Lab with Terraform
- Category: Cloud
- Source article: https://medium.com/@1200km/building-a-vulnerable-gcp-pentest-lab-with-terraform-9d1edfcd8eff
- Published: 2026-01-29
- Repository: https://github.com/anpa1200/vulnerable-cloud-lab
- Preserved media: 18 article image(s), including screenshots and infographics where present.
- Preserved technical blocks: 96 code/configuration block(s).
Ecosystem Fit
This page mirrors the original Medium lab content into the 1200km knowledge base so it remains available inside the 1200km.com documentation ecosystem. Use the linked repository when one exists; otherwise use the deployment commands and configuration blocks preserved below as the lab source of truth.
Deployment Requirements
The full prerequisites, deployment flow, validation commands, screenshots, and operational notes are preserved from the article below. Review the repository metadata above first, then follow the article sections in order.
A complete, step-by-step guide to deploying intentionally misconfigured cloud resources for hands-on security training.

Introduction
This guide will walk you through building a comprehensive vulnerable cloud lab environment on Google Cloud Platform using Terraform. The lab includes intentionally misconfigured resources designed for cloud penetration testing training.
**⚠️ WARNING:**This lab contains intentional vulnerabilities. Only deploy in isolated test environments with proper authorization.
What You’ll Build:
-
DVWA (Damn Vulnerable Web Application)— Full-featured vulnerable web app with 10+ vulnerability categories (SQL Injection, XSS, Command Injection, File Inclusion, etc.)
-
Internal database server (MariaDB)
-
Publicly accessible storage bucket with sensitive data
-
Vulnerable Cloud Run service
-
Vulnerable Cloud Function with SSRF
-
Overprivileged service accounts
-
Exposed credentials
-
Information disclosure page exposing Cloud Function and Cloud Run URLs
**Estimated Time:**30–45 minutes Estimated Cost:~$12–15/month
Table of Contents
-
Introduction
-
Prerequisites
-
GCP Project Setup
-
Local Environment Setup
-
Terraform Configuration
-
Deployment Process
-
Verification
-
Accessing the Lab
-
Cleanup
Prerequisites
Required Accounts & Services
-
Google Cloud Platform Account
-
Active GCP account with billing enabled
-
Access to create projects and resources
2. Local Machine Requirements
-
Linux, macOS, or Windows with WSL
-
Internet connection
-
Terminal/command line access
Required Software
Before starting, ensure you have the following installed:
1. Google Cloud SDK (gcloud)
Linux:
# Download and install
curl https://sdk.cloud.google.com | bash
exec
 -l
$SHELL
# Verify installation
gcloud version

macOS:
#
Using Homebrew
brew install --cask google-cloud-sdk
#
Or download from:
#
https://cloud.google.com/sdk/docs/install
**Windows:**Download and run the installer from:https://cloud.google.com/sdk/docs/install
2. Terraform
Linux:
# Download Terraform
wget https://releases.hashicorp.com/terraform/1.6.0/terraform_1.6.0_linux_amd64.zip
unzip terraform_1.6.0_linux_amd64.zip
sudo
mv
 terraform /usr/local/bin/
rm
 terraform_1.6.0_linux_amd64.zip
#or snap
sudo snap install terraform --classic
# Verify
terraform version

macOS:
brew install terraform
**Windows:**Download from:https://www.terraform.io/downloads
3. Git
# Linux
sudo apt-
get
 install git
# Debian/Ubuntu
sudo yum install git
# RHEL/CentOS
# macOS
brew install git
# Verify
git --version

4. Zip Utility (for Cloud Function)
# Linux
sudo apt-get install
zip
# macOS (usually pre-installed)
# Windows: Use built-in compression or 7-Zip
GCP Project Setup
Step 1: Create a New GCP Project
Option A: Using gcloud CLI
# Set a unique project ID (must be globally unique)
export
 PROJECT_ID=
"cloud-pentest-lab-
$(date +%s)
"
export
 REGION=
"us-central1"
export
 ZONE=
"us-central1-a"
# Create the project
gcloud projects create
$PROJECT_ID
 \
    --name=
"Cloud Pentest Lab"
 \
    --set-as-default
# Link billing account (replace with your billing account ID)
gcloud billing projects
link

$PROJECT_ID
 \
    --billing-account=$(gcloud billing accounts list --format=
"value(name)"
 |
head
 -1)
Option B: Using GCP Console
-
Go toGCP Console
-
Click “Select a project” → “New Project”
-
Enter project name: “Cloud Pentest Lab”
-
Click “Create”
-
Note your Project ID

Step 2: Enable Required APIs
Terraform will automatically enable most APIs, but let’s enable them manually to avoid delays:
# Set your project
gcloud config
set
 project
$PROJECT_ID
# Enable all required APIs
gcloud services
enable
 \
    compute.googleapis.com \
    storage.googleapis.com \
    iam.googleapis.com \
    cloudresourcemanager.googleapis.com \
    secretmanager.googleapis.com \
    container.googleapis.com \
    run.googleapis.com \
    cloudfunctions.googleapis.com \
    cloudbuild.googleapis.com
# Verify APIs are enabled
gcloud services list --enabled
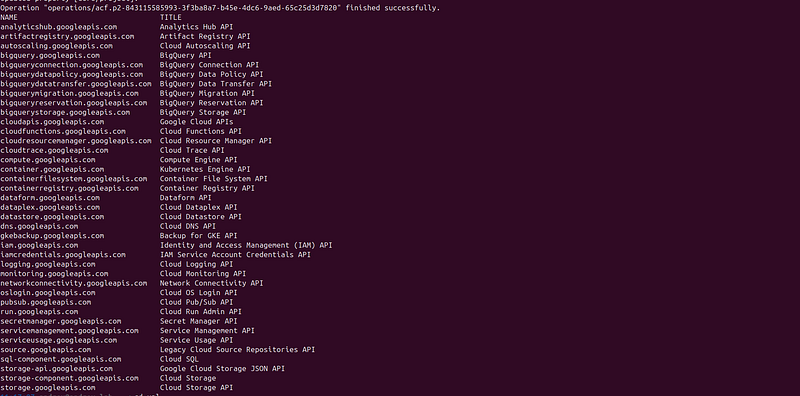
**Expected Output:**You should see all 8 APIs listed as “ENABLED”.
Step 3: Authenticate and Set Up Application Default Credentials
⚠️CRITICAL: This step is required for Terraform to work. Without it, you’ll get authentication errors when running terraform plan or terraform apply.
Step 3.1: Authenticate with Google Account
# Authenticate with your Google account
gcloud auth login
# Set up Application Default Credentials (for Terraform)
gcloud auth application-
default
 login
# Verify authentication
gcloud auth
list
Expected Output:

Step 3.2: Set Up Application Default Credentials (Required for Terraform)
Terraform uses Application Default Credentials (ADC) to authenticate with GCP. This is different fromgcloud auth login.
#
Set
 up Application
Default
 Credentials
gcloud auth application
-
default
 login
What happens:
-
A browser window will open
-
You’ll be asked to sign in with your Google account
-
You’ll need to grant permissions
-
Credentials will be saved to
~/.config/gcloud/application_default_credentials.json
If gcloud is not in your PATH:
If you getcommand 'gcloud' not found, use the full path:
# Find gcloud location
which
 gcloud
# or
find ~ -name gcloud -
type
 f 2>/dev/null | grep bin/gcloud
# Use full path (example)
~/google-cloud-sdk/bin/gcloud auth application-default login
To add gcloud to PATH permanently:
# Add to ~/.bashrc or ~/.zshrc
echo

'export PATH="$HOME/google-cloud-sdk/bin:$PATH"'
 >> ~/.bashrc
source
 ~/.bashrc
# Then use normally
gcloud auth application-default login
Step 3.3: Verify Application Default Credentials
# Test that credentials are set up correctly
gcloud auth application-
default

print
-access-token
Expected Output:
-
Should return an access token (long string starting with
ya29.) -
If you get an error, credentials are not set up correctly
Alternative verification:
# Check if credentials file exists
ls
 -la ~/.config/gcloud/application_default_credentials.json
Troubleshooting Application Default Credentials
Error: “No credentials loaded” or “could not find default credentials”
This means Application Default Credentials are not set up. Solution:
gcloud auth application-
default
 login
Error: Browser doesn’t open or authentication fails
Use the--no-browserflag:
gcloud auth application-default login
--no-browser
This will:
-
Display a URL to visit manually
-
Ask you to paste the authorization code
-
Complete the authentication
Error: “gcloud not found”
-
Use the full path to gcloud (see Step 3.2 above)
-
Or install Google Cloud SDK if not installed
Error: “scope is required but not consented”
-
Run the login command again
-
Make sure to grant all requested permissions
-
Check that you’re using the correct Google account
Step 4: Set Up Billing Alerts (Recommended)
# Create a budget alert (optional but recommended)
# This helps prevent unexpected charges
# First, get your billing account ID
gcloud billing accounts list
# Then set up a budget (requires billing account ID)
# Note: Budget setup is typically done via console
# Go to: https://console.cloud.google.com/billing/budgets
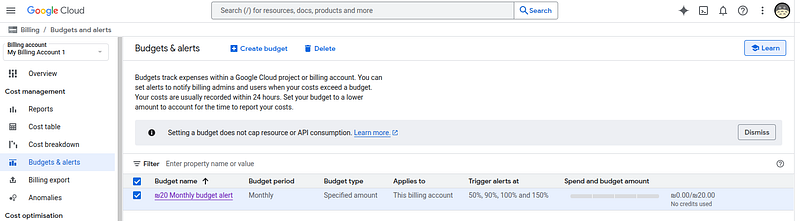
Via Console:
-
Navigate to Billing → Budgets & alerts
-
Click “Create Budget”
-
Set budget amount (e.g., $20)
-
Set alert threshold (e.g., 50%, 90%, 100%)
-
Save
Local Environment Setup
Step 1: Clone or Navigate to Project Directory
If you already have the project files:
cd
 /home/andrey/Cloud_PTcd /home/andrey/Cloud_PT
If you need to set up from scratch:
# Create project directory
mkdir
 -p ~/cloud-pentest-lab
cd
 ~/cloud-pentest-lab
# Copy Terraform files (if needed)
# Or clone from your repository
Step 3: Set Environment Variables
# Set your GCP project ID
export
 TF_VAR_project_id=
"your-project-id-here"
export
 TF_VAR_region=
"us-central1"
export
 TF_VAR_zone=
"us-central1-a"
# Or create a .env file (optional)
cat
 > .
env
 <<
EOF
export TF_VAR_project_id="your-project-id-here"
export TF_VAR_region="us-central1"
export TF_VAR_zone="us-central1-a"
EOF
source
 .
env
Terraform Configuration
Step 1: Create Terraform Variables Files
cd
 terraform
# Copy the example file
cp
 terraform.tfvars.example terraform.tfvars
# Edit the file with your values
nano terraform.tfvars
# or
vim terraform.tfvars
# or use your preferred editor
Edit**terraform.tfvars**:
project_id
 =
"your-gcp-project-id"
region
     =
"us-central1"
zone
       =
"us-central1-a"
**Important:**Replaceyour-gcp-project-idwith your actual GCP project ID.
Step 2: Create Terraform Configuration Files
Before verifying the project structure, you need to create all the Terraform configuration files. If you’re starting from scratch, create the following files:
Create Directory Structure
# Create main project directory (if not exists)
mkdir
 -p ~/cloud-pentest-lab
cd
 ~/cloud-pentest-lab
# Create Terraform directory
mkdir
 -p terraform/function_code
# Create other directories
mkdir
 -p scenarios tools
# Create Terraform directory
mkdir
 -p terraform/function_code
# Create other directories
mkdir
 -p scenarios tools
Create Terraform Files
1. Create**terraform/main.tf**
This is the main Terraform configuration file. Copy the content from the project’sterraform/main.tffile, or create it with the infrastructure definitions.
#
If you have the file from the project, copy it:
#
cp
 /path/to/Cloud_PT/terraform/main.tf terraform/
#
Or create it manually (see terraform/main.tf
in
 the project)
2. Create**terraform/variables.tf**
cat > terraform/variables.tf <<
'EOF'
variable
"project_id"
 {
  description =
"GCP Project ID"

type
        =
string
}
variable
"region"
 {
  description =
"GCP Region"

type
        =
string

default
     =
"us-central1"
}
variable
"zone"
 {
  description =
"GCP Zone"

type
        =
string

default
     =
"us-central1-a"
}
EOF
3. Create**terraform/outputs.tf**
output

"project_id"
 {
  description =
"GCP Project ID"
  value       = var.project_id
}
output

"region"
 {
  description =
"GCP Region"
  value       = var.region
}
output

"zone"
 {
  description =
"GCP Zone"
  value       = var.zone
}
output

"web_server_ip"
 {
  description =
"Public IP of the web server"
  value       = google_compute_instance.web_server.network_interface[
0
].access_config[
0
].nat_ip
}
output

"web_server_name"
 {
  description =
"Name of the web server instance"
  value       = google_compute_instance.web_server.name
}
output

"db_server_name"
 {
  description =
"Name of the database server instance"
  value       = google_compute_instance.db_server.name
}
output

"overprivileged_sa_email"
 {
  description =
"Email of the overprivileged service account"
  value       = google_service_account.overprivileged_sa.email
}
output

"vulnerable_bucket_name"
 {
  description =
"Name of the vulnerable storage bucket"
  value       = google_storage_bucket.vulnerable_bucket.name
}
output

"cloud_run_url"
 {
  description =
"URL of the vulnerable Cloud Run service"
  value       = google_cloud_run_service.vulnerable_api.
status
[
0
].url
}
output

"cloud_function_url"
 {
  description =
"URL of the vulnerable Cloud Function"
  value       = google_cloudfunctions_function.vulnerable_function.https_trigger_url
}
output

"service_account_key_location"
 {
  description =
"Location of exposed service account key"
  value       =
"Metadata: ${google_compute_instance.web_server.name} or Secret Manager: ${google_secret_manager_secret.sa_key.secret_id}"
}
output

"database_internal_ip"
 {
  description =
"Internal IP of the database server"
  value       = google_compute_instance.db_server.network_interface[
0
].network_ip
  sensitive   =
true
}
4. Create**terraform/terraform.tfvars.example**
cat
 > terraform/terraform.tfvars.example <<
'EOF'
project_id =
"your-gcp-project-id"
region     =
"us-central1"
zone       =
"us-central1-a"
EOF
5. Create**terraform/.gitignore**
cat > terraform/.gitignore <<
'EOF
'
*.tfstate
*.tfstate.*
.terraform/
.terraform.lock.hcl
*.tfvars
!*.tfvars.example
crash.log
override
.tf
override
.tf.json
*_
override
.tf
*_
override
.tf.json
function_code.zip
EOF
6. Create**terraform/Makefile**(Optional)
cat > terraform/Makefile <<'EOF'
.PHONY
: init plan apply destroy validate format output
init:
 terraform init
validate:
 terraform validate
format:
 terraform fmt -recursive
plan:
 terraform plan -out=tfplan
apply:
 terraform apply tfplan
destroy:
 terraform destroy
output:
 terraform output
prepare-function:
 cd function_code && \
 pip3 install -r requirements.txt -t . && \
 zip -r ../function_code.zip . && \
 cd ..
clean:
 rm -f *.tfstate* tfplan
 rm -rf .terraform
 rm -f function_code.zip
deploy: validate prepare-function plan apply output
check: validate format
EOF
7. Create Cloud Function Code
Create**terraform/function_code/main.py**:
cat > terraform/function_code/main.py <<
'EOF'
import
 os
import
 json
import
 urllib.request
from
 flask
import
 Request
def

vulnerable_handler
(
request: Request
):

"""Intentionally vulnerable Cloud Function with SSRF vulnerability"""


# SSRF vulnerability - no validation

if

'url'

in
 request.args:
        url = request.args.get(
'url'
)

try
:

# Vulnerable: No validation of URL
            response = urllib.request.urlopen(url, timeout=
5
)

return
 response.read().decode(
'utf-8'
)

except
 Exception
as
 e:

return

f"Error:
{
str
(e)}
"


# Command injection vulnerability

if

'cmd'

in
 request.args:

import
 subprocess
        cmd = request.args.get(
'cmd'
)

# Vulnerable: Direct command execution
        result = subprocess.run(cmd, shell=
True
, capture_output=
True
, text=
True
)

return
 result.stdout


# Exposed environment variables

if

'env'

in
 request.args:

return
 json.dumps(
dict
(os.environ))


# Exposed secrets

if

'secret'

in
 request.args:

return
 os.environ.get(
'SECRET_KEY'
,
'Not found'
)


return

"""
    <h1>Vulnerable Cloud Function</h1>
    <p>Endpoints:</p>
    <ul>
        <li>?url=http://example.com - SSRF</li>
        <li>?cmd=whoami - Command Injection</li>
        <li>?env=1 - Environment Variables</li>
        <li>?secret=1 - Secret Key</li>
    </ul>
    """
EOF
Create**terraform/function_code/requirements.txt**:
cat
 > terraform/function_code/requirements.txt <<
'EOF'
flask==2.3.0
EOF
DVWA (Damn Vulnerable Web Application) Deployment
The Terraform configuration automatically deploys**DVWA (Damn Vulnerable Web Application)**on the web server instance. DVWA is a well-known, intentionally vulnerable web application designed for security testing and training.
What is DVWA?
DVWA is a PHP/MySQL web application that is intentionally vulnerable. It provides a legal environment to learn and practice web application security testing techniques. DVWA includes multiple vulnerability categories with different security levels (Low, Medium, High, Impossible).
DVWA Features
DVWA includes the following vulnerability categories:
-
SQL Injection— Various SQL injection challenges
-
Command Injection— OS command execution vulnerabilities
-
File Inclusion— Local and Remote File Inclusion (LFI/RFI)
-
File Upload— Unsafe file upload vulnerabilities
-
XSS (Cross-Site Scripting)— Reflected, Stored, and DOM-based XSS
-
CSRF (Cross-Site Request Forgery)— CSRF token bypass challenges
-
Brute Force— Weak authentication mechanisms
-
Weak Session IDs— Predictable session token vulnerabilities
-
CSP Bypass— Content Security Policy bypass techniques
-
JavaScript— Client-side security vulnerabilities
What Gets Deployed Automatically
The startup script inmain.tfautomatically:
-
**Installs:**nginx, PHP 7.4 with FPM, PHP extensions (mysql, gd, curl, xml, mbstring, zip), MariaDB, Git
-
**Clones DVWA:**Downloads DVWA from GitHub (https://github.com/digininja/DVWA)
-
**Configures Database:**Sets up MariaDB with DVWA database and user
-
**Configures DVWA:**Pre-configures with “low” security level (most vulnerable)
-
**Creates Info Page:**Creates
/var/www/html/info.phpthat exposes Cloud Function and Cloud Run URLs -
**Sets Permissions:**Configures proper file permissions for uploads and logs
-
**Exposes Credentials:**Service account key in
/tmp/sa-key.json
**No Manual Steps Required:**DVWA is deployed automatically when the instance is created. The startup script runs during instance boot and sets up everything.
DVWA Access Information
After deployment, you can access DVWA:
-
URL:
[http://WEB_SERVER_IP/](http://WEB_SERVER_IP/) -
Default Credentials:
-
Username:
admin -
Password:
password -
**Security Level:**Pre-configured to “Low” (most vulnerable)
-
**Database:**Automatically created and initialized
Information Disclosure Page
An additionalinfo.phppage is created that exposes Cloud Function and Cloud Run URLs:
-
URL:
[http://WEB_SERVER_IP/info.php](http://WEB_SERVER_IP/info.php) -
**Purpose:**Simulates exposed internal documentation
-
Contains:
-
Cloud Function URL
-
Cloud Run service URL
-
Storage bucket name
-
**Important Note:**The
main.tffile is large and complex (350+ lines). You have three options:
Option A: Copy from Existing Project (Recommended)
# If you have access to the project files
cp
 /home/andrey/Cloud_PT/terraform/main.tf terraform/
# Verify the file was copied
ls
 -lh terraform/main.tf
Option B: Download/Copy from RepositoryIf the files are in a repository, clone it:
git
clone
 <repository-url> ~/cloud-pentest-lab
cd
 ~/cloud-pentest-lab
Option C: Manual CreationYou’ll need to copy the completemain.tfcontent which includes:
nano
main
.tf
terraform {
  required_version =
">= 1.0"
  required_providers {
    google = {
      source  =
"hashicorp/google"
      version =
"~> 5.0"
    }
    archive = {
      source  =
"hashicorp/archive"
      version =
"~> 2.0"
    }
    random = {
      source  =
"hashicorp/random"
      version =
"~> 3.0"
    }
  }
}
provider
"google"
 {
  project = var.project_id
  region  = var.region
  zone    = var.zone
}
# Enable required APIs
resource
"google_project_service"

"required_apis"
 {
  for_each = toset([

"compute.googleapis.com"
,

"storage.googleapis.com"
,

"iam.googleapis.com"
,

"cloudresourcemanager.googleapis.com"
,

"secretmanager.googleapis.com"
,

"container.googleapis.com"
,

"run.googleapis.com"
,

"cloudfunctions.googleapis.com"
,

"cloudbuild.googleapis.com"
  ])
  service = each.value
  project = var.project_id
  disable_on_destroy = false
}
# VPC Network
resource
"google_compute_network"

"vulnerable_vpc"
 {
  name                    =
"vulnerable-vpc-
${random_id.suffix.hex}
"
  auto_create_subnetworks = false
  routing_mode            =
"REGIONAL"
}
# Public Subnet (intentionally exposed)
resource
"google_compute_subnetwork"

"public_subnet"
 {
  name          =
"public-subnet-
${random_id.suffix.hex}
"
  ip_cidr_range =
"10.0.1.0/24"
  region        = var.region
  network       = google_compute_network.vulnerable_vpc.id
}
# Private Subnet (target for lateral movement)
resource
"google_compute_subnetwork"

"private_subnet"
 {
  name                     =
"private-subnet-
${random_id.suffix.hex}
"
  ip_cidr_range            =
"10.0.2.0/24"
  region                   = var.region
  network                  = google_compute_network.vulnerable_vpc.id
  private_ip_google_access = true
}
# Firewall Rules - Intentionally permissive (vulnerable)
resource
"google_compute_firewall"

"allow_all_internal"
 {
  name    =
"allow-all-internal-
${random_id.suffix.hex}
"
  network = google_compute_network.vulnerable_vpc.name
  allow {
    protocol =
"tcp"
    ports    = [
"0-65535"
]
  }
  allow {
    protocol =
"udp"
    ports    = [
"0-65535"
]
  }
  allow {
    protocol =
"icmp"
  }
  source_ranges = [
"10.0.0.0/8"
]
  target_tags   = [
"vulnerable"
]
}
# Firewall Rule - Exposed web services
resource
"google_compute_firewall"

"allow_http_https"
 {
  name    =
"allow-http-https-
${random_id.suffix.hex}
"
  network = google_compute_network.vulnerable_vpc.name
  allow {
    protocol =
"tcp"
    ports    = [
"80"
,
"443"
,
"8080"
,
"8443"
]
  }
  source_ranges = [
"0.0.0.0/0"
]
  target_tags   = [
"web-server"
]
}
# Firewall Rule - Allow SSH access
resource
"google_compute_firewall"

"allow_ssh"
 {
  name    =
"allow-ssh-
${random_id.suffix.hex}
"
  network = google_compute_network.vulnerable_vpc.name
  allow {
    protocol =
"tcp"
    ports    = [
"22"
]
  }
  source_ranges = [
"0.0.0.0/0"
]
  target_tags   = [
"web-server"
,
"vulnerable"
]
}
# Overprivileged Service Account (intentional misconfiguration)
resource
"google_service_account"

"overprivileged_sa"
 {
  account_id   =
"overprivileged-sa-
${random_id.suffix.hex}
"
  display_name =
"Overprivileged Service Account"
  description  =
"Intentionally overprivileged for pentest lab"
}
# Grant excessive permissions
resource
"google_project_iam_member"

"overprivileged_roles"
 {
  for_each = toset([

"roles/owner"
,

"roles/storage.admin"
,

"roles/secretmanager.admin"
,

"roles/compute.admin"
,

"roles/iam.securityAdmin"
  ])
  project = var.project_id
  role    = each.value
  member  =
"serviceAccount:
${google_service_account.overprivileged_sa.email}
"
}
# Service Account Key (intentionally exposed in metadata)
resource
"google_service_account_key"

"exposed_key"
 {
  service_account_id = google_service_account.overprivileged_sa.name
  public_key_type    =
"TYPE_X509_PEM_FILE"
}
# Store key in Secret Manager (but also expose it)
resource
"google_secret_manager_secret"

"sa_key"
 {
  secret_id =
"exposed-sa-key-
${random_id.suffix.hex}
"
  replication {
    auto {}
  }
}
resource
"google_secret_manager_secret_version"

"sa_key_version"
 {
  secret      = google_secret_manager_secret.sa_key.id
  secret_data = base64decode(google_service_account_key.exposed_key.private_key)
}
# Storage Bucket - Publicly accessible with sensitive data
resource
"google_storage_bucket"

"vulnerable_bucket"
 {
  name          =
"vulnerable-bucket-
${random_id.suffix.hex}
"
  location      = var.region
  force_destroy = true
  uniform_bucket_level_access = false

# Intentionally public
  public_access_prevention =
"inherited"
}
# Make bucket publicly readable
resource
"google_storage_bucket_iam_member"

"public_read"
 {
  bucket = google_storage_bucket.vulnerable_bucket.name
  role   =
"roles/storage.objectViewer"
  member =
"allUsers"
}
# Upload sensitive file to bucket
resource
"google_storage_bucket_object"

"sensitive_data"
 {
  name   =
"secrets/database-credentials.json"
  bucket = google_storage_bucket.vulnerable_bucket.name
  content = jsonencode({
    db_host     =
"internal-db-
${random_id.suffix.hex}
"
    db_user     =
"admin"
    db_password =
"EXAMPLE_PASSWORD_123!"
    api_key     =
"stripe_live_example_
${random_id.suffix.hex}
"
  })
}
# Compute Instance - Web Server (vulnerable)
resource
"google_compute_instance"

"web_server"
 {
  name         =
"web-server-
${random_id.suffix.hex}
"
  machine_type =
"e2-micro"
  zone         = var.zone
  boot_disk {
    initialize_params {
      image =
"debian-cloud/debian-11"
      size  =
20
    }
  }
  network_interface {
    network    = google_compute_network.vulnerable_vpc.name
    subnetwork = google_compute_subnetwork.public_subnet.name
    access_config {

# Public IP
    }
  }
  tags = [
"web-server"
,
"vulnerable"
]

# Expose service account key in metadata (vulnerable)
  metadata = {
    startup-script = <<-EOF

#!/bin/bash
      set -e


# Update system
      apt-get update
      DEBIAN_FRONTEND=noninteractive apt-get install -
y
 \
        nginx \
        php-fpm \
        php-cli \
        php-mysql \
        php-gd \
        php-curl \
        php-xml \
        php-mbstring \
        php-zip \
        mariadb-server \
        mariadb-client \
        git \
        unzip


# Start services
      systemctl start mariadb
      systemctl start nginx
      systemctl start php7.
4
-fpm
      systemctl enable mariadb
      systemctl enable nginx
      systemctl enable php7.
4
-fpm


# Intentionally expose service account key in metadata
      echo
"
${base64decode(google_service_account_key.exposed_key.private_key)}
"
 >
/tmp/sa
-key.json

chmod

644
 /tmp/sa-key.json


# Setup MySQL for DVWA
      mysql -e
"CREATE DATABASE IF NOT EXISTS dvwa;"
      mysql -e
"CREATE USER IF NOT EXISTS 'dvwa'@'localhost' IDENTIFIED BY 'p@ssw0rd';"
      mysql -e
"GRANT ALL PRIVILEGES ON dvwa.* TO 'dvwa'@'localhost';"
      mysql -e
"FLUSH PRIVILEGES;"


# Install DVWA
      cd /var/www/html
      rm -rf *
      git clone https:
//gi
thub.com/digininja/DVWA.git .


# Configure DVWA
      cp config/config.inc.php.dist config/config.inc.php
      sed -i
"s/\$_DVWA\[ 'db_user' \]     = 'root';/\$_DVWA\[ 'db_user' \]     = 'dvwa';/"
 config/config.inc.php
      sed -i
"s/\$_DVWA\[ 'db_password' \] = 'p@ssw0rd';/\$_DVWA\[ 'db_password' \] = 'p@ssw0rd';/"
 config/config.inc.php
      sed -i
"s/\$_DVWA\[ 'db_database' \] = 'dvwa';/\$_DVWA\[ 'db_database' \] = 'dvwa';/"
 config/config.inc.php
      sed -i
"s/\$_DVWA\[ 'default_security_level' \] = 'impossible';/\$_DVWA\[ 'default_security_level' \] = 'low';/"
 config/config.inc.php


# Set permissions

chown
 -R www-data:www-data /var/www/html

chmod
 -R
755
 /var/www/html

chmod

777
 /var/www/html/hackable/uploads/
2
>
/dev/null
 || true

# Create phpids log directory if it doesn't exist

mkdir
 -p /var/www/html/external/phpids/
0
.
6
/lib/IDS/tmp/
2
>
/dev/null
 || true

chmod

777
 /var/www/html/external/phpids/
0
.
6
/lib/IDS/tmp/phpids_log.txt
2
>
/dev/null
 || true

chmod

777
 /var/www/html/config


# Create info page that exposes Cloud Function and Cloud Run URLs
      cat >
/var/
www/html/info.php <<
'INFOPHP'
      <?php
      // Information disclosure - exposes internal service URLs
      ?>
      <!DOCTYPE html>
      <html>
      <head>
          <title>Internal Services Information<
/title>
          <style>
              body { font-family: Arial, sans-serif; margin: 40px; background: #f5f5f5; }
              .container { background: white; padding: 30px; border-radius: 8px; box-shadow: 0 2px 4px rgba(0,0,0,0.1); }
              h1 { color: #333; }
              .service { margin: 20px 0; padding: 15px; background: #e8f4f8; border-left: 4px solid #2196F3; }
              .service h3 { margin-top: 0; color: #1976D2; }
              .url { font-family: monospace; background: #f0f0f0; padding: 5px 10px; border-radius: 3px; word-break: break-all; }
              .warning { color: #d32f2f; font-weight: bold; }
          </s
tyle>
      <
/head>
      <body>
          <div class="container">
              <h1>Internal Services Information</
h1>
              <p>This page contains internal service URLs
for
 development purposes.<
/p>

              <div class="service">
                  <h3>Cloud Function API</
h3>
                  <p>Serverless function
for
 processing requests:<
/p>
                  <div class="url">${google_cloudfunctions_function.vulnerable_function.https_trigger_url}</di
v>
                  <p><small>Endpoints: ?cmd=, ?url=, ?env=, ?secret=<
/small></p
>
              <
/div>

              <div class="service">
                  <h3>Cloud Run API Service</
h3>
                  <p>Containerized API service:<
/p>
                  <div class="url">${google_cloud_run_service.vulnerable_api.status[0].url}</di
v>
              <
/div>

              <div class="service">
                  <h3>Storage Bucket</
h3>
                  <p>Public storage bucket:<
/p>
                  <div class="url">gs:/
/${google_storage_bucket.vulnerable_bucket.name}</di
v>
              <
/div>

              <hr>
              <p><a href="/
">← Back to DVWA</a></p>
              <p><small>Last updated: <?php echo date('Y-m-d H:i:s'); ?></small></p>
          </div>
      </body>
      </html>
      INFOPHP

      # Create redirect from root to DVWA setup if needed
      cat > /var/www/html/index.php <<'INDEXPHP'
      <?php
      // Redirect to DVWA or show info
      if (file_exists('/var/www/html/setup.php')) {
          header('Location: /setup.php');
          exit;
      } else {
          header('Location: /login.php');
          exit;
      }
      ?>
      INDEXPHP

      # Update nginx config to serve PHP and DVWA
      cat > /etc/nginx/sites-available/default <<NGINX
      server {
          listen 80 default_server;
          listen [::]:80 default_server;
          root /var/www/html;
          index index.php index.html;

          location / {
              try_files \$uri \$uri/ =404;
          }

          location ~ \.php$ {
              include snippets/fastcgi-php.conf;
              fastcgi_pass unix:/var/run/php/php7.4-fpm.sock;
              fastcgi_param SCRIPT_FILENAME \$document_root\$fastcgi_script_name;
              include fastcgi_params;
          }

          location ~ /\.ht {
              deny all;
          }
      }
      NGINX

      # Restart services
      systemctl restart nginx
      systemctl restart php7.4-fpm

      # Wait a bit for services to stabilize
      sleep 5

      # Create DVWA database (run setup via CLI if possible)
      echo "
DVWA installation complete!
"
      echo "
Access DVWA at: http:
//
$(curl -s ifconfig.me)/
"
      echo "
Default credentials: admin / password
"
      echo "
Service info page: http:
//
$(curl -s ifconfig.me)/info.php
"
    EOF
    # Store key in metadata (intentional vulnerability)
    sa-key = base64decode(google_service_account_key.exposed_key.private_key)
  }
  service_account {
    email  = google_service_account.overprivileged_sa.email
    scopes = ["
cloud-platform
"]
  }
}
# Compute Instance - Internal Database Server
resource "
google_compute_instance
" "
db_server
" {
  name         = "
db-server-${random_id.suffix.hex}
"
  machine_type = "
e2-micro
"
  zone         = var.zone
  boot_disk {
    initialize_params {
      image = "
debian-cloud/debian-
11
"
      size  = 20
    }
  }
  network_interface {
    network    = google_compute_network.vulnerable_vpc.name
    subnetwork = google_compute_subnetwork.private_subnet.name
    # No public IP
  }
  tags = ["
database
", "
vulnerable
"]
  metadata = {
    startup-script = <<-EOF
      #!/bin/bash
      apt-get update
      apt-get install -y mysql-server
      systemctl start mysql

      # Create vulnerable database
      mysql -e "
CREATE DATABASE app_db;
"
      mysql -e "
CREATE USER
'admin'
@'%' IDENTIFIED BY
'EXAMPLE_PASSWORD_123!'
;
"
      mysql -e "
GRANT ALL PRIVILEGES ON app_db.* TO
'admin'
@'%';
"
      mysql -e "
FLUSH PRIVILEGES;
"
    EOF
  }
}
# Cloud Run Service - Vulnerable API
resource "
google_cloud_run_service
" "
vulnerable_api
" {
  name     = "
vulnerable-api-${random_id.suffix.hex}
"
  location = var.region
  template {
    spec {
      containers {
        image = "
gcr.io/cloudrun/hello
"
        env {
          name  = "
DATABASE_URL
"
          value = "
mysql:
//admin
:EXAMPLE_PASSWORD_123!@${google_compute_instance.db_server.network_interface[
0
].network_ip}:
3306
/app_db
"
        }
        env {
          name  = "
API_KEY
"
          value = "
stripe_live_example
_
${random_id.suffix.hex}
"
        }
      }
      service_account_name = google_service_account.overprivileged_sa.email
    }
  }
  traffic {
    percent         = 100
    latest_revision = true
  }
}
# Make Cloud Run publicly accessible
resource "
google_cloud_run_service_iam_member
" "
public_access
" {
  service  = google_cloud_run_service.vulnerable_api.name
  location = google_cloud_run_service.vulnerable_api.location
  role     = "
roles/run.invoker
"
  member   = "
allUsers
"
}
# Cloud Function - Vulnerable function with SSRF
# Note: Function code must be prepared before deployment
# Run: cd function_code && zip -r ../function_code.zip . && cd ..
resource "
google_cloudfunctions_function
" "
vulnerable_function
" {
  name        = "
vulnerable-function-${random_id.suffix.hex}
"
  description = "
Intentionally vulnerable function
for
 pentest
"
  runtime     = "
python39
"
  region      = var.region
  available_memory_mb   = 256
  source_archive_bucket = google_storage_bucket.vulnerable_bucket.name
  source_archive_object = google_storage_bucket_object.function_code.name
  # HTTP trigger - required for HTTP-triggered functions
  trigger_http = true
  entry_point = "
vulnerable_handler
"
  environment_variables = {
    SECRET_KEY = "
exposed-secret-${random_id.suffix.hex}
"
  }
  service_account_email = google_service_account.overprivileged_sa.email
  depends_on = [google_storage_bucket_object.function_code]
}
# Function code - create zip archive
data "
archive_file
" "
function_zip
" {
  type        = "
zip
"
  output_path = "
${path.module}/function_code.zip
"
  source_dir  = "
${path.module}/function_code
"
}
resource "
google_storage_bucket_object
" "
function_code
" {
  name   = "
function-code.zip
"
  bucket = google_storage_bucket.vulnerable_bucket.name
  source = data.archive_file.function_zip.output_path
}
# Make Cloud Function publicly accessible
resource "
google_cloudfunctions_function_iam_member
" "
public_access
" {
  project        = var.project_id
  region         = var.region
  cloud_function = google_cloudfunctions_function.vulnerable_function.name
  role           = "
roles/cloudfunctions.invoker
"
  member         = "
allUsers
"
}
# Random suffix for uniqueness
resource "
random_id
" "
suffix
" {
  byte_length = 4
}
-
Terraform and provider configuration (google, archive, random)
-
API enablement (8 GCP APIs)
-
VPC and network setup (2 subnets)
-
Firewall rules (2 rules)
-
Service accounts and IAM (overprivileged SA with 5 roles)
-
Storage bucket (public with sensitive data)
-
Compute instances (web server and database)
-
Cloud Run service (vulnerable API)
-
Cloud Function (SSRF vulnerability)
-
Archive file data source (for function code)
**⚠️ CRITICAL:**Themain.tffile is essential - without it, Terraform cannot deploy the infrastructure. Make sure you have a complete copy.
**Recommended:**Use Option A or B to ensure you have the complete, tested configuration. Themain.tffile contains all the infrastructure definitions and is too large to manually type.
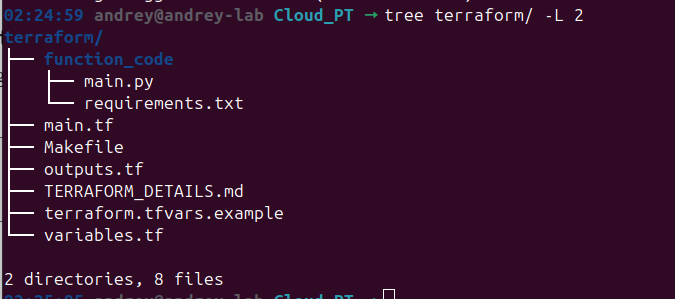
Step 3: Verify Project Structure
Ensure you have the following structure:
tree terraform/ -L
2
Expected Structure:
Step 4: Review Terraform Configuration
Before deploying, let’s understand what will be created:
# View main configuration
cat
 main.tf |
head
 -50
# View variables
cat
 variables.tf
# View outputs
cat
 outputs.tf
Key Resources That Will Be Created:
-
1 VPC network
-
2 subnets (public and private)
-
2 firewall rules
-
2 compute instances (web server and database)
-
1 storage bucket
-
1 Cloud Run service
-
1 Cloud Function
-
1 service account with multiple roles
-
1 Secret Manager secret
Step 4: Prepare Cloud Function Code
The Cloud Function code needs to be packaged as a ZIP file. Terraform will handle this automatically, but let’s verify:
# Check function code exists
ls
 -la function_code/
# Expected files:
# - main.py
# - requirements.txt
Themain.tffile includes adata "archive_file"resource that will automatically create the ZIP file during deployment.
Deployment Process
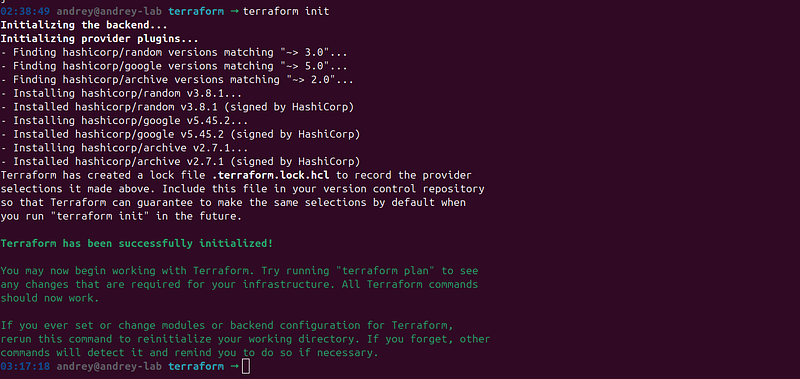
Step 1: Initialize Terraform
cd
 terraform
# Initialize Terraform (downloads providers)
terraform
init
Expected Output:
If you see errors:
-
Check your internet connection
-
Verify Terraform version:
terraform version(should be >= 1.0) -
Check provider versions in
main.tf
Step 2: Validate Configuration
# Validate Terraform configuration
terraform validate
Expected Output:

If validation fails:
-
Check for syntax errors in
.tffiles -
Verify all required variables are set
-
Review error messages for specific issues
Step 3: Format Configuration (Optional)
Terraform fmt formats Terraform files to a consistent style.
What it does
-
Rewrites .tf files to canonical formatting
-
Standardizes indentation, spacing, and alignment
-
Makes code easier to read and maintain
Why it’s optional
-
Not required for functionality
-
Terraform works without formatting
-
Recommended for consistency and readability
# Format all Terraform files
terraform
fmt
 -recursive
Step 4: Review Deployment Plan
**IMPORTANT:**Always review the plan before applying!
# Generate and review the execution plan
terraform plan
What to Look For:
-
Number of resources to be created (should be ~15–20)
-
Resource types and names
-
Any warnings or errors
-
Estimated costs (if shown)
Expected Output:
Plan:

20

to
 add,
0

to
 change,
0

to
 destroy.
Changes to Outputs:
  + cloud_function_url        = (known after apply)
  + cloud_run_url             = (known after apply)
  + database_internal_ip      = (sensitive value)
  + overprivileged_sa_email   = (known after apply)
  + service_account_key_location = (known after apply)
  + vulnerable_bucket_name    = (known after apply)
  + web_server_ip             = (known after apply)
Save the plan to a file (optional):
terraform plan -
out
=tfplan
Step 5: Apply Configuration
⚠️ This will create real resources and incur costs!
# Apply the configuration
terraform apply
# Or if you saved the plan:
terraform apply tfplan
Terraform will:
-
Show you the plan again
-
Ask for confirmation:
Do you want to perform these actions? -
Type
yesto proceed
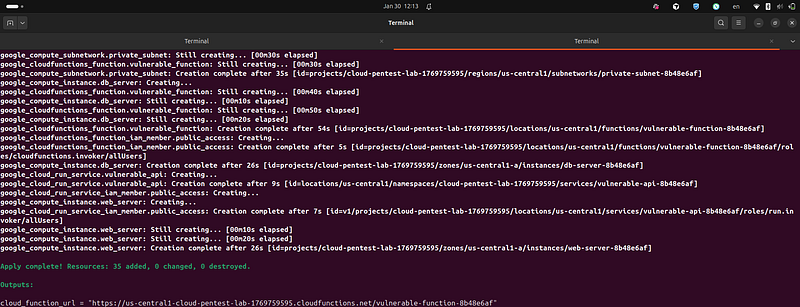
Expected Process:
google_project_service
.required_apis
[
"compute.googleapis.com"
]
:
Creating
...
google_project_service
.required_apis
[
"storage.googleapis.com"
]
:
Creating
...
...
google_compute_instance
.web_server
:
Creating
...
google_compute_instance
.db_server
:
Creating
...
...
Apply

complete
!
Resources
:
20

added
,
0

changed
,
0

destroyed
.
**Deployment Time:**5–10 minutes
Common Issues During Apply:
-
**API not enabled:**Wait a few minutes and retry
-
**Quota exceeded:**Check your GCP quotas
-
**Permission denied:**Verify your account has Owner role
-
**Billing not enabled:**Enable billing for the project
Step 6: Save Outputs
After successful deployment, save the outputs:
terraform
output
 project_id
terraform
output
 region
terraform
output
 zone
terraform
output
 web_server_ip
terraform
output
 web_server_name
terraform
output
 db_server_name
terraform
output
 vulnerable_bucket_name
terraform
output
 cloud_run_url
terraform
output
 cloud_function_url
terraform
output
 overprivileged_sa_email
terraform
output
 service_account_key_location
terraform
output
 database_internal_ip  # Sensitive - requires -raw f
Important Outputs to Save:
-
web_server_ip- Public IP for web server -
vulnerable_bucket_name- Storage bucket name -
cloud_run_url- Cloud Run service URL -
cloud_function_url- Cloud Function URL -
overprivileged_sa_email- Service account email
Verification
Step 1: Verify Compute Instances
# List all instances
gcloud compute instances list

Step 2: Verify DVWA Installation
The web server includesDVWA (Damn Vulnerable Web Application)— a full-featured vulnerable web application for security testing.
# Get web server IP
WEB_IP=$(terraform output -raw web_server_ip)
# Access DVWA (wait 3-5 minutes after deployment for startup script)
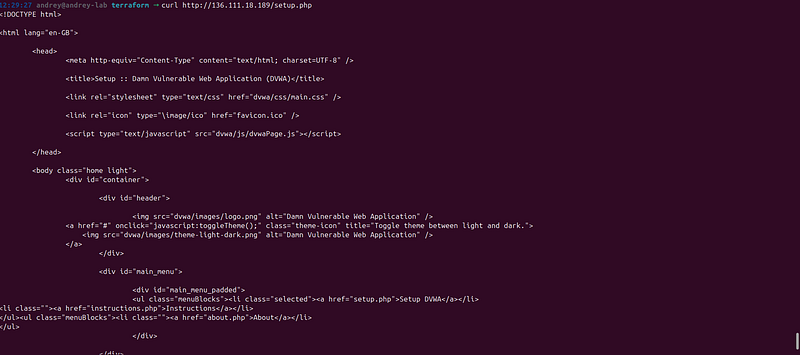
curl -L http:
//
$WEB_IP/ | head -
30
# Or open in browser: http://$WEB_IP/
# Check info page that exposes Cloud Function and Cloud Run URLs
curl http:
//
$WEB_IP/info.php |
grep
-i
"cloud"
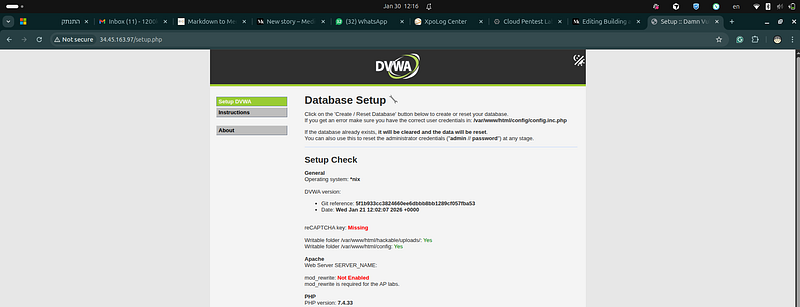
Expected DVWA Content:
-
DVWA login/setup page should be accessible
-
Default credentials:
admin/password -
Database setup may be required on first access
DVWA Features:
-
10+ vulnerability categories (SQL Injection, XSS, Command Injection, File Inclusion, etc.)
-
Multiple security levels (Low, Medium, High, Impossible)
-
Pre-configured to “Low” security level (most vulnerable)
Information Disclosure Page:
-
URL:
[http://WEB_SERVER_IP/info.php](http://WEB_SERVER_IP/info.php) -
**Purpose:**Exposes Cloud Function and Cloud Run URLs
-
Contains:
-
Cloud Function URL
-
Cloud Run service URL
-
Storage bucket name
If DVWA Shows Default Nginx Page or 404:
-
Wait 3–5 minutes for the startup script to complete
-
Check startup script logs:
gcloud compute instances
get
-serial-port-output WEB_SERVER_NAME \   --zone=ZONE --project=PROJECT_ID | grep -i
"DVWA"
- If still not working, recreate the instance:
cd
 terraform terraform taint google_compute_instance.web_server terraform apply
**Why DVWA Matters:**DVWA provides a comprehensive platform for learning web application security testing. The information disclosure page (info.php) demonstrates how attackers can discover Cloud Function and Cloud Run URLs without having access to Terraform configuration files. In real-world scenarios, these URLs might be exposed through:
-
Internal documentation pages
-
Developer dashboards
-
API documentation
-
Error messages
-
Configuration files
Step 3: Verify Storage Bucket
# Get bucket name
BUCKET=$(terraform output -raw vulnerable_bucket_name)
# List bucket contents
gsutil
ls
 gs://
$BUCKET
/
# Try to read sensitive file (should work - it's public!)
gsutil
cat
 gs://
$BUCKET
/secrets/database-credentials.json
Expected Output:
{

"db_host"
:

"internal-db-xxxx"
,

"db_user"
:

"admin"
,

"db_password"
:

"EXAMPLE_PASSWORD_123!"
,

"api_key"
:

"stripe_live_example_xxxx"
}

Step 4: Verify Cloud Run Service
# Get Cloud Run URL
CLOUD_RUN_URL=
$(terraform output -raw cloud_run_url)
# Test Cloud Run service
curl $CLOUD_RUN_URL
**Expected:**Should return a response (may be default hello world)
Step 5: Verify Service Account
# Get service account email
SA_EMAIL=
$(terraform output -raw overprivileged_sa_email)
# List service account roles
gcloud projects get-iam-policy
$(terraform output -raw project_id)
 \
  --flatten=
"bindings[].members"
 \
  --filter=
"bindings.members:serviceAccount:$SA_EMAIL"
 \
  --format=
"table(bindings.role)"
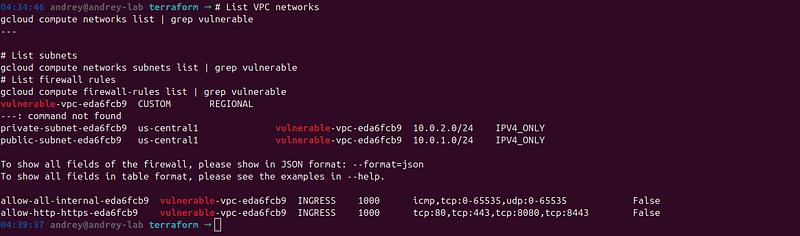
Step 6: Verify Network Configuration
# List VPC networks
gcloud

compute

networks

list

|

grep

vulnerable
---
# List subnets
gcloud

compute

networks

subnets

list

|

grep

vulnerable
# List firewall rules
gcloud

compute

firewall-rules

list

|

grep

vulnerable
---
Storage Bucket Access
# Public URL (if bucket is public)
BUCKET=$(terraform output -raw vulnerable_bucket_name)
echo

"Bucket: gs://
$BUCKET
"
echo

"Public URL: https://storage.googleapis.com/
$BUCKET
/secrets/database-credentials.json"
Service Account Key Access
The service account key is exposed in two locations:
1. Instance Metadata:
# Via web server file read vulnerability
curl
"http://
$(terraform output -raw web_server_ip)
/api.php?file=/tmp/sa-key.json"
2. Secret Manager:
# Get secret name
SECRET=$(terraform output -raw service_account_key_location |
cut
 -d: -f2 | xargs)
# Access via gcloud (requires authentication)
gcloud secrets versions access latest --secret=
"
$SECRET
"
Accessing the Lab
DVWA (Damn Vulnerable Web Application)
The lab automatically deploys**DVWA (Damn Vulnerable Web Application)**on the web server. DVWA is a well-known, intentionally vulnerable PHP/MySQL web application designed for security testing and training.
What is DVWA?
DVWA is an intentionally vulnerable web application that provides a legal environment to learn and practice web application security testing. It includes multiple vulnerability categories with different security levels, allowing you to practice various attack techniques safely.
DVWA Vulnerability Categories
DVWA includes 10 major vulnerability categories:
-
SQL Injection— Various SQL injection challenges with different difficulty levels
-
Command Injection— OS command execution vulnerabilities
-
File Inclusion— Local and Remote File Inclusion (LFI/RFI)
-
File Upload— Unsafe file upload vulnerabilities
-
XSS (Cross-Site Scripting)— Reflected, Stored, and DOM-based XSS
-
CSRF (Cross-Site Request Forgery)— CSRF token bypass challenges
-
Brute Force— Weak authentication mechanisms
-
Weak Session IDs— Predictable session token vulnerabilities
-
CSP Bypass— Content Security Policy bypass techniques
-
JavaScript— Client-side security vulnerabilities
Accessing DVWA
DVWA URL:
# Get DVWA URL from Terraform outputs
terraform output dvwa_url
# Output: http://WEB_SERVER_IP/
# Or construct manually
WEB_IP=$(terraform output -raw web_server_ip)
echo

"http://
$WEB_IP
/"
Default Credentials:
-
Username:
admin -
Password:
password
First Time Setup:
-
Access DVWA URL in your browser
-
Login with default credentials (
admin/password) -
Click “Create / Reset Database” button if prompted
-
Wait for database initialization
-
Go to “DVWA Security” in the left menu
-
Set security level to “Low” (most vulnerable)
Security Levels:
-
**Low:**Most vulnerable — no security measures (recommended for testing)
-
**Medium:**Some security measures in place
-
**High:**Stronger security measures
-
**Impossible:**Secure implementation (for reference)
Information Disclosure Page
An additionalinfo.phppage exposes Cloud Function and Cloud Run URLs:
Access:
# Get info page URL
terraform output info_page_url
# Output: http://WEB_SERVER_IP/info.php
# Or access directly
curl http://$(terraform output -raw web_server_ip)/info.php
What It Shows:
-
Cloud Function URL with endpoints documentation
-
Cloud Run service URL
-
Storage bucket name
-
Service descriptions
**Purpose:**This simulates a real-world scenario where internal service documentation is publicly accessible, allowing attackers to discover Cloud Function and Cloud Run URLs without having access to Terraform configuration files.
What Gets Deployed Automatically
The Terraform startup script automatically:
-
**Installs:**nginx, PHP 7.4 with FPM, PHP extensions (mysql, gd, curl, xml, mbstring, zip), MariaDB, Git
-
**Clones DVWA:**Downloads from GitHub (https://github.com/digininja/DVWA)
-
**Configures Database:**Sets up MariaDB with DVWA database and user
-
**Pre-configures:**Security level set to “Low” (most vulnerable)
-
Creates Info Page:
/var/www/html/info.phpwith service URLs -
**Sets Permissions:**Configures file permissions for uploads and logs
-
**Exposes Credentials:**Service account key in
/tmp/sa-key.json
No manual steps required— everything is deployed automatically when the instance is created.
DVWA Testing Examples
SQL Injection:
User
 ID:
1
' OR '
1
'='
1
Command Injection:
IP Address: 127.0.0.1;
cat
 /etc/passwd
File Inclusion:
File: ../../../../etc/passwd
XSS:
Name
:
<
script
>
alert
(
'XSS'
)
</
script
>
Troubleshooting DVWA
If DVWA Shows “Database Error”:
-
Wait 2–3 minutes after instance creation
-
Access
/setup.phpdirectly to reset database -
Click “Create / Reset Database” button
-
Check MariaDB is running:
systemctl status mariadb
If You See Default Nginx Page:
-
Wait 3–5 minutes for startup script to complete
-
Check startup script logs for “DVWA installation complete”
-
If still not working, recreate the instance:
cd
 terraform terraform taint google_compute_instance.web_server terraform apply
Why DVWA Matters:
DVWA provides a comprehensive platform for learning web application security:
-
**Legal Environment:**Practice attacks without legal concerns
-
**Multiple Vulnerabilities:**Learn various attack techniques
-
**Difficulty Levels:**Progress from basic to advanced
-
**Real-World Scenarios:**Simulates common web application vulnerabilities
-
**Educational:**Includes hints and documentation
The vulnerabilities in DVWA are based on real-world web application security issues, helping you understand attack vectors and develop secure coding practices.
Web Server Access
# Get web server IP
WEB_IP=$(terraform output -raw web_server_ip)
# Access via browser
echo

"Open in browser: http://
$WEB_IP
"
echo

"Vulnerable endpoint: http://
$WEB_IP
/api.php?cmd=id"
echo

"Homepage with service URLs: http://
$WEB_IP
/"
SSH Access (if needed)
# SSH into web server
# Get instance name and zone from outputs
WEB_SERVER_NAME
=
$(
terraform output -raw web_server_name)
ZONE
=
$(
terraform output -raw zone)
PROJECT_ID
=
$(
terraform output -raw project_id)
# SSH into the instance (direct connection)
gcloud compute ssh
$WEB_SERVER_NAME
 --zone=
$ZONE
 --project=
$PROJECT_ID
# Alternative: One-liner
gcloud compute ssh
$(
terraform output -raw web_server_name) \
  --zone=
$(
terraform output -raw zone) \
  --project=
$(
terraform output -raw project_id)
# If SSH connection times out, use IAP tunneling (recommended)
gcloud compute ssh
$WEB_SERVER_NAME
 \
  --zone=
$ZONE
 \
  --project=
$PROJECT_ID
 \
  --tunnel-through-iap
# Troubleshoot SSH connection issues
gcloud compute ssh
$WEB_SERVER_NAME
 \
  --zone=
$ZONE
 \
  --project=
$PROJECT_ID
 \
  --troubleshoot
# If you need to find the instance name manually:
gcloud compute instances list --filter=
"name:web-server*"
Storage Bucket Access
# Public URL (if bucket is public)
BUCKET=$(terraform output -raw vulnerable_bucket_name)
echo

"Bucket: gs://
$BUCKET
"
echo

"Public URL: https://storage.googleapis.com/
$BUCKET
/secrets/database-credentials.json"
Service Account Key Access
The service account key is exposed in two locations:
1. Instance Metadata:
# Via web server file read vulnerability
curl
"http://
$(terraform output -raw web_server_ip)
/api.php?file=/tmp/sa-key.json"
2. Secret Manager:
# Get secret name
SECRET=$(terraform output -raw service_account_key_location |
cut
 -d: -f2 | xargs)
# Access via gcloud (requires authentication)
gcloud secrets versions access latest --secret=
"
$SECRET
"
Troubleshooting
Issue: Terraform Init Fails
Error:Failed to query available provider packages
Solution:
# Check internet connection
ping google.com
# Try with explicit provider source
terraform init -upgrade
# Clear Terraform cache and retry
rm
 -rf .terraform
terraform init
Issue: API Not Enabled
Error:Error 403: Compute Engine API has not been used
Solution:
# Enable the API manually
gcloud services
enable
 compute.googleapis.com
# Wait 1-2 minutes, then retry
terraform apply
Issue: Quota Exceeded
Error:Quota 'INSTANCES' exceeded
Solution:
# Check current quotas
gcloud compute project-info describe --project=
$PROJECT_ID
# Request quota increase via console:
# https://console.cloud.google.com/iam-admin/quotas
Issue: Billing Not Enabled
Error:Billing account not found
Solution:
# Link billing account
gcloud billing projects
link

$PROJECT_ID
 \
  --billing-account=$(gcloud billing accounts list --format=
"value(name)"
 |
head
 -1)
# Verify
gcloud billing projects describe
$PROJECT_ID
Issue: Permission Denied
Error:Permission denied on resource
Solution:
# Verify you have Owner role
gcloud projects get-iam-policy
$PROJECT_ID
 \
  --flatten=
"bindings[].members"
 \
  --filter=
"bindings.members:user:
$(gcloud config get-value account)
"
# If not, add Owner role (requires project owner)
gcloud projects add-iam-policy-binding
$PROJECT_ID
 \
  --member=
"user:
$(gcloud config get-value account)
"
 \
  --role=
"roles/owner"
Issue: SSH Connection Timeout
Error:ssh: connect to host [IP] port 22: Connection timed out
**Symptoms:**Cannot SSH into compute instances
Solution:
Option 1: Use IAP Tunneling (Recommended)
# SSH using IAP tunneling (works even without public SSH access)
gcloud compute ssh
$(terraform output -raw web_server_name)
 \
  --zone=
$(terraform output -raw zone)
 \
  --project=
$(terraform output -raw project_id)
 \
  --tunnel-through-iap
Option 2: Add SSH Firewall Rule
# Check if SSH firewall rule exists
gcloud compute firewall-rules list | grep allow-ssh
# If missing, apply the updated Terraform configuration
cd
 terraform
terraform apply
Option 3: Troubleshoot SSH Issues
# Run SSH troubleshooting
gcloud compute ssh
$(terraform output -raw web_server_name)
 \
  --zone=
$(terraform output -raw zone)
 \
  --project=
$(terraform output -raw project_id)
 \
  --troubleshoot
# Check firewall rules
gcloud compute firewall-rules list --filter=
"name:allow-ssh*"
# Verify instance is running
gcloud compute instances describe
$(terraform output -raw web_server_name)
 \
  --zone=
$(terraform output -raw zone)
 \
  --format=
"get(status)"
**Note:**The Terraform configuration includes an SSH firewall rule. If you deployed before this was added, runterraform applyto add it.
Issue: Web Server Not Responding
**Symptoms:**HTTP requests timeout or return errors
Solution:
# Check instance status
WEB_NAME=$(terraform output -raw web_server_name)
ZONE=$(terraform output -raw zone)
gcloud compute instances describe
$WEB_NAME
 --zone=
$ZONE
# Check if startup script completed
gcloud compute instances get-serial-port-output
$WEB_NAME
 \
  --zone=
$ZONE
 |
tail
 -50
# Check firewall rules
gcloud compute firewall-rules list | grep allow-http
# Wait 3-5 minutes for startup script to complete
Issue: Cloud Function Deployment Fails
Error:Error creating function
Solution:
# Verify function code ZIP was created
ls
 -la terraform/function_code.zip
# If missing, create manually
cd
 terraform/function_code
zip -r ../function_code.zip .
cd
 ..
# Retry deployment
terraform apply
Issue: Storage Bucket Creation Fails
Error:Bucket name already exists
Solution:
-
Bucket names must be globally unique
-
Terraform uses random suffix, but if it conflicts:
# Destroy and recreate with new random suffix
terraform destroy
terraform apply
Issue: Terraform State Version Mismatch
Error:Failed to load state: unsupported backend state version 4
**Symptoms:**Terraform cannot read the state file
Solution:
Option 1: Use Manual Cleanup
# Use the manual cleanup script
cd
 terraform
./manual_cleanup.sh
Option 2: Fix State File
# Backup current state
cp
 terraform.tfstate terraform.tfstate.backup2
# Try to upgrade Terraform
# Download latest version from https://www.terraform.io/downloads
# Or use manual cleanup (see Cleanup section)
Option 3: Delete Resources ManuallySee “Option B: Manual Cleanup” in the Cleanup section.
Getting Help
Check Terraform State:
#
View

current
 state
terraform
show
# List
all
 resources
terraform state list
View Logs:
# Terraform logs
cat
 terraform.tfstate
# Current state
# GCP logs
gcloud logging
read

"resource.type=compute_instance"
 --
limit
 50
Cleanup
Step 1: Destroy All Resources
⚠️ This will permanently delete all lab resources!
cd
 terraform
# Review what will be destroyed
terraform plan -destroy
# Destroy all resources
terraform destroy
Expected Process:
google_compute_instance.web_server:

Destroying...
google_compute_instance.db_server:

Destroying...
google_storage_bucket.vulnerable_bucket:

Destroying...
...
Destroy

complete!

Resources:

20

destroyed.
**Note:**Some resources may take a few minutes to delete.
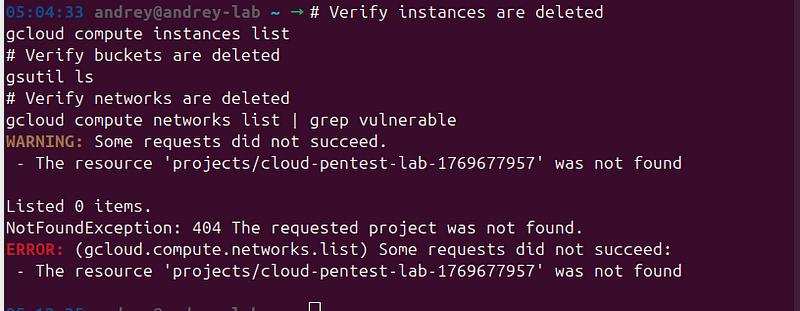
Step 2: Verify Cleanup
# Verify instances are deleted
gcloud compute instances list
# Verify buckets are deleted
gsutil
ls
# Verify networks are deleted
gcloud compute networks list | grep vulnerable
Step 3: Delete Project (Optional)
⚠️ This will delete the entire GCP project!
# Delete the project (requires project deletion permission)
gcloud projects
delete
 $PROJECT_ID
# Note: Project deletion can take time and is irreversible
**Alternative:**Just leave the project empty (no cost if no resources)
Step 4: Clean Local Files
# Remove Terraform state and cache
cd
 terraform
rm
 -rf .terraform
rm
 -f terraform.tfstate terraform.tfstate.backup
rm
 -f tfplan
rm
 -f function_code.zip
Cost Management Tips
-
Set Budget Alerts(as shown in setup)
-
Destroy When Not in Use
-
terraform destroy # Stops all costs
3. Monitor Usage
gcloud billing accounts list gcloud billing projects describe $PROJECT_ID
4. Use Preemptible Instances(modifymain.tfif desired)
5. Schedule Automatic Shutdown(use Cloud Scheduler)
Additional Resources
-
Terraform Documentation:https://www.terraform.io/docs
-
GCP Documentation:https://cloud.google.com/docs
-
Terraform GCP Provider:https://registry.terraform.io/providers/hashicorp/google/latest/docs
-
GCP Security Best Practices:https://cloud.google.com/security/best-practices
Summary Checklist
Use this checklist to ensure complete setup:
-
GCP account created and billing enabled
-
New GCP project created
-
All required APIs enabled
-
gcloud authenticated
-
Terraform installed and verified
-
Project files in place
-
terraform.tfvarsconfigured -
terraform initcompleted successfully -
terraform planreviewed -
terraform applycompleted -
All outputs saved
-
Web server accessible
-
Storage bucket accessible
-
Cloud Run service accessible
-
Cloud Function accessible
-
Service account verified
-
Budget alerts configured
-
Lab outputs documented
**Congratulations!**🎉 You’ve successfully built a vulnerable cloud pentest lab. Remember to use it responsibly and only for authorized testing.
Fast redeploy after destruction
# 1. Login
gcloud auth login
# 2. Create new project
export
 PROJECT_ID=
"cloud-pentest-lab-
$(date +%s)
"
gcloud projects create
$PROJECT_ID
 --name=
"Cloud Pentest Lab"
# 3. Set project
gcloud config
set
 project
$PROJECT_ID
# 4. Link billing account
gcloud billing accounts list
gcloud billing projects
link

$PROJECT_ID
 --billing-account=011607-0196AF-A74C3F
# 5. Enable APIs
gcloud services
enable
 cloudresourcemanager.googleapis.com compute.googleapis.com cloudfunctions.googleapis.com run.googleapis.com storage.googleapis.com secretmanager.googleapis.com iam.googleapis.com cloudbuild.googleapis.com container.googleapis.com
# 6. Fix ADC quota project
gcloud auth application-default set-quota-project
$PROJECT_ID
# 7. Update terraform.tfvars
cd
 terraform
cat
 > terraform.tfvars <<
EOFTF
project_id = "$PROJECT_ID"
region     = "us-central1"
zone       = "us-central1-a"
EOFTF
# 8. Initialize Terraform
rm
 -rf .terraform terraform.tfstate* 2>/dev/null ||
true
terraform init
# 9. Deploy
terraform plan
terraform apply