Building a Vulnerable Cloud Pentest Lab with Terraform
- Category: Cloud
- Source article: https://medium.com/@1200km/building-a-vulnerable-cloud-pentest-lab-with-terraform-9858ac96b29e
- Published: 2026-03-13
- Repository: https://github.com/anpa1200/vulnerable-cloud-lab
- Preserved media: 6 article image(s), including screenshots and infographics where present.
- Preserved technical blocks: 41 code/configuration block(s).
Ecosystem Fit
This page mirrors the original Medium lab content into the 1200km knowledge base so it remains available inside the 1200km.com documentation ecosystem. Use the linked repository when one exists; otherwise use the deployment commands and configuration blocks preserved below as the lab source of truth.
Deployment Requirements
The full prerequisites, deployment flow, validation commands, screenshots, and operational notes are preserved from the article below. Review the repository metadata above first, then follow the article sections in order.
A complete, step-by-step guide to deploying intentionally misconfigured cloud resources for hands-on security training on GCP and AWS.

Introduction
This guide walks you through building a comprehensive vulnerable cloud lab environment using Terraform. The included deployment wizard supports both Google Cloud Platform (GCP) and Amazon Web Services (AWS). The lab includes intentionally misconfigured resources designed for cloud penetration testing training.
⚠️**WARNING:**This lab contains intentional vulnerabilities. Only deploy in isolated test environments with proper authorization.
What You’ll Build
The lab deploys a collection of intentionally vulnerable cloud services designed for penetration testing and red team training. The exact resources depend on the chosen provider, but both deployments include:
-
A vulnerable web application (DVWA) exposed to the public internet
-
Overprivileged compute identity / service account (owner/admin privileges)
-
Public storage bucket hosting secrets and private keys
-
A vulnerable serverless function (SSRF, RCE, env dump, path traversal)
-
Hardcoded credentials and exposed secrets
-
An information disclosure page revealing internal endpoints and metadata
Provider-specific details:
-
**GCP:**Cloud Run service, Cloud Function, GCS bucket, IAM service account, Compute Engine VM.
-
**AWS:**EC2 instance running DVWA, Lambda function + Function URL, S3 bucket, IAM role, Secrets Manager secret.
**Estimated Time:**30–45 minutes
Estimated Cost:~$12–15/month (depends on region and resource usage)
Table of Contents
-
Introduction
-
Prerequisites
-
Local Environment Setup
-
Deployment Process
-
Wizard Walkthrough
-
Verification
-
Accessing the Lab
-
Cleanup
Prerequisites
Required Accounts & Services
-
Google Cloud Platform account(for GCP deployment) — billing account required, butyou do not need to set it up manually; the wizard handles everything
-
Amazon Web Services accountwith billing enabled (for AWS deployment)
-
Permission to create projects/resources or equivalent IAM permissions in the target account
Local Machine Requirements
-
Linux, macOS, or Windows with WSL
-
Internet connection
-
Terminal / command line access
Required Software
1. Google Cloud SDK ( gcloud )
Linux
curl https://sdk.cloud.google.com | bash
exec
 -l
$SHELL
# Verify
gcloud version
macOS
brew install
--cask
 google-cloud-sdk
WindowsDownload and run the installer from:https://cloud.google.com/sdk/docs/install
2. AWS CLI (optional, for AWS deployment)
Linux
curl
"https://awscli.amazonaws.com/awscli-exe-linux-x86_64.zip"
 -o
"awscliv2.zip"
unzip awscliv2.zip
sudo ./aws/install
aws --version
macOS
brew install awscli
WindowsDownload and install from:https://docs.aws.amazon.com/cli/latest/userguide/getting-started-install.html
3. Terraform
Linux
wget https://releases.hashicorp.com/terraform/1.6.0/terraform_1.6.0_linux_amd64.zip
unzip terraform_1.6.0_linux_amd64.zip
sudo
mv
 terraform /usr/local/bin/
rm
 terraform_1.6.0_linux_amd64.zip
terraform version
macOS
brew install terraform
WindowsDownload from:https://www.terraform.io/downloads
4. Git
# Linux
sudo apt-
get
 install git
# Debian/Ubuntu
sudo yum install git
# RHEL/CentOS
# macOS
brew install git
git --version
5. Zip Utility (Cloud Function packaging)
Linux
sudo apt-
get
 install zip
macOS(usually pre-installed)
Windows: Use built-in compression or 7-Zip.
Local Environment Setup
Clone the Lab Repository
git
clone
 https://github.com/anpa1200/vulnerable-cloud-lab.git
cd
 vulnerable-cloud-lab
(Optional) Clone the Scanner Repo
The deploy script auto-detects~/cloud_audit, but you can clone it explicitly:
git
clone
 https://github.com/anpa1200/stratus-ai.git ~/cloud_audit
Deployment Process
Quick Deploy (recommended)
The wizard handleseverything— account selection, project creation, billing setup, API enablement, and Terraform execution. No manualgcloudor console steps are required.
bash scripts/deploy.sh
Wizard Walkthrough
When you runbash scripts/deploy.shthe wizard guides you through these steps in order:
Step 1 — Cloud Provider
Which cloud provider would you
like

to
 deploy the lab
to
?

1
) Google Cloud Platform (GCP)

2
) Amazon Web Services (AWS)
Choose [1/2] (default 1):
Select1for GCP or2for AWS. The remaining steps below apply to theGCPpath.
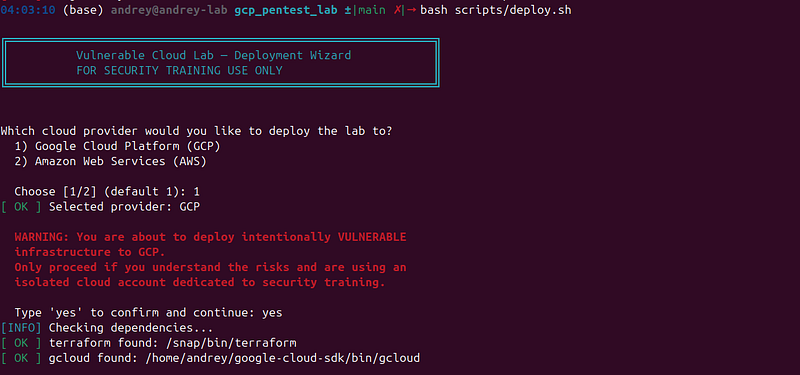
Step 2 — Google Cloud Account
The wizard lists everygcloudaccount stored on your machine (service accounts are hidden) and marks the currently active one with*:
Google Cloud Account:
  Authenticated accounts:

1
)   alice
@gmail
.com

2
)
*
 bob
@company
.com

3
)
Add

/
 login
with
 a different account
Choose account [2]:
-
PressEnterto keep the active account.
-
Type a number to switch to a different authenticated account — ADC is automatically refreshed to match.
-
Choose the last option to open a browser login and add a new account on the spot.
> No manual gcloud auth login or gcloud auth application-default login needed.
Step 3 — GCP Project
GCP Project Setup:
  Previously used project: my
-
old
-
lab
-20240101
   ← shown if terraform.tfvars
exists

1
) Use existing project

2
)
Create

new
 project
Choose [1/2] (default 1):
This menualways appears, even if aterraform.tfvarsis already present from a previous run.
Option 1 — Use an existing project
Existing

GCP

project
:

GCP

Project

ID

[my-old-lab-20240101]
:
Press Enter to reuse the previous project, or type a different ID. The wizard verifies the project exists before continuing.
Option 2 — Create a new project
Create
 a
new
 GCP project:

New
 Project ID (globally
unique
, e.g. mylab
-20260313
):
After you enter the ID the wizard:
-
Runs
gcloud projects create— the project is created and set as default. -
Enables theService Usage APIon the new project (required before billing can be attached).
-
Grants
serviceusage.serviceUsageConsumerandserviceusage.serviceUsageAdminIAM roles to your account.
Then it immediately moves to the billing step below.
Step 4 — Billing Account (new projects only)
For anewly created projectthe wizard always shows the billing account picker. For existing projects it only shows it if no billing account is linked yet.
New
 project requires a billing account.
Please
select
 a billing account
to
 link
to
 project my-
new
-lab-
20260313
:
  Available billing accounts:
  ─────────────────────────────────────────────────────────────────────
   1)  My Billing Account                  0176F6-B2A4F5-E88DG1  [open]
   2)  Team Budget                         A3B2C3-D4E5F6-G7H8M3  [open]
  ─────────────────────────────────────────────────────────────────────
Select billing account [1]:
Type the number and press Enter. The wizard links the selected billing account to the project automatically.
If no billing accounts are listed
This means your Google account lacksbilling.accounts.listpermission. The wizard shows:
[WARN]
 No billing accounts visible for: you@example.com
  To grant yourself Billing Account Viewer so the list shows up,
  ask a billing admin to run:
    gcloud beta billing accounts add-iam-policy-binding <BILLING_ACCOUNT_ID> \
      --member="user:you@example.com" --role="roles/billing.viewer"
  Or enter the billing account ID directly. Format: XXXXXX-XXXXXX-XXXXXX
  (find it at
https://console.cloud.google.com/billing)
Billing account ID (or leave empty to abort):
You can paste the billing account ID directly (with or without thebillingAccounts/prefix — both are accepted).
If the link fails with permission denied
The wizard shows a ready-to-run command for the billing admin to grant youroles/billing.user:
gcloud beta billing accounts
add
-iam-policy-binding XXXXXX-XXXXXX-XXXXXX \
  --member=
"user:you@example.com"
 --role=
"roles/billing.user"
After the admin runs it (or you link manually in the GCP Console), press Enter to continue.
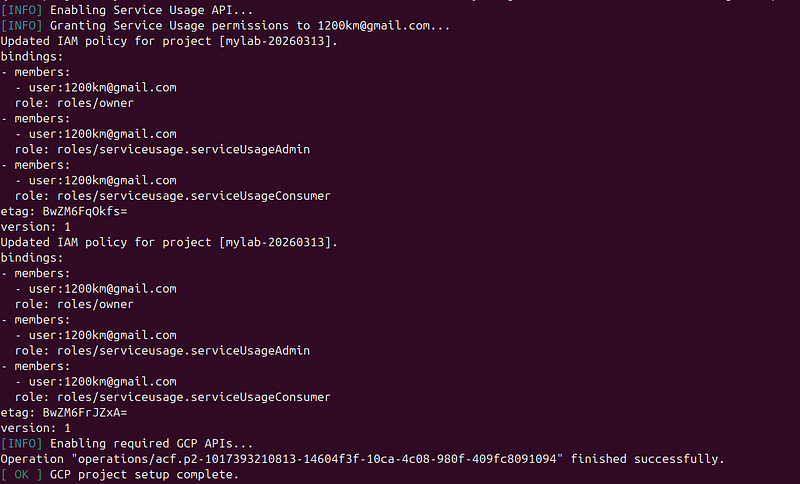
Step 5 — API Enablement & Permissions
The wizard enables all APIs required by Terraform and (re-)grants Service Usage roles. This step isidempotent— safe to run multiple times:
[INFO]
 Enabling Service Usage API...
[INFO]
 Granting Service Usage permissions
to
 you
@example
.com...
[INFO] Enabling required GCP APIs...
[ OK ] GCP project setup complete.
APIs enabled:compute,storage,iam,cloudresourcemanager,secretmanager,container,run,cloudfunctions,cloudbuild.
Step 6 — Terraform Init → Plan → Apply
The wizard runs the three Terraform stages automatically and prints the lab summary when done:
[INFO]
 Initialising Terraform...
[INFO]
 Creating Terraform plan...
[INFO]
 Applying Terraform plan...
[ OK ]
 Infrastructure deployed.
Deployment complete!
...
REMINDER: Run 'bash scripts/cleanup.sh' when finished to avoid unexpected cloud charges.

Verification
bash scripts/verify.sh
The script asks which provider you deployed and then validates:
-
DVWA web server access + info disclosure
-
Vulnerable function (RCE, SSRF, env dump, path traversal)
-
Public bucket secrets and keys
Web Server & DVWA
WEB_IP
=$(terraform output -raw web_server_ip)
# Visit in your browser:
# http://$WEB_IP/
DVWA credentials:
-
**Username:**admin
-
**Password:**password
Storage Bucket
BUCKET=$(terraform output -raw vulnerable_bucket_name)
gsutil
ls
 gs://
$BUCKET
/
gsutil
cat
 gs://
$BUCKET
/secrets/database-credentials.json
Cloud Function
FUNCTION_URL=
$(terraform output -raw cloud_function_url)
curl
"$FUNCTION_URL?env=1"
Cloud Run
CLOUD_RUN_URL=
$(terraform output -raw cloud_run_url)
curl $CLOUD_RUN_URL

Accessing the Lab
GCP (Cloud Run / Cloud Function / Compute)
The web server exposes aninfo.phppage with internal service URLs:
http://<WEB_IP>/info.php

SSH into the instance:
gcloud compute ssh $(terraform output -raw web_server_name) \
  --zone=$(terraform output -raw zone) \
  --project=$(terraform output -raw project_id)
AWS (EC2 / Lambda)
dvwa_url=$(terraform -
chdir
=terraform/aws output -raw dvwa_url)
echo

"DVWA:
$dvwa_url
"
# Info page: ${dvwa_url}info.php
Cleanup
Destroy everything when you’re done:
cd
 vulnerable-cloud-lab
bash scripts/cleanup.sh
Summary Checklist
-
GCP or AWS account available
-
gcloudand/orawsCLI installed -
Terraform installed
-
Repo cloned
-
bash scripts/deploy.shcompleted (wizard handles all GCP setup automatically) -
bash scripts/verify.shconfirms vulnerabilities are reachable -
Lab destroyed when finished (
bash scripts/cleanup.sh)