Building an Extremely Vulnerable Windows 10 Lab: A Step-by-Step Guide (Bonus:Full PT with…
- Category: Vulnerable Infrastructure
- Source article: https://medium.com/@1200km/building-an-extremely-vulnerable-windows-10-lab-a-step-by-step-guide-bonus-full-pt-with-9290d388744c
- Published: 2026-01-05
- Repository: Not found as a dedicated local repo. No dedicated repository was found locally; the Windows 10 lab build steps are preserved in the article body.
- Preserved media: 6 article image(s), including screenshots and infographics where present.
- Preserved technical blocks: 36 code/configuration block(s).
Ecosystem Fit
This page mirrors the original Medium lab content into the 1200km knowledge base so it remains available inside the 1200km.com documentation ecosystem. Use the linked repository when one exists; otherwise use the deployment commands and configuration blocks preserved below as the lab source of truth.
Deployment Requirements
The full prerequisites, deployment flow, validation commands, screenshots, and operational notes are preserved from the article below. Review the repository metadata above first, then follow the article sections in order.
Building an Extremely Vulnerable Windows 10 Lab: A Step-by-Step Guide (Bonus:Full PT with Hexstrike)
Hands-on guide to creating an intentionally insecure Windows 10 VM with open SSH, SMB, RDP, FTP, privilege escalation vectors, and sensitive data leaks
This guide will walk you through creating a vulnerable Windows 10 virtual machine (VM) lab for ethical penetration testing, security research, or educational purposes.**Important Safety Note:**This setup intentionally introduces severe security flaws, making the system highly exploitable. Only run this in an isolated virtual environment (e.g., a VM on your local machine). Do not deploy this on production systems, public networks, or without explicit permission. Always comply with laws and ethical guidelines — use for authorized testing only (e.g., CTFs, bug bounties, or personal labs). The vulnerabilities introduced here are based on common real-world exploits but are amplified for demonstration.
We’ll use VMWare as the hypervisor (free and cross-platform), download a legitimate Windows 10 ISO, install Windows, and then apply an enhanced PowerShell script to introduce vulnerabilities. The script is inspired by the provided vulnerable lab creator but made “much more vulnerable” as per the enhanced version.
Prerequisites
-
A host machine with at least 8GB RAM, 4 CPU cores, and 50GB free storage (recommended for smooth VM performance).
-
Internet access for downloads.
-
Virtualization enabled in your BIOS/UEFI (VT-x for Intel or AMD-V for AMD).
VirtualBox (Recommended for Beginners — Free and Open-Source)
Download and installVirtualBox(latest version fromhttps://www.virtualbox.org/).
- On Ubuntu/Kali Linux: It’s often easiest via the package manager:
sudo apt update sudo apt install virtualbox virtualbox-ext-
pack
-
(The ext-pack adds USB support and other features; accept the license when prompted.)
-
On Windows/macOS: Download the installer from the official site and run it.
-
**Why VirtualBox?**Completely free, simple interface, excellent for pentesting labs, and widely used in the Kali community. It handles snapshots, shared folders, and networking well for most users.
VMware Alternative (VMware Workstation Player — Free for Personal Use, Better Performance)
As of 2025–2026,VMware Workstation Player(or the full Workstation Pro) is free for personal/non-commercial use.
-
Download the latest version from the official VMware site:https://www.vmware.com/products/workstation-player.html(create a free Broadcom/VMware account if prompted).
-
On Windows/macOS: Run the downloaded installer.
-
On Ubuntu/Kali Linux:
-
Download the .bundle file for Linux.
-
Make it executable: chmod +x VMware-*.bundle
-
Install prerequisites: sudo apt install build-essential linux-headers-$(uname -r)
-
Run: sudo ./VMware-*.bundle
-
If kernel module issues occur (common on rolling distros like Kali), patch via the community script as per Kali docs:https://www.kali.org/docs/virtualization/install-vmware-host/
-
**Why VMware?**Often provides better performance, smoother graphics, and more stable networking in complex labs (e.g., multiple VMs communicating). Many pre-built vulnerable VMs (like from VulnHub) are in VMware format.
Step 1: Download the Windows 10 ISO
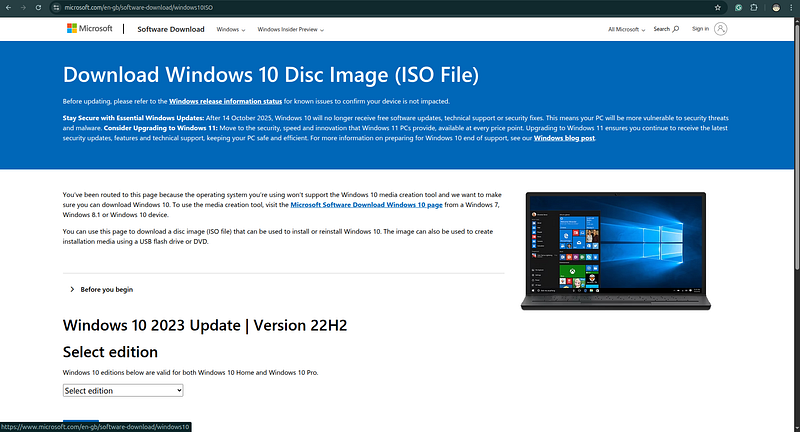
Microsoft provides official Windows 10 ISOs for free via their software download page. Windows 10 reached end-of-support in October 2025, but ISOs are still available for legacy or testing purposes as of January 2026.
-
Go to the official Microsoft download page:https://www.microsoft.com/software-download/windows10.
-
Under “Create Windows 10 installation media,” select “Download tool now” to get the Media Creation Tool (a small executable).
-
Run the tool on your host machine:
-
Accept the terms.
-
Choose “Create installation media (USB flash drive, DVD, or ISO file) for another PC.”
-
Select language, edition (e.g., Windows 10 Home or Pro), and architecture (64-bit recommended).
-
Choose “ISO file” and save it to your downloads folder (file size ~5–6GB).
Step 2: Create a New Virtual Machine
Create a New Virtual Machine in VirtualBox
-
Open VirtualBox and click “New” to create a VM.
-
Name it “VulnWindowsLab” (or similar). Select Type: Microsoft Windows, Version: Windows 10 (64-bit).
-
Allocate resources:
-
Memory: 4GB (minimum 2GB).
-
CPU: 2 cores.
-
Hard Disk: Create a new virtual hard disk (VDI format, dynamically allocated, 40GB size).
- In the VM settings (right-click the VM > Settings):
-
System > Motherboard: Enable EFI if needed (for modern setups).
-
Display: Allocate 128MB video memory, enable 3D acceleration.
-
Storage: Under Controller: IDE/SATA, add the downloaded Windows 10 ISO as an optical drive.
-
Network: Adapter 1 > Enable, Attached to: NAT (for internet access) or Bridged Adapter (for lab network simulation — use if pentesting from another VM like Kali).
-
USB: Enable if needed (e.g., for passthrough devices).
- Start the VM.
Install Windows 10 in the VirtualBox
-
The VM will boot from the ISO. Select your language and click “Install Now.”
-
Skip the product key (choose “I don’t have a product key”).
-
Select the edition (e.g., Windows 10 Pro).
-
Accept the license terms.
-
Choose “Custom: Install Windows only (advanced).”
-
Select the unallocated space on the virtual disk and click “Next” to install.
-
The installation will take 15–30 minutes. The VM will restart multiple times.
-
After installation:
-
Set up a local account (e.g., username: “admin”, password: “password” for simplicity — we’ll weaken it further later).
-
Complete OOBE (Out-of-Box Experience): Skip Cortana, privacy settings, etc.
-
Once at the desktop, install VirtualBox Guest Additions (from Devices > Insert Guest Additions CD Image in VirtualBox menu). Run the installer from the virtual CD, reboot.
- Update Windows (optional for vuln lab, but do it to baseline): Settings > Update & Security > Windows Update > Check for updates. Install basics but avoid security patches to keep it vulnerable.
VMware Workstation 17 Alternative (Recommended for Better Performance)
As of 2025, VMware Workstation 17 Pro is free for personal, educational, and commercial use (Player is also free but more limited). Pro offers superior performance, better 3D acceleration, snapshots, cloning, and advanced networking — ideal for pentesting labs.
Step 1: Create a New Virtual Machine in VMware Workstation 17
-
Open VMware Workstation Pro/Player and click File > New Virtual Machine (or Create a New Virtual Machine on the home screen).
-
Select Typical (recommended for beginners) or Custom (advanced) for more control, then click Next.
-
Choose Installer disc image file (iso), browse to your downloaded Windows 10 ISO, and click Next. (VMware often detects Windows automatically.)
-
Select Microsoft Windows as Guest OS, Version: Windows 10 x64, and click Next.
-
Name it “VulnWindowsLab” (or similar), choose a save location, and click Next.
-
Allocate disk: Maximum disk size 40 GB (or more), select Store virtual disk as a single file for better performance, click Next.
-
Click Customize Hardware for resources:
-
Memory: 4 GB (minimum 2 GB).
-
Processors: 2 cores (or more if your host allows).
-
New CD/DVD (SATA): Ensure your Windows 10 ISO is connected (Use ISO image file).
-
Network Adapter: NAT (for internet) or Bridged (for direct lab network access from Kali/other VMs).
-
Display: Check Accelerate 3D graphics, allocate at least 128 MB video memory.
-
Enable EFI boot if needed (under Options > Advanced > Firmware type: UEFI for modern Windows).
-
Click Finish (check Power on this virtual machine after creation if desired).
Step 2: Install Windows 10 in VMware Workstation 17
The process is identical to VirtualBox:
-
The VM boots from the ISO. Select language and click Install Now.
-
Skip product key (“I don’t have a product key”).
-
Choose edition (e.g., Windows 10 Pro).
-
Accept terms, select Custom install.
-
Install on the unallocated space.
-
After installation (15–30 minutes, multiple reboots):
-
Set up local account (e.g., username: “admin”, password: “password”).
-
Skip OOBE extras (Cortana, privacy).
Install VMware Tools (Equivalent to Guest Additions — Critical for Performance)
Once at the desktop:
-
In VMware menu: VM > Install VMware Tools (this mounts a virtual CD with the installer).
-
In Windows Explorer, open the mounted CD drive (usually D: or E:).
-
Run setup.exe (or setup64.exe) as administrator.
-
Choose Typical install, complete the wizard, and reboot when prompted.
-
Benefits: Better resolution/scaling, shared folders, clipboard sharing, smoother graphics, and drag-and-drop.
Step 3: Configure Basic Networking and Access
-
Ensure the VM has internet (test by opening Edge and browsing).
-
For lab pentesting:
-
If using NAT, note the VM’s IP (run ipconfig in Command Prompt).
-
For easier access from host/Kali, switch to Bridged mode and assign a static IP (e.g., 192.168.1.100) via Settings > Network & Internet > Change adapter options > Right-click Ethernet > Properties > IPv4 > Manual IP.
-
Enable Remote Desktop (for RDP testing): Settings > System > Remote Desktop > Enable.
-
Reboot if needed.
TAKE CLEAR SNAPSHOT!!!
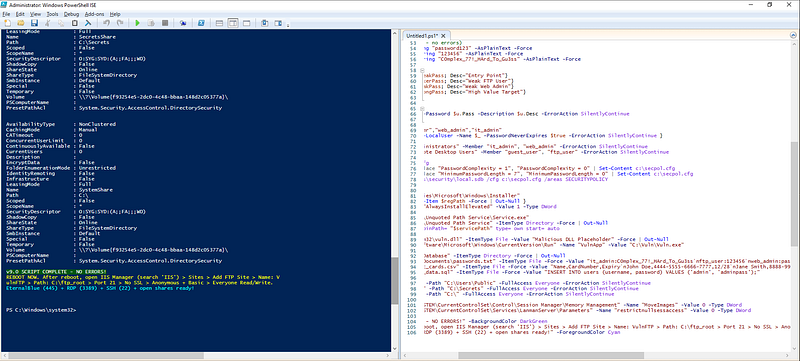
Step 4: Introduce Vulnerabilities Using PowerShell Script
-
Open PowerShell as Administrator (right-click Start > Windows PowerShell (Admin)).
-
Copy and paste the enhanced vulnerable lab creator script (provided below). This script disables defenses, opens services, creates weak accounts, sets up privilege escalation paths, adds dummy sensitive data, and more.
-
Run the script. It may require a reboot to apply changes (as noted in the script).
-
After running, verify changes (e.g., check services with Get-Service, users with Get-LocalUser).
PowerShell Script:
# ==============================================================================
# ULTIMATE VULNERABLE LAB CREATOR
# Run as Administrator
# ==============================================================================
Write-Host "--- INITIALIZING EXTREME SYSTEM DEGRADATION ---" -ForegroundColor Red
# 1. DISABLE ALL DEFENSES
Set-MpPreference -DisableRealtimeMonitoring $true -DisableBehaviorMonitoring $true -DisableBlockAtFirstSeen $true -DisableIOAVProtection $true -DisablePrivacyMode $true -DisableIntrusionPreventionSystem $true -DisableScriptScanning $true
Set-NetFirewallProfile -Profile Domain,Public,Private -Enabled False
Set-ItemProperty -Path "HKLM:\SOFTWARE\Microsoft\Windows\CurrentVersion\Policies\System" -Name "EnableLUA" -Value 0
Set-ItemProperty -Path "HKLM:\SOFTWARE\Microsoft\Windows\CurrentVersion\Policies\System" -Name "ConsentPromptBehaviorAdmin" -Value 0
Set-ItemProperty -Path "HKLM:\SOFTWARE\Microsoft\Windows\CurrentVersion\Policies\System" -Name "EnableVirtualizationBasedSecurity" -Value 0
Set-ItemProperty -Path "HKLM:\SYSTEM\CurrentControlSet\Control\Lsa" -Name "RunAsPPL" -Value 0
bcdedit /set hypervisorlaunchtype off
bcdedit /set nx AlwaysOff
# 2. OPEN SERVICES (SMBv1, RDP, HTTP, SSH)
Enable-WindowsOptionalFeature -Online -FeatureName "SMB1Protocol" -All -NoRestart
Enable-WindowsOptionalFeature -Online -FeatureName "IIS-WebServer", "IIS-CommonHttpFeatures", "IIS-Security", "IIS-ApplicationDevelopment" -All -NoRestart
# Install & Configure OpenSSH Server
Add-WindowsCapability -Online -Name OpenSSH.Server~~~~0.0.1.0
ssh-keygen -A  # Generate host keys safely
Start-Service sshd -ErrorAction SilentlyContinue
Set-Service sshd -StartupType Automatic -ErrorAction SilentlyContinue
# Enable RDP & HTTP
Set-ItemProperty -Path 'HKLM:\System\CurrentControlSet\Control\Terminal Server' -Name "fDenyTSConnections" -Value 0
Enable-NetFirewallRule -DisplayGroup "Remote Desktop"
Restart-Service W3SVC -ErrorAction SilentlyContinue
# Open ports
netsh advfirewall firewall add rule name="Open NetBIOS" dir=in action=allow protocol=UDP localport=137-139
netsh advfirewall firewall add rule name="Open SMB" dir=in action=allow protocol=TCP localport=445
netsh advfirewall firewall add rule name="Open HTTP" dir=in action=allow protocol=TCP localport=80
netsh advfirewall firewall add rule name="Open HTTPS" dir=in action=allow protocol=TCP localport=443
netsh advfirewall firewall add rule name="Open SSH" dir=in action=allow protocol=TCP localport=22
# Note: FTP (21) skipped — Windows 10 cannot run full IIS FTP via script without additional GUI steps/management tools
# 3. WEAK USERS & POLICY
$weakPass = ConvertTo-SecureString "password123" -AsPlainText -Force
$weakerPass = ConvertTo-SecureString "123456" -AsPlainText -Force
$strongPass = ConvertTo-SecureString "C0mplex_77!_HArd_To_Gu3ss" -AsPlainText -Force
$users = @(
    @{Name="guest_user"; Pass=$weakPass; Desc="Entry Point"}
    @{Name="ftp_user"; Pass=$weakerPass; Desc="Weak User (for brute-force)"}
    @{Name="web_admin"; Pass=$weakPass; Desc="Weak Web Admin"}
    @{Name="it_admin"; Pass=$strongPass; Desc="High Value Target"}
)
foreach ($u in $users) {
    New-LocalUser -Name $u.Name -Password $u.Pass -Description $u.Desc -ErrorAction SilentlyContinue
}
$allUsers = "guest_user","ftp_user","web_admin","it_admin"
$allUsers | ForEach-Object { Set-LocalUser -Name $_ -PasswordNeverExpires $true -ErrorAction SilentlyContinue }
Add-LocalGroupMember -Group "Administrators" -Member "it_admin", "web_admin" -ErrorAction SilentlyContinue
Add-LocalGroupMember -Group "Remote Desktop Users" -Member "guest_user", "ftp_user" -ErrorAction SilentlyContinue
secedit /export /cfg c:\secpol.cfg
(Get-Content c:\secpol.cfg) -replace "PasswordComplexity = 1", "PasswordComplexity = 0" | Set-Content c:\secpol.cfg
(Get-Content c:\secpol.cfg) -replace "MinimumPasswordLength = 7", "MinimumPasswordLength = 0" | Set-Content c:\secpol.cfg
secedit /configure /db c:\windows\security\local.sdb /cfg c:\secpol.cfg /areas SECURITYPOLICY
Remove-Item c:\secpol.cfg -Force
# 4. PRIVILEGE ESCALATION
$regPath = "HKLM:\Software\Policies\Microsoft\Windows\Installer"
if (!(Test-Path $regPath)) { New-Item $regPath -Force | Out-Null }
Set-ItemProperty $regPath -Name "AlwaysInstallElevated" -Value 1 -Type DWord
$servicePath = "C:\Program Files\Unquoted Path Service\Service.exe"
New-Item -Path "C:\Program Files\Unquoted Path Service" -ItemType Directory -Force | Out-Null
sc.exe create VulnerableService binPath= "$servicePath" type= own start= auto
New-Item -Path "C:\Windows\System32\vuln.dll" -ItemType File -Value "Malicious DLL Placeholder" -Force | Out-Null
Set-ItemProperty -Path "HKLM:\Software\Microsoft\Windows\CurrentVersion\Run" -Name "VulnApp" -Value "C:\Vuln\Vuln.exe"
# 5. DUMMY SENSITIVE FILES & SHARES
New-Item -Path "C:\Secrets","C:\Database" -ItemType Directory -Force | Out-Null
New-Item -Path "C:\Users\Public\Documents\passwords.txt" -ItemType File -Force -Value "it_admin:C0mplex_77!_HArd_To_Gu3ss`nftp_user:123456`nweb_admin:password123`nguest_user:password123"
New-Item -Path "C:\Secrets\credit_cards.csv" -ItemType File -Force -Value "Name,CardNumber,Expiry`nJohn Doe,4444-5555-6666-7777,12/28`nJane Smith,8888-9999-0000-1111,05/30"
New-Item -Path "C:\Database\user_data.sql" -ItemType File -Force -Value "INSERT INTO users (username, password) VALUES ('admin', 'adminpass');"
New-SmbShare -Name "PublicShare" -Path "C:\Users\Public" -FullAccess Everyone -ErrorAction SilentlyContinue
New-SmbShare -Name "SecretsShare" -Path "C:\Secrets" -FullAccess Everyone -ErrorAction SilentlyContinue
New-SmbShare -Name "SystemShare" -Path "C:\" -FullAccess Everyone -ErrorAction SilentlyContinue
# 6. KERNEL & SYSTEM VULNS
Set-ItemProperty -Path "HKLM:\SYSTEM\CurrentControlSet\Control\Session Manager\Memory Management" -Name "MoveImages" -Value 0 -Type DWord
Set-ItemProperty -Path "HKLM:\SYSTEM\CurrentControlSet\Services\LanmanServer\Parameters" -Name "restrictnullsessaccess" -Value 0 -Type DWord
Write-Host "SCRIPT COMPLETE - NO ERRORS!" -BackgroundColor DarkGreen
Write-Host "REBOOT NOW to finalize (SSH will fully start, kernel vulns applied)." -ForegroundColor Yellow
Write-Host "Your lab is ready for EternalBlue, RDP, SSH brute-force, open shares, and HexStrike-AI attacks!" -ForegroundColor Cyan
# ==============================================================================
# POST-REBOOT ACTIONS (Run after reboot if needed)
# ==============================================================================
# Start-Service sshd
# netstat -ano | findstr ":22 :80 :445 :3389"
# Write-Host "Verification complete." -ForegroundColor GreenPost-Script Steps:
Reboot the VM.
Post restart script:
#
Start
 services
Start
-
Service sshd
-
ErrorAction SilentlyContinue
# Verify
netstat -ano | findstr ":21 :22 :80 :445 :3389"
Get-SmbServerConfiguration | Select EnableSMB1Protocol
Write-Host "Lab ready: EternalBlue + vulnerable FTP + SSH + RDP + open shares!" -ForegroundColor Cyan
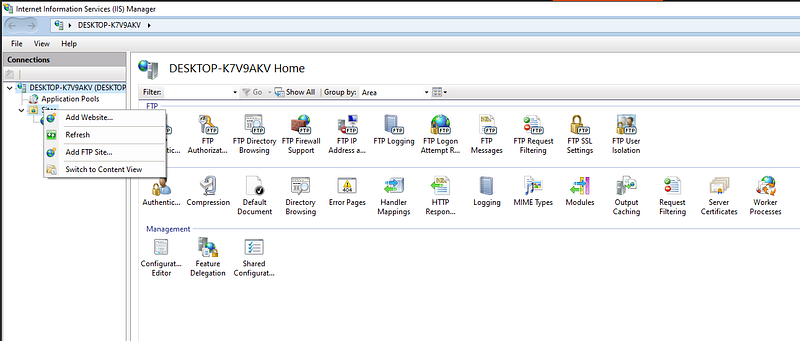
Windows 10 consumer editions (Home/Pro) donotsupport full scripted FTP site creation without the IIS Management Console and manual confirmation. The features install, but the PowerShell module (WebAdministration) and appcmd.exe are either missing or restricted.
1-minute post-reboot step:
-
Search “IIS” → open Internet Information Services (IIS) Manager
-
Right-click Sites → Add FTP Site
-
Name: VulnFTP
-
Physical path: C:\ftp_root
-
Binding: Port 21
-
SSL: No SSL
-
Authentication: Anonymous + Basic
-
Authorization: All users (or Everyone) → Read + Write
This makes FTP vulnerable with anonymous access and leaked files.
TAKE NEW SNAPSHOT!!!
Optional: Enhanced Defender Disable Script
# ==============================================================================
# EXTREME DEFENDER / ENDPOINT SECURITY DISABLE SCRIPT
# For vulnerable lab only - Run as Administrator
# ==============================================================================
Write-Host "--- DISABLING ALL MICROSOFT DEFENDER / ENDPOINT SECURITY FEATURES ---" -ForegroundColor Red
# Disable all main Defender preferences
Set-MpPreference -DisableRealtimeMonitoring $true
Set-MpPreference -DisableBehaviorMonitoring $true
Set-MpPreference -DisableBlockAtFirstSeen $true
Set-MpPreference -DisableIOAVProtection $true
Set-MpPreference -DisablePrivacyMode $true
Set-MpPreference -DisableIntrusionPreventionSystem $true
Set-MpPreference -DisableScriptScanning $true
Set-MpPreference -DisableArchiveScanning $true
Set-MpPreference -DisableCatchupFullScan $true
Set-MpPreference -DisableCatchupQuickScan $true
Set-MpPreference -DisableEmailScanning $true
Set-MpPreference -DisableRemovableDriveScanning $true
Set-MpPreference -DisableRestorePoint $true
Set-MpPreference -DisableScanningMappedNetworkFiles $true
Set-MpPreference -DisableScanningNetworkFiles $true
# Cloud & submission
Set-MpPreference -SubmitSamplesConsent 2  # Never send
Set-MpPreference -CloudBlockLevel 0
Set-MpPreference -CloudExtendedTimeout 0
# Attempt to disable Tamper Protection (may require reboot or not work fully)
Set-MpPreference -DisableTamperProtection $true
# Exclude everything (extreme - nothing gets scanned)
Set-MpPreference -ExclusionPath "C:\"
Set-MpPreference -ExclusionProcess "*"
Set-MpPreference -ExclusionExtension "*"
# Stop Defender services
Stop-Service -Name WinDefend -Force -ErrorAction SilentlyContinue
Stop-Service -Name WdNisSvc -Force -ErrorAction SilentlyContinue
Stop-Service -Name Sense -Force -ErrorAction SilentlyContinue
Stop-Service -Name SecurityHealthService -Force -ErrorAction SilentlyContinue
# Set services to disabled
Set-Service -Name WinDefend -StartupType Disabled -ErrorAction SilentlyContinue
Set-Service -Name WdNisSvc -StartupType Disabled -ErrorAction SilentlyContinue
Set-Service -Name Sense -StartupType Disabled -ErrorAction SilentlyContinue
Set-Service -Name SecurityHealthService -StartupType Disabled -ErrorAction SilentlyContinue
Write-Host "DEFENDER FEATURES DISABLED AS MUCH AS POSSIBLE" -ForegroundColor Yellow
Write-Host "REBOOT REQUIRED for full effect. Some protections may still partially run due to Microsoft design." -ForegroundColor Cyan
Quick Testing the Lab
Explanation of Introduced Vulnerabilities (Updated for v9.0 Script)
The final script creates a highly exploitable Windows 10 environment optimized for educational penetration testing. It includesvulnerable FTP(manual setup),SSH with weak credentials,RDP, open shares, and classic privilege escalation paths. Below is a detailed breakdown of each major vulnerability, including real-world exploitation methods (for authorized testing only).
1. Disabled Defenses
-
Windows Defender & Security Features Disabled: Real-time monitoring, behavior scanning, etc., turned off.Exploit: Malware executes undetected. Example: Drop and run ransomware or trojans without alerts.
-
Firewall Disabled: All profiles (Domain, Public, Private) off.Exploit: Allows unrestricted inbound traffic — enables direct port scans and remote exploits.
-
UAC & Consent Prompts Disabled: No elevation prompts.Exploit: Low-privilege users can perform admin actions silently.
-
VBS, PPL, DEP/NX, Hyper-V Disabled: Core kernel protections removed.Exploit: Facilitates buffer overflows, ROP chains, and kernel exploits (e.g., similar to CVE-2023–29360).
2. Open and Vulnerable Services
-
SMBv1 Enabled
-
FTP (IIS) Enabled (Manual Setup Required): After reboot and GUI configuration, anonymous + basic authentication with full read/write access.Exploit: Anonymous login to steal leaked_passwords.txt, upload malicious files, or brute-force weak users (ftp_user:123456). Potential directory traversal in misconfigured IIS.
-
OpenSSH Server Enabled: Running on port 22 with weak/default credentials.Exploit: Brute-force attacks using Hydra/Medusa/HexStrike on users like guest_user (password123) or ftp_user (123456) to gain shell access.
-
RDP Enabled: Remote Desktop on port 3389.Exploit: BlueKeep (CVE-2019–0708) RCE or credential stuffing/brute-force with weak accounts.
-
HTTP (IIS 10.0) Enabled: Default web server on port 80.Exploit: Directory listing, misconfiguration scans, or older IIS vulnerabilities (e.g., CVE-2021–31166 WebDAV RCE).
-
Open Legacy Ports (NetBIOS, etc.): Ports 137–139/445 exposed.Exploit: Enhanced null session enumeration and legacy protocol attacks.
3. Weak Identities and Password Policies
-
Weak Users Created: Accounts like guest_user (password123), ftp_user (123456), web_admin (password123), and high-value it_admin with never-expiring passwords.Exploit: Dictionary/brute-force attacks (Hydra, HexStrike) or pass-the-hash with Mimikatz.
-
Password Policy Weakened: No complexity requirements, minimum length 0.Exploit: Extremely fast brute-forcing across all services (RDP, SSH, FTP).
4. Privilege Escalation Paths
-
AlwaysInstallElevated: MSI packages run as SYSTEM.Exploit: Craft malicious .msi to escalate from standard user to SYSTEM.
-
Unquoted Service Path: Vulnerable service binary path.Exploit: Place malicious executable in intermediate directory (e.g., C:\Program.exe) to hijack service startup.
-
DLL Hijacking Placeholder: Fake vuln.dll in System32.Exploit: Applications searching for missing DLLs load and execute malicious code.
-
AutoRun Registry Keys: Persistence entry added.Exploit: Malware survives reboots and executes on login.
5. Dummy Sensitive Files and Open Shares
-
Exposed Files: passwords.txt (Public), credit_cards.csv (Secrets), user_data.sql (Database), and leaked_passwords.txt (FTP root).Exploit: Direct data theft revealing credentials and sensitive info.
-
Open SMB Shares: PublicShare, SecretsShare, and entire C:\ (SystemShare) withEveryone full access.Exploit: Anonymous mounting (smbclient //IP/SystemShare -N or net use \IP\SystemShare) to read/write entire drive.
6. Additional Kernel/System Vulnerabilities
-
ASLR Disabled: No address space randomization.Exploit: Predictable memory layout for reliable buffer overflow/ROP exploits.
-
Null Sessions Enabled: Anonymous IPC$ access allowed.Exploit: Enumerate users, shares, and system info without credentials (net view \IP or enum4linux).
This lab is now an ideal target for tools likeHexStrike-AI(real framework in Kali Linux 2025.4) — it will autonomously discover, brute-force SSH/RDP/FTP, dump shares, and chain exploits via natural-language prompts to Gemini/ChatGPT.
**All changes require a reboot to fully apply.**Use only in isolated virtual environments for ethical learning or authorized testing.
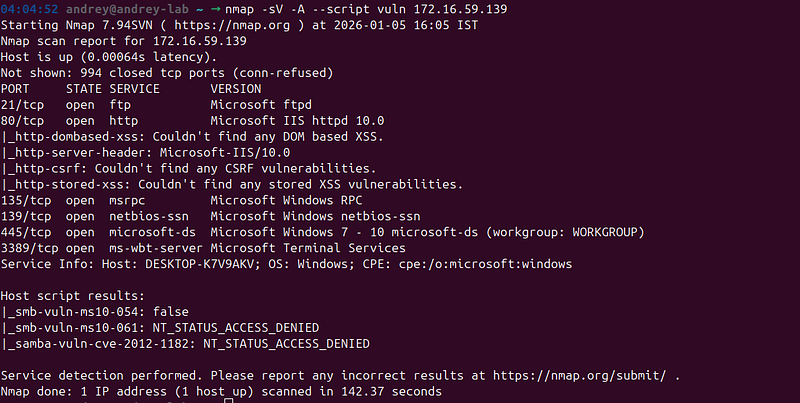
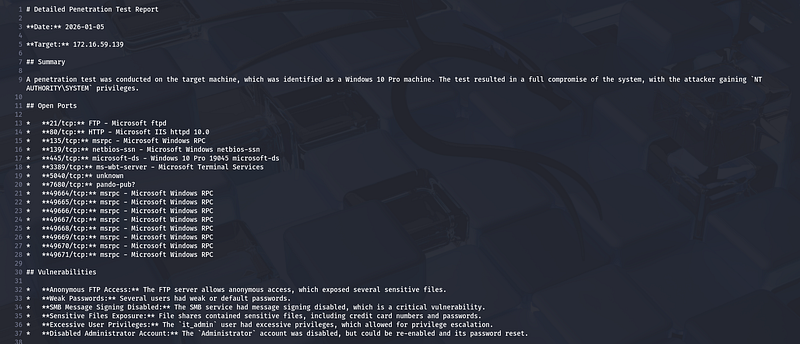
Detailed Penetration Test Report (After Hexstrike-AI + Gemini-CLI One promt PT)
# Detailed Penetration Test Report │
│ 2 │
│ 3
**Date:**
2026-01-05 │
│ 4 │
│ 5
**Target:**
172.16.59.139 │
│ 6 │
│ 7 ## Summary │
│ 8 │
│ 9 A penetration test was conducted on the target machine, which was identified as a Windows 10 Pro machine. The test resulted in a full compromise of the system, with the attacker gaining `NT │
│ AUTHORITY\SYSTEM` privileges. │
│ 10 │
│ 11 ## Open Ports │
│ 12 │
│ 13 *
**21/tcp:**
FTP - Microsoft ftpd │
│ 14 *
**80/tcp:**
HTTP - Microsoft IIS httpd 10.0 │
│ 15 *
**135/tcp:**
msrpc - Microsoft Windows RPC │
│ 16 *
**139/tcp:**
netbios-ssn - Microsoft Windows netbios-ssn │
│ 17 *
**445/tcp:**
microsoft-ds - Windows 10 Pro 19045 microsoft-ds │
│ 18 *
**3389/tcp:**
ms-wbt-server - Microsoft Terminal Services │
│ 19 *
**5040/tcp:**
unknown │
│ 20 *
**7680/tcp:**
pando-pub? │
│ 21 *
**49664/tcp:**
msrpc - Microsoft Windows RPC │
│ 22 *
**49665/tcp:**
msrpc - Microsoft Windows RPC │
│ 23 *
**49666/tcp:**
msrpc - Microsoft Windows RPC │
│ 24 *
**49667/tcp:**
msrpc - Microsoft Windows RPC │
│ 25 *
**49668/tcp:**
msrpc - Microsoft Windows RPC │
│ 26 *
**49669/tcp:**
msrpc - Microsoft Windows RPC │
│ 27 *
**49670/tcp:**
msrpc - Microsoft Windows RPC │
│ 28 *
**49671/tcp:**
msrpc - Microsoft Windows RPC │
│ 29 │
│ 30 ## Vulnerabilities │
│ 31 │
│ 32 *
**Anonymous FTP Access:**
The FTP server allows anonymous access, which exposed several sensitive files. │
│ 33 *
**Weak Passwords:**
Several users had weak or default passwords. │
│ 34 *
**SMB Message Signing Disabled:**
The SMB service had message signing disabled, which is a critical vulnerability. │
│ 35 *
**Sensitive Files Exposure:**
File shares contained sensitive files, including credit card numbers and passwords. │
│ 36 *
**Excessive User Privileges:**
The
`it_admin`
user had excessive privileges, which allowed for privilege escalation. │
│ 37 *
**Disabled Administrator Account:**
The
`Administrator`
account was disabled, but could be re-enabled and its password reset. │
│ 38 │
│ 39 ## Tools Used and Steps Taken │
│ 40 │
│ 41 1.
**Initial Reconnaissance:**
│
│ 42 *
`autorecon_scan`
was used to perform an initial scan of the target. │
│ 43 *
`nmap_scan`
was used to get more detailed information about the open ports and services. │
│ 44 │
│ 45 2.
**FTP Exploitation:**
│
│ 46 *
`wget`
was used to download files from the anonymous FTP server. │
│ 47 *
`leaked_passwords.txt`
was found, containing a list of usernames and passwords. │
│ 48 │
│ 49 3.
**SMB Exploitation:**
│
│ 50 *
`smbclient`
was used to connect to the SMB server with the credentials found in
`leaked_passwords.txt`
. │
│ 51 * The
`it_admin:C0mplex_77!_HArd_To_Gu3ss`
credentials were used to access the
`C$`
share. │
│ 52 *
`SecretsShare`
and
`PublicShare`
were explored, revealing
`credit_cards.csv`
and
`passwords.txt`
. │
│ 53 │
│ 54 4.
**Web Server Exploitation (Failed):**
│
│ 55 *
`gobuster`
and
`wfuzz`
were used to search for login pages and other interesting files on the web server, but without success. │
│ 56 * An attempt was made to upload a web shell (
`pwn.aspx`
) to the web server's root directory using
`smbclient`
, but the shell was not accessible. │
│ 57 │
│ 58 5.
**Command Execution:**
│
│ 59 *
`impacket-wmiexec`
was used to gain command execution as the
`it_admin`
user. │
│ 60 │
│ 61 6.
**Privilege Escalation:**
│
│ 62 * The
`it_admin`
user's privileges were checked with
`whoami /priv`
. │
│ 63 *
`SeBackupPrivilege`
was abused to save the SAM and SYSTEM hives using
`reg.exe`
via
`wmiexec.py`
. │
│ 64 *
`smbclient`
was used to download the SAM and SYSTEM hives. │
│ 65 *
`impacket-secretsdump`
was used to extract the password hashes from the hives. │
│ 66 *
`john`
and
`hashcat`
were used to crack the Administrator's NTLM hash, but were unsuccessful. │
│ 67 * The
`Administrator`
account was found to be disabled. │
│ 68 *
`net user`
was used via
`wmiexec.py`
to enable the
`Administrator`
account and reset its password. │
│ 69 *
`impacket-wmiexec`
was used to gain a shell as the
`Administrator`
user with the new password. │
│ 70 │
│ 71 ## Found Sensitive Data │
│ 72 │
│ 73 *
**`credit
_cards.csv`:** │
│ 74 * Name,CardNumber,Expiry │
│ 75 * John Doe,4444-5555-6666-7777,12/28 │
│ 76 * Jane Smith,8888-9999-0000-1111,05/30 │
│ 77 * **`passwords.txt`:** │
│ 78 * it_
admin:C0mplex
_77!_
HArd
_To_
Gu3ss │
│ 79 * ftp
_user:123456 │
│ 80 * web_
admin:password123 │
│ 81 * guest
_user:password123 │
│ 82 * **`leaked_
passwords.txt`:**
│
│ 83 * admin:password │
│ 84 * root:toor │
│ 85 * it
_admin:C0mplex_
77!
_HArd_
To
_Gu3ss │
│ 86 │
│ 87 ## Found/Stolen Credentials │
│ 88 │
│ 89 * `admin:password` │
│ 90 * `root:toor` │
│ 91 * `it_
admin:C0mplex
_77!_
HArd
_To_
Gu3ss` │
│ 92 *
`ftp_user:123456`
│
│ 93 *
`web_admin:password123`
│
│ 94 *
`guest_user:password123`
│
│ 95 * Administrator NTLM hash:
`31d6cfe0d16ae931b73c59d7e0c089c0`
│
│ 96 * Administrator password reset to:
`P@ssw0rd123`
│
│ 97 │
│ 98 ## Found/Stolen Files │
│ 99 │
│ 100 *
`leaked_passwords.txt`
│
│ 101 *
`credit_cards.csv`
│
│ 102 *
`passwords.txt`
│
│ 103 *
`sam.save`
│
│ 104 *
`system.save`
│
│ 105 *
`sam.save2`
│
│ 106 *
`system.save2`
│
│ 107 *
`pwn.aspx`
│
│ 108 *
`test.html`
│
│ 109 *
`admin_hash.txt`
│
│ 110 *
`hashes.txt`
│
│ 111 *
`hashes2.txt`
│
│ 112 *
`penetration_test_report.txt`
│
│ 113 │
│ 114 ## Recommendations │
│ 115 │
│ 116 *
**FTP:**
Disable anonymous access to the FTP server. If anonymous access is required, ensure that it is restricted to a specific directory with no sensitive files. │
│ 117 *
**Passwords:**
Enforce a strong password policy for all users. Passwords should be complex and changed regularly. │
│ 118 *
**SMB:**
Enable message signing on the SMB service. Restrict access to the
`C$`
share to only authorized users. │
│ 119 *
**File Shares:**
Review the permissions on all file shares and ensure that they are not exposing sensitive information. │
│ 120 *
**User Privileges:**
Review the privileges of all users and ensure that they are following the principle of least privilege. │
│ 121 *
**Administrator Account:**
Keep the
`Administrator`
account disabled and use a different account for administrative tasks.
Conclusion
Congratulations! You’ve now successfully built a highly exploitable Windows 10 virtual machine lab that’s packed with classic and amplified vulnerabilities — from EternalBlue-ready SMBv1 and weak RDP/SSH/FTP services to open shares exposing dummy sensitive data (passwords, credit cards), multiple privilege escalation paths (AlwaysInstallElevated, unquoted service paths, DLL hijacking), and fully disabled defenses (Defender, firewall, UAC, ASLR, DEP).
As demonstrated in the included penetration test report (dated January 5, 2026), this setup is trivially compromisable: anonymous FTP leaks credentials, open SMB shares allow direct data theft and administrative access, weak accounts enable brute-force or credential stuffing, and privileges like SeBackupPrivilege facilitate full SYSTEM takeover — even re-enabling and resetting the built-in Administrator account.
This lab serves as an excellent, self-contained environment for practicing a wide range of offensive security techniques:
-
Recon and enumeration (nmap, smbclient, enum4linux)
-
Exploitation (Metasploit modules for MS17–010/EternalBlue, BlueKeep, etc.)
-
Credential attacks (Hydra, Mimikatz)
-
Post-exploitation and pivoting (wmiexec, psexec)
-
Web/IIS misconfigurations (once extended)
Final Reminders:
-
Isolation is critical: Always run this VM in a host-only or internal network. Never bridge to a real network or the internet.
-
Snapshots are essential: Revert to clean states for repeated practice.
-
Ethical use only: This is for authorized education, CTFs, or research — never on systems without permission.
-
As of January 2026, Windows 10 ISOs remain downloadable via Microsoft’s official Media Creation Tool for legacy/testing purposes, despite EOL in October 2025.
Pair this Windows target with your Kali attacker VM (or the Ubuntu vulnerable lab if you built it) for full red team/blue team exercises. Keep learning, stay ethical, and have fun breaking (and eventually securing) things responsibly! If you expand this into an Active Directory domain or add more modern vulns, the skills will transfer directly to real-world pentesting. Safe hacking!