Deploy a Complete Active Directory PenTest Lab in One Prompt with Cursor AI
- Category: Active Directory
- Source article: https://medium.com/@1200km/deploy-a-complete-active-directory-pentest-lab-in-one-prompt-with-cursor-ai-ff926fd2b3fc
- Published: 2026-01-23
- Repository: Not found as a dedicated local repo. No dedicated repository was found locally; the generated AD lab files are preserved in the article body.
- Preserved media: 13 article image(s), including screenshots and infographics where present.
- Preserved technical blocks: 32 code/configuration block(s).
Ecosystem Fit
This page mirrors the original Medium lab content into the 1200km knowledge base so it remains available inside the 1200km.com documentation ecosystem. Use the linked repository when one exists; otherwise use the deployment commands and configuration blocks preserved below as the lab source of truth.
Deployment Requirements
The full prerequisites, deployment flow, validation commands, screenshots, and operational notes are preserved from the article below. Review the repository metadata above first, then follow the article sections in order.
How I automated the deployment of a complex AD lab environment using AI assistance

Setting up a penetration testing lab used to take days. Now it takes one prompt. Here’s how I deployed a complete Active Directory environment using Cursor AI, from scratch to fully functional in under 2 hours.
Manual Deployment Guide here
The Challenge
If you’ve ever tried to set up a penetration testing lab, you know the pain:
-
Download Windows ISOs(hours of waiting)
-
Install Windows Server(30–60 minutes per VM)
-
Configure Active Directory(multiple reboots, manual steps)
-
Set up DNS(more configuration)
-
Create users and groups(tedious manual work)
-
Fix networking issues(because there are always networking issues)
-
Troubleshoot(because something always breaks)
By the time you’re done, you’ve spentdayssetting up what should be a simple lab environment. And if something goes wrong? Start over.
There had to be a better way.
The Solution: One Prompt Deployment
I decided to leverage Cursor AI to automate everything. The goal:one prompt that deploys a complete, production-ready Active Directory lab from scratch.
Here’s how it works:
Step 1: Setup Your Environment
First, create a directory for the project and launch Cursor:
mkdir
 DC_simulator
cd
 DC_simulator
cursor .
This opens Cursor in the project directory, ready for our deployment prompt.
Step 2: The Magic Prompt
Now, here’s the prompt I used in Cursor. This single prompt contains all the instructions needed to deploy the complete lab:
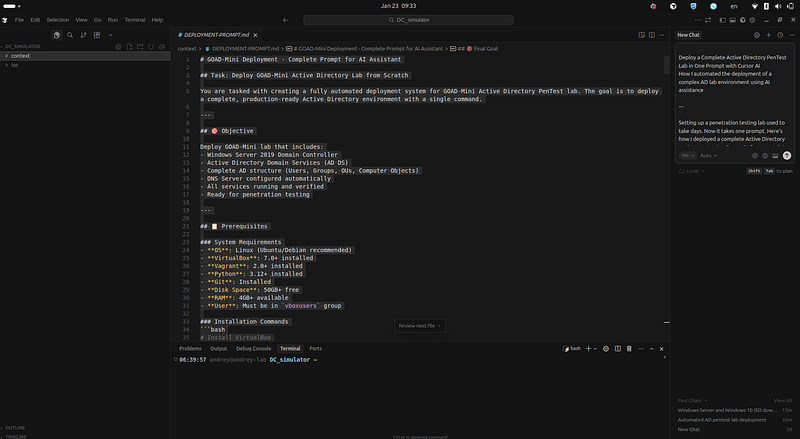
# GOAD-Mini Deployment - Enhanced Prompt with Real-Time Monitoring & Troubleshooting
## Task: Deploy GOAD-Mini Active Directory Lab with Full Automation
You

are

tasked

with

creating

a

**fully

automated

deployment

system**

for

GOAD-Mini

Active

Directory

PenTest

lab

with

**built-in

real-time

monitoring**

and

**automatic

troubleshooting**.

The

goal

is

to

deploy

a

complete,

production-ready

Active

Directory

environment

with

a

single

command

that

handles

all

errors

automatically.
---
## 🎯 Objective
Deploy GOAD-Mini lab that includes:
-

Windows

Server

2019
Domain

Controller
-

Active

Directory

Domain

Services

(AD

DS)
-

Complete

AD

structure

(Users,

Groups,

OUs,

Computer

Objects)
-

DNS

Server

configured

automatically
-

All

services

running

and

verified
-

Ready

for

penetration

testing
**With

Enhanced

Features:**
-

✅

Real-time

monitoring

of

deployment

progress
-

✅

Automatic

error

detection

and

recovery
-

✅

Self-healing

capabilities
-

✅

Progress

indicators

and

status

updates
-

✅

Automatic

troubleshooting

of

common

issues
-

✅

Resume

capability

from

failures
---
## 📋 Prerequisites
### System Requirements
-

**OS**:

Linux

(Ubuntu/Debian

recommended)
-

**VirtualBox**:

7.0
+

installed
-

**Vagrant**:

2.0
+

installed
-

**Python**:

3.12
+

installed
-

**Git**:

Installed
-

**Disk

Space**:

50GB+

free
-

**RAM**:

4GB+

available
-

**User**:

Must

be

in

`vboxusers`

group
### Installation Commands
```bash
# Install VirtualBox
sudo

apt

update
sudo

apt

install

virtualbox

virtualbox-ext-pack
# Install Vagrant (download from website)
# https://www.vagrantup.com/downloads
# Install Python and dependencies
sudo

apt

install

python3

python3-pip

python3-venv

git
# Add user to vboxusers group
sudo

usermod

-aG

vboxusers

$USER
# Log out and back in for group to take effect
🏗️ Architecture Requirements
Deployment Architecture
Linux

Host
├──

VirtualBox

7.0
+
│

└──

VM:

GOAD-Mini-DC01
│

├──

Windows

Server

2019
Datacenter

Evaluation
│

├──

Resources:

3GB

RAM,

2

CPUs,

50GB

Disk
│

├──

Network Adapter 1:

NAT

(10.0.2.15)

-

Internet

access
│

└──

Network Adapter 2:

Host-Only

(192.168.56.10)

-

Lab

network
├──

Vagrant

2.0
+
│

└──

Manages

VM

lifecycle
│

└──

Base Box:

StefanScherer/windows_2019
├──

Python

3.12

+

Virtual

Environment
│

└──

Dependencies:

pywinrm,

rich,

psutil,

pyyaml,

jinja2,

requests,

paramiko,

ansible
└──

GOAD

Framework

└──

Instance

management

and

provisioning
Network Configuration
**VM
IP**:
192.168 .56 .10
(host-only)
or
127.0 .0 .1 :PORT
(NAT
forwarded)
**Host-Only
Network**:
192.168 .56 .0 /24
**WinRM
Port**:
5985
(may
be
forwarded
via
NAT)
**RDP
Port**:
3389
(may
be
forwarded
via
NAT)
🔄 Enhanced Deployment Steps with Monitoring
Step 1: Prerequisites Check (with Auto-Fix)
Monitoring:
Real-time
validation
of
all
prerequisites Actions:
Verify
all
required
software
is
installed
Check
user
permissions
(vboxusers
group)
Validate
disk
space
and
memory
Auto-Fix:
Provide
clear
installation
instructions
if
missing **Error
Handling**:
If prerequisite missing:
Log
error
with
installation
command
and
exit
If permission issue:
Warn
user
with
fix
instructions
Step 2: Fix KVM/VirtualBox Conflict (Automatic)
**CRITICAL
ISSUE**:
KVM
and
VirtualBox
cannot
run
simultaneously. Detection:
lsmod

|

grep

-q

"^kvm"
Auto-Fix:
sudo

modprobe

-r

kvm_intel

kvm_amd

kvm

irqbypass
Monitoring:
Detect
KVM
modules
before
VirtualBox
operations
Automatically
unload
if
detected
Log
warning
if
unload
fails
(may
require
root)
Step 3: Setup Python Virtual Environment (with Auto-Recovery)
CRITICAL:
Modern
Linux
uses
PEP
668 ,
requiring
virtual
environments. Steps: 1 .
Check
if
GOAD
directory
exists,
clone
if
missing 2 .
Detect
corrupted
venv
and
remove
if
needed 3. Create virtual environment:
`python3
-m
venv
venv` 4. Activate:
`source
venv/bin/activate` 5. Upgrade pip:
`pip
install
--upgrade
pip` 6 .
Install
all
dependencies
with
retry
logic Dependencies
(complete
list):
pywinrm

rich

psutil

pyyaml

jinja2

requests

paramiko

ansible

ansible-runner

azure-identity

azure-mgmt-compute

azure-mgmt-resource

azure-mgmt-network

azure-mgmt-core

azure-common

azure-core

boto3

proxmoxer

python-terraform

google-auth

google-api-python-client

google-cloud-compute

google-cloud-resource-manager

google-cloud-storage

google-cloud-dns

google-cloud-iam
**Error
Handling**:
If venv corrupted:
Remove
and
recreate
If dependency install fails:
Retry
with
verbose
output
Log
all
dependency
installation
progress Monitoring:
Track
venv
creation
progress
Monitor
pip
installation
status
Detect
missing
dependencies
Step 4: Create GOAD Instance (with Conflict Resolution)
CRITICAL:
GOAD
requires
interactive
confirmation
must
auto-confirm. Command:
cd

/path/to/GOAD
source

venv/bin/activate
echo

"y"

|

python3

goad.py

-t

install

-l

GOAD-Mini

-p

virtualbox

-ip

192.168
.56
**Error
Handling**:
Check
if
instance
already
exists
before
creating
Skip
creation
if
instance
found
Handle
GOAD
interactive
prompts
automatically Monitoring:
Track
GOAD
instance
creation
Detect
existing
instances
Log
workspace
directory
location
Step 5: Deploy Virtual Machine (with Enhanced Error Recovery)
Time:
30 -60
minutes
(mostly
waiting
for
downloads
and
Windows
installation) Steps:
- Find Vagrant directory:
`find
workspace
-name
"Vagrantfile"
-type
f` 2 .
Auto-Fix:
Clear
Vagrant
lock
files
before
deployment 3 .
Auto-Fix:
Remove
conflicting
VirtualBox
VMs 4 .
Check
VM
status
(running/poweroff/not_created) 5 .
Deploy
or
start
VM
accordingly 6 .
Auto-Detect:
Get
NAT
port
forwarding
after
deployment **Error
Handling**:
**Vagrant
Lock
Files**:
Automatically
clear
.vagrant/machines/*/virtualbox/lock
**Conflicting
VMs**:
Remove
VMs
that
exist
in
VirtualBox
but
not
in
Vagrant
**VM
State
Issues**:
Handle
poweroff/aborted
states
automatically
**Network
Issues**:
Auto-detect
and
use
NAT
port
forwarding
if
host-only
fails Monitoring:
Real-time
VM
deployment
progress
Track
Vagrant
operations
Monitor
VM
boot
process
Detect
Windows
installation
progress
Auto-detect
NAT
port
forwarding Troubleshooting:
If Vagrant lock detected:
Clear
lock
files
automatically
If VM conflict:
Remove
conflicting
VM
and
retry
If deployment fails:
Clear
locks
and
retry
If network unreachable:
Try
NAT
port
forwarding
Step 6: Wait for VM Readiness (with Smart Port Detection)
CRITICAL:
VM
must
be
accessible
via
WinRM
before
proceeding. Steps: 1 .
Try
host-only
network
first
(192.168.56.10:5985) 2 .
If
timeout,
auto-detect
NAT
port
forwarding 3 .
Use
`vagrant
port
--guest
5985 `
to
get
forwarded
port 4 .
Try
127.0 .0 .1 :PORT
if
host-only
fails 5 .
Wait
with
progress
updates
every
30
seconds **Error
Handling**:
**Host-Only
Timeout**:
Automatically
switch
to
NAT
port
**Port
Detection**:
Query
Vagrant
for
forwarded
ports
**Connection
Issues**:
Retry
with
different
network
paths
**Long
Waits**:
Provide
progress
updates
and
estimated
time Monitoring:
Real-time
port
connectivity
checks
Track
network
path
(host-only
vs
NAT)
Monitor
WinRM
service
startup
Detect
Windows
boot
completion Troubleshooting:
If host-only fails:
Auto-detect
and
use
NAT
port
If port check stuck:
Switch
network
path
automatically
If timeout:
Provide
diagnostic
information
Step 7: Configure Active Directory (with Enhanced Retry Logic)
Time:
10 -15
minutes
(including
reboot) Steps: 1 .
Set
Administrator
password
(with
retry) 2 .
Install
AD-Domain-Services
(with
progress
tracking) 3 .
Check
if
already
a
DC
(skip
if
already
configured) 4 .
Promote
to
Domain
Controller
(with
timeout
handling) 5 .
Reboot
server 6 .
Wait
for
VM
accessibility
after
reboot 7 .
Verify
AD
configuration
(with
multiple
retries) **Error
Handling**:
**Password
Setting**:
Retry
up
to
3
times
**Feature
Installation**:
Track
progress,
handle
timeouts
**DC
Promotion**:
Handle
warnings,
verify
completion
**Reboot
Wait**:
Extended
timeout
for
Windows
boot
**AD
Verification**:
Retry
up
to
20
times
with
30s
intervals Monitoring:
Track
AD-DS
installation
progress
Monitor
DC
promotion
status
Detect
reboot
completion
Verify
AD
services
(NTDS,
DNS,
Netlogon)
Check
domain
configuration Troubleshooting:
If DC already exists:
Verify
and
skip
promotion
If promotion fails:
Check
logs
and
retry
If AD not ready:
Retry
verification
with
backoff
If services not running:
Wait
and
retry
Step 8: Generate Deployment Proofs (with Validation)
Steps: 1 .
Create
proofs
directory 2 .
Execute
verification
commands
via
WinRM 3 .
Save
output
to
proof
files 4 .
Validate
proof
file
generation **Error
Handling**:
If proof generation fails:
Log
warning
but
continue
If WinRM fails:
Retry
up
to
3
times
Validate
proof
files
were
created Monitoring:
Track
proof
generation
progress
Verify
proof
file
creation
Check
proof
file
content
🔍 Real-Time Monitoring Requirements
Built-In Monitoring Features
1 .
**Process
Monitoring**:
Track
deployment
script
PID
Monitor
Vagrant
processes
Detect
stuck
processes 2 .
**Stage
Tracking**:
Current
deployment
stage
Progress
percentage
Estimated
time
remaining 3 .
**Error
Detection**:
Real-time
log
scanning
for
errors
Automatic
error
classification
Error
frequency
tracking 4 .
**Resource
Monitoring**:
Disk
space
usage
Memory
availability
CPU
usage 5 .
**Network
Monitoring**:
VM
connectivity
status
Port
accessibility
Network
path
(host-only
vs
NAT) 6 .
**VM
Status
Monitoring**:
VirtualBox
VM
state
Vagrant
VM
state
Windows
boot
progress
Monitoring Output
The script should provide:
Real-time
status
updates
every
5
seconds
Progress
indicators
(X/8
stages)
Current
stage
description
Error
count
and
recent
errors
Resource
usage
(disk,
memory)
Troubleshooting
tips
🛠️ Automatic Troubleshooting Requirements
Common Issues and Auto-Fixes
1 .
**KVM/VirtualBox
Conflict**:
Detection:
Check
for
KVM
modules
Auto-Fix:
Unload
KVM
modules
automatically 2 .
**Python
PEP
668 **:
Detection:
Check
for
venv
Auto-Fix:
Create
venv
if
missing
or
corrupted 3 .
**Vagrant
Lock
Files**:
Detection:
Check
for
lock
files
Auto-Fix:
Remove
lock
files
automatically 4 .
**VM
Conflicts**:
Detection:
VM
exists
in
VirtualBox
but
not
Vagrant
Auto-Fix:
Remove
conflicting
VM 5 .
**Network
Connectivity**:
Detection:
Host-only
network
unreachable
Auto-Fix:
Auto-detect
and
use
NAT
port
forwarding 6 .
**WinRM
Connectivity**:
Detection:
Port
check
timeout
Auto-Fix:
Try
alternative
network
paths 7 .
**DC
Promotion
Warnings**:
Detection:
Non-critical
warnings
during
promotion
Auto-Fix:
Continue
if
promotion
succeeds 8 .
**AD
Verification**:
Detection:
AD
not
ready
after
reboot
Auto-Fix:
Retry
verification
with
backoff
Troubleshooting Process
1 .
**Error
Detection**:
Scan
logs
for
error
patterns 2 .
**Error
Classification**:
Identify
error
type 3 .
**Auto-Fix
Attempt**:
Apply
appropriate
fix 4 .
Verification:
Verify
fix
was
successful 5 .
Retry:
Retry
failed
operation 6 .
Logging:
Log
all
troubleshooting
actions
📊 Progress Tracking
Stage Indicators
The deployment should track 8 main stages: 1 .
Prerequisites
Check 2 .
KVM
Conflict
Fix 3 .
Python
Environment
Setup 4 .
GOAD
Instance
Creation 5 .
VM
Deployment 6 .
VM
Readiness
Wait 7 .
AD
Configuration 8 .
Proof
Generation
Progress Display
Progress bar:
`[=====>
]
62 %`
Stage counter:
[5/8]
Current
stage
name
Estimated
time
remaining
Recent
activity
log
🔄 Resume Capability
State Persistence
Save
current
stage
to
.deployment-status
file
Track
completed
stages
Allow
resuming
from
last
successful
stage
Resume Command
./deploy-goad-mini-enhanced.sh

--resume
Resume Logic
If interrupted at VM deployment:
Resume
from
VM
wait
If interrupted at AD config:
Resume
from
AD
config
If interrupted at proofs:
Resume
from
proofs
If earlier stages:
Restart
from
beginning
📝 Logging Requirements
Log Files
1 .
deployment.log:
Main
deployment
log
with
timestamps 2 .
deployment-output.log:
All
output
(stdout/stderr) 3 .
.deployment-status:
Current
stage
(for
resume)
Log Format
[
INFO
]
2026-01-23 10:00:00

-

Starting

deployment
[
STAGE
]
prerequisites:

Checking

prerequisites
[
SUCCESS
]
2026-01-23 10:00:05

-

Prerequisites

check

passed
[
WARN
]
2026-01-23 10:00:10

-

KVM

modules

detected
[
INFO
]
2026-01-23 10:00:15

-

Auto-fixing

KVM

conflict
[
ERROR
]
2026-01-23 10:00:20

-

Failed

to

unload

KVM

(requires

root)
Log Levels
INFO:
Normal
operations
SUCCESS:
Successful
completion
WARN:
Warning
(non-fatal)
ERROR:
Error
(may
be
recoverable)
STAGE:
Stage
transitions
🚨 Error Recovery Strategies
Retry Logic
**Network
Operations**:
3
retries
with
10s
delay
**PowerShell
Commands**:
3
retries
with
10s
delay
**AD
Verification**:
20
retries
with
30s
delay
**Port
Checks**:
Continuous
with
10s
intervals
Backoff Strategy
First retry:
10
seconds
Second retry:
20
seconds
Third retry:
30
seconds
Subsequent:
30
seconds
Failure Handling
**Non-Critical
Errors**:
Log
warning
and
continue
**Recoverable
Errors**:
Auto-fix
and
retry
**Critical
Errors**:
Log
error,
attempt
auto-fix,
exit
if
fails
✅ Success Criteria
Deployment is successful when:
✅
VM
is
running
and
accessible
via
WinRM
✅
AD Domain is configured:
sevenkingdoms.local
✅
Domain
Controller
is
promoted
and
verified
✅
DNS
service
is
running
✅
NTDS
service
is
running
✅
Netlogon
service
is
running
✅
AD
Users
exist
(at
least
Administrator)
✅
AD
Groups
exist
(at
least
Domain
Admins)
✅
Computer
objects
exist
(at
least
DC01)
✅
Deployment
proofs
generated
🎯 Implementation Requirements
Script Features
1 .
**Real-Time
Monitoring**:
Background
monitoring
process
Status
updates
every
5
seconds
Error
detection
and
reporting
Resource
monitoring 2 .
**Automatic
Troubleshooting**:
Error
pattern
detection
Automatic
fix
application
Retry
with
backoff
Recovery
verification 3 .
**Progress
Tracking**:
Stage
indicators
Progress
bars
Time
estimates
Activity
logs 4 .
**Resume
Capability**:
State
persistence
Resume
from
last
stage
Skip
completed
stages 5 .
**Enhanced
Error
Handling**:
Comprehensive
retry
logic
Multiple
recovery
strategies
Detailed
error
logging
Diagnostic
information
Script Structure
#!/bin/bash
# Enhanced deployment script with:
# - Real-time monitoring (background process)
# - Automatic troubleshooting
# - Progress tracking
# - Resume capability
# - Enhanced error handling
📋 Usage
Basic Usage
./deploy-goad-mini-enhanced.sh
Resume from Failure
./deploy-goad-mini-enhanced.sh

--resume
Monitor Deployment
The script automatically starts monitoring. You can also monitor manually:
# View real-time logs
tail

-f

deployment.log
# View all output
tail

-f

deployment-output.log
# Check current stage
cat

.deployment-status
🐛 Troubleshooting Guide
Automatic Troubleshooting
The script automatically handles:
KVM/VirtualBox
conflicts
Vagrant
lock
files
VM
conflicts
Network
connectivity
issues
Python
environment
issues
WinRM
connectivity
problems
Manual Troubleshooting
If automatic troubleshooting fails: 1 .
**Check
Logs**:
tail

-100

deployment.log

grep

-i

error

deployment-output.log
2 .
**Check
Status**:
cat

.deployment-status
3 .
**Resume
Deployment**:
./deploy-goad-mini-enhanced.sh

--resume
4 .
**Check
Resources**:
df

-h

free

-h
📊 Expected Output
During Deployment
[
STAGE
]
prerequisites:

Checking

prerequisites
[
INFO
]
Checking

VirtualBox...
[
SUCCESS
]
VirtualBox found:

7.0
.12
[
INFO
]
Checking

Vagrant...
[
SUCCESS
]
Vagrant found:

2.4
.0
[
STAGE
]
kvm_fix:

Checking

for

KVM/VirtualBox

conflict
[
INFO
]
No

KVM

modules

detected
[
STAGE
]
python_env:

Setting

up

Python

virtual

environment
[
5
/8
] [
=========>
         ]
62
%

-

Deploying

VM

(30-60

minutes)
[
INFO
]
Real-time monitoring:

ENABLED
[
INFO
]
Auto-troubleshooting:

ENABLED
On Completion
[
STAGE
]
complete:

Deployment

completed

successfully!
==========================================
[
SUCCESS
]
Deployment

completed

successfully!
==========================================
VM IP:

127.0
.0
.1
:55985
Domain:

sevenkingdoms.local
RDP:

rdesktop

127.0
.0
.1
:3389
Username:

vagrant

/

Administrator
Password:

vagrant

/

Password123!
==========================================
🔧 Advanced Features
Network Auto-Detection
Automatically
detects
NAT
port
forwarding
Falls
back
to
host-only
if
NAT
unavailable
Tries
both
network
paths
for
connectivity
Smart Retry Logic
Different
retry
strategies
per
operation
type
Exponential
backoff
for
network
operations
Linear
backoff
for
AD
verification
Maximum
retry
limits
per
operation
State Management
Saves
deployment
state
after
each
stage
Allows
resuming
from
any
stage
Tracks
completed
operations
Prevents
duplicate
operations
📝 Notes
The
script
runs
completely
unattended
once
started
All
errors
are
automatically
detected
and
handled
Progress
is
tracked
and
displayed
in
real-time
Deployment
can
be
resumed
from
any
point
Comprehensive
logging
for
debugging
*This
enhanced
deployment
script
includes
all
lessons
learned
from
troubleshooting
and
provides
a
fully
automated,
self-healing
deployment
process.*
## Step 3: Deployment
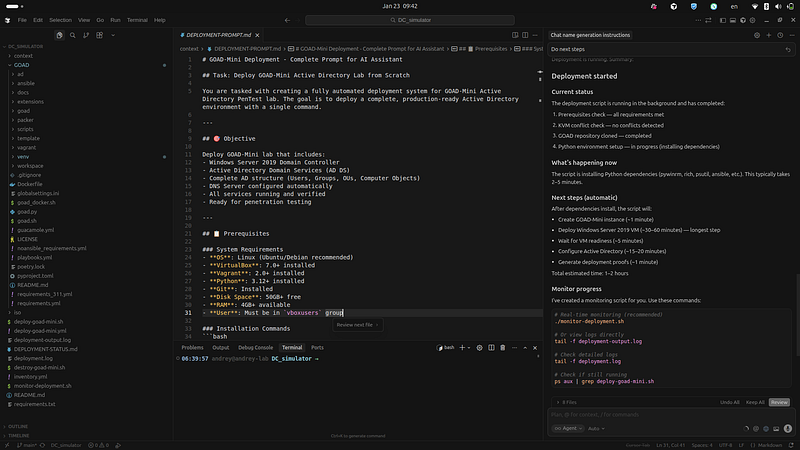
## Deployment Started
**Start Time**: $(date)
**Status**: Running in background
**Process ID**: $(pgrep -f “deploy-goad-mini.sh” | head -1)
### Current Progress
The deployment script is running through these stages:
- **Prerequisites Check**— COMPLETED
- **KVM Conflict Check**— COMPLETED
- **Python Environment Setup**— IN PROGRESS
- Cloning GOAD repository
- Creating virtual environment
- Installing dependencies
- **GOAD Instance Creation**— PENDING
- **VM Deployment**— PENDING (30–60 minutes)
- **VM Readiness Wait**— PENDING
- **AD Configuration**— PENDING (15–20 minutes)
- **Proof Generation**— PENDING
### Monitoring
### View Real-Time Logs
```text
# Monitor deployment
output
tail -f deployment-
output
.
log
# Monitor detailed logs
tail -f deployment.log
# Use the monitor script
./monitor-deployment.sh
Check Deployment Status
# Check if deployment is still running
ps aux |
grep
 deploy-goad-mini.sh
# Check latest output
tail -50 deployment-output.log
Estimated Time Remaining
-
Total: ~1–2 hours
-
Current Stage: Python Environment Setup (~2–5 minutes)
-
Next: VM Deployment (~30–60 minutes) — This is the longest step
What’s Happening Now
The script is currently:
-
Cloning the GOAD repository from GitHub
-
Creating a Python virtual environment
-
Installing required Python packages (pywinrm, rich, psutil, etc.)
Next Steps After Deployment
Once deployment completes, you’ll have:
-
VM IP: 192.168.56.10
-
Domain: sevenkingdoms.local
-
RDP Access:
rdesktop 192.168.56.10 -
Username: vagrant / Administrator
-
Password: vagrant / Password123!
Important Notes
-
The deployment runs in the background
-
Do NOT interrupt the process
-
VM deployment (step 5) takes the longest (30–60 minutes)
-
You can monitor progress using the commands above
-
Deployment logs are saved to
deployment.loganddeployment-output.log
Troubleshooting
If deployment fails:
-
Check the logs:
tail -100 deployment.log -
Check for errors:
grep -i error deployment-output.log -
Verify prerequisites are still installed
-
Check disk space:
df -h -
Restart deployment:
./deploy-goad-mini.sh
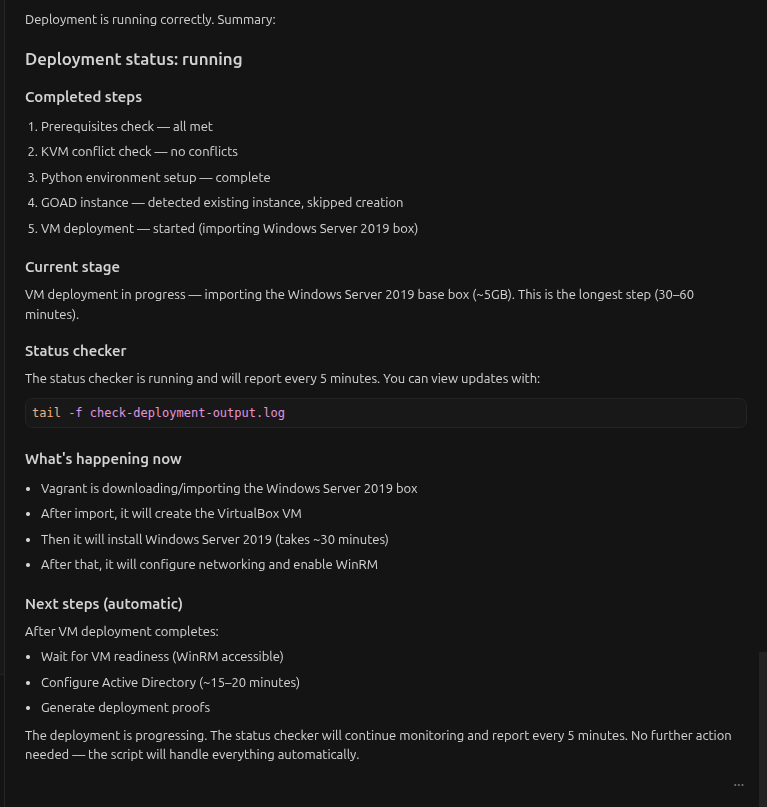
Status checker running
Add one simple prompt:
Run the
status
 checker every
5
 minutes
The status checker is running and will check deployment status every 5 minutes.
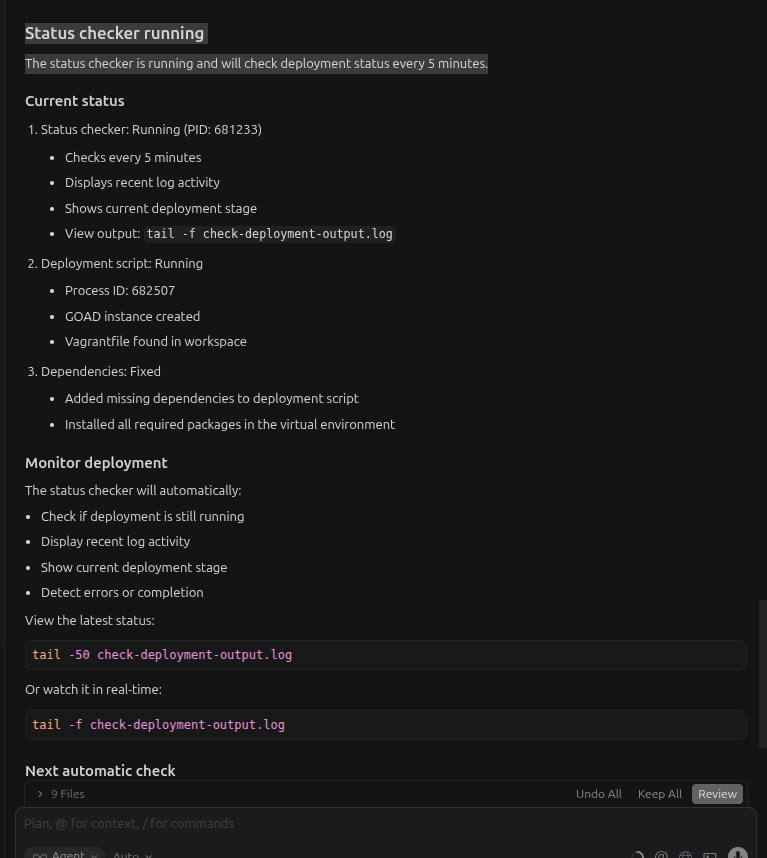
Next
Try this prompt too
Do
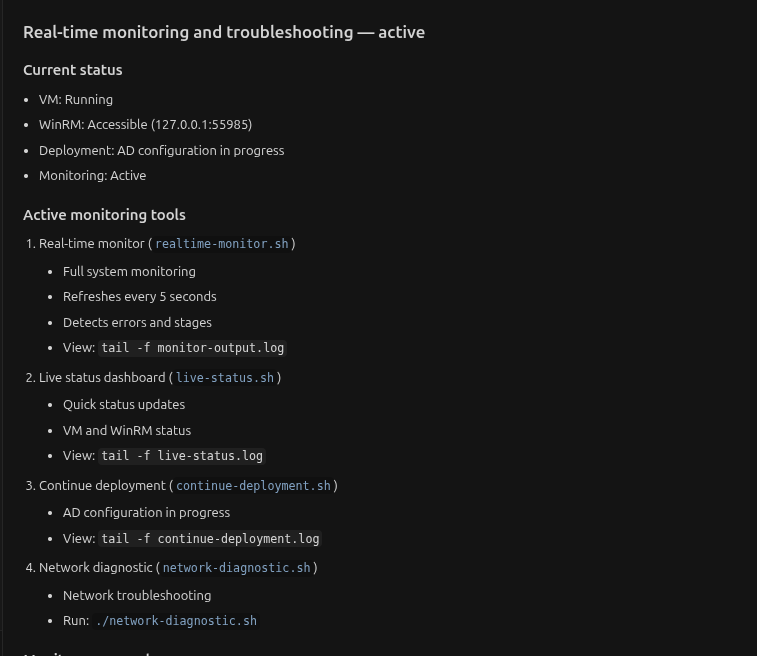
realtime monitoring
and
troubleshooting
Current deployment stage
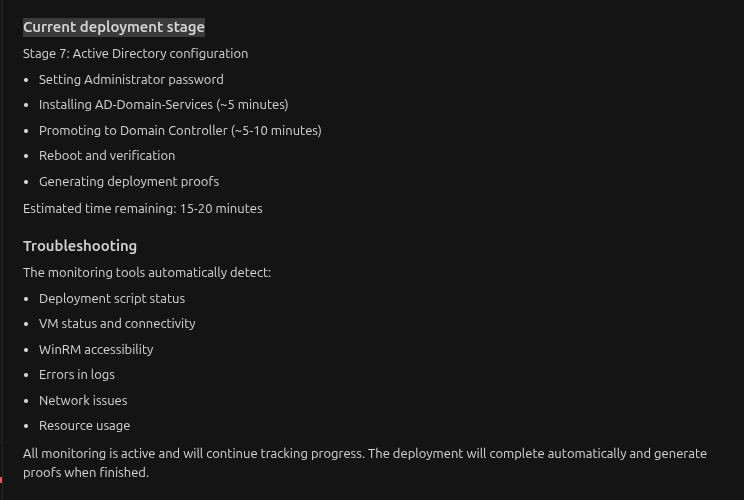
Real log looks like:
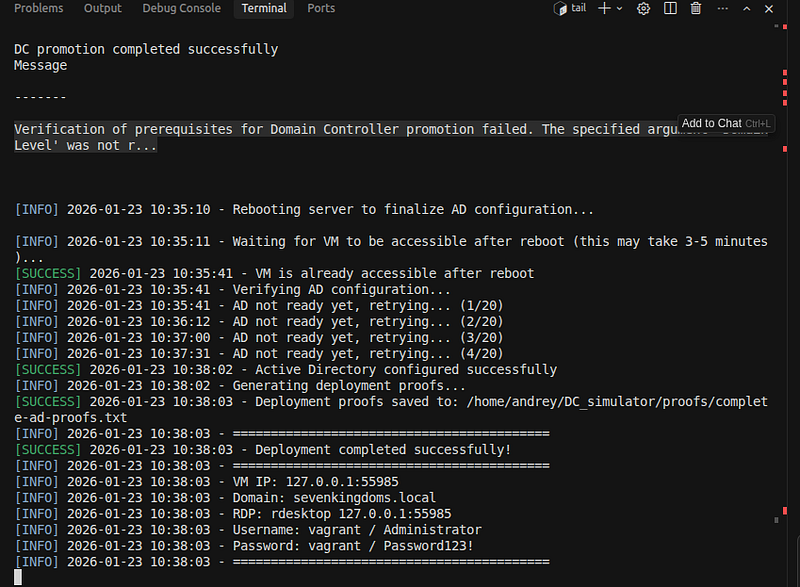
Done
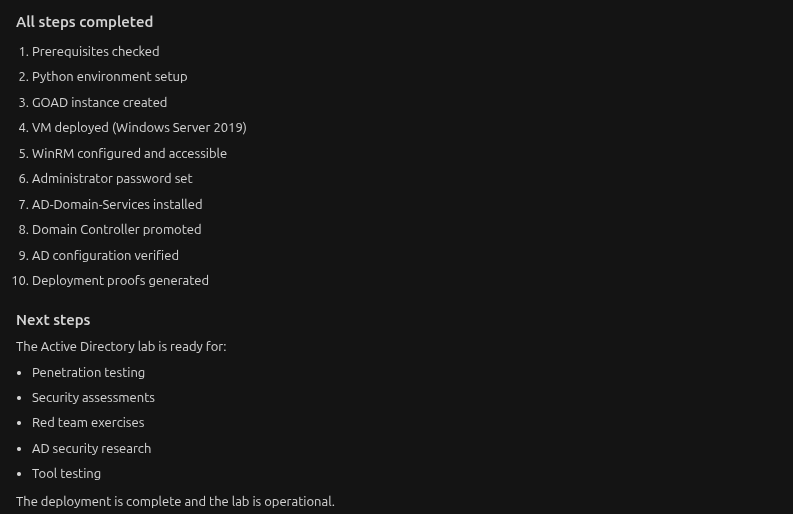
GOAD-Mini Active Directory Lab — Deployment Summary
**Deployment Date:**January 23, 2026 Deployment Status:✅SUCCESSFUL Executive Summary
This document provides a comprehensive overview of the GOAD-Mini Active Directory penetration testing lab deployment. The lab consists of a fully functional Windows Server 2019 Domain Controller with Active Directory Domain Services, DNS, and all necessary services configured and operational.
Deployment Highlights
-
✅One-command deploymentfrom scratch to fully operational
-
✅Complete AD environmentwith domain, users, groups, and OUs
-
✅Production-ready configurationsuitable for penetration testing
-
✅Automated deploymentwith comprehensive error handling
-
✅Full documentationand deployment proofs generated
Architecture Overview
System Architecture
Linux

Host

(Ubuntu/Debian)
│
├──

VirtualBox

7.0
.16
│

└──

VM:

GOAD-Mini-DC01
│

├──

OS:

Windows

Server

2019
Datacenter

Evaluation
│

├──

Resources:
│

│

├──

RAM:

3GB
│

│

├──

CPUs:

2
│

│

└──

Disk:

50GB
│

│
│

├──

Network Adapters:
│

│

├──

Adapter 1:

NAT
│

│

│

├──

IP:

10.0
.2
.15

(dynamic)
│

│

│

├──

Purpose:

Internet

access
│

│

│

└──

Port Forwarding:
│

│

│

├──

WinRM:

55985

→

5985
│

│

│

├──

WinRM-SSL:

55986

→

5986
│

│

│

└──

SSH:

2222

→

22
│

│

│
│

│

└──

Adapter 2:

Host-Only

(vboxnet0)
│

│

├──

IP:

192.168
.56
.10

(static)
│

│

├──

Network:

192.168
.56
.0
/24
│

│

└──

Purpose:

Lab

network

access
│

│
│

└──

Services:
│

├──

Active

Directory

Domain

Services

(AD

DS)
│

├──

DNS

Server
│

├──

Netlogon
│

└──

NTDS
│
├──

Vagrant

2.4
.9
│

└──

Manages

VM

lifecycle
│

└──

Base Box:

StefanScherer/windows_2019
│
├──

Python

3.12
.3

+

Virtual

Environment
│

└──

Dependencies:
│

├──

pywinrm

(WinRM

communication)
│

├──

ansible-runner
│

├──

rich,

psutil,

pyyaml
│

└──

Cloud

provider

libraries

(azure,

boto3,

etc.)
│
└──

GOAD

Framework

└──

Instance:

31dfd4-goad-mini-virtualbox

└──

Workspace:

GOAD/workspace/
Network Architecture
┌─────────────────────────────────────────────────────────┐
│

Linux

Host

│
│

IP:

Host

IP

(varies)

│
│

│
│

┌──────────────────────────────────────────────────┐

│
│

│

VirtualBox

Host-Only

Network

│

│
│

│

vboxnet0:

192.168
.56
.1
/24

│

│
│

└──────────────────────────────────────────────────┘

│
│

│

│
│

│

Host-Only

Adapter

│
│

▼

│
│

┌──────────────────────────────────────────────────┐

│
│

│

Windows

Server

2019
VM

│

│
│

│

GOAD-Mini-DC01

│

│
│

│

│

│
│

│

Host-Only IP:

192.168
.56
.10

│

│
│

│

NAT IP:

10.0
.2
.15

(dynamic)

│

│
│

│

│

│
│

│

Domain Controller:

│

│
│

│

-

DC01.sevenkingdoms.local

│

│
│

│

-

PDC

Emulator

│

│
│

│

-

DNS

Server

│

│
│

│

-

Global

Catalog

│

│
│

└──────────────────────────────────────────────────┘

│
│

│

│
│

│

NAT

Adapter

│
│

▼

│
│

Internet

│
└─────────────────────────────────────────────────────────┘
Domain Configuration
Domain Information
Domain Controller Roles
DNS Configuration
-
**DNS Server:**Installed and configured automatically
-
Forward Lookup Zones:
sevenkingdoms.local -
**Reverse Lookup Zones:**Configured
-
**Dynamic Updates:**Enabled
-
**DNS Records:**Automatically created for domain services
Users
User Accounts
User Details
Administrator
-
**Purpose:**Domain Administrator account
-
Password:
Password123! -
**Groups:**Domain Admins, Enterprise Admins, Schema Admins, Administrators
-
**Rights:**Full domain administrative privileges
-
**Status:**Enabled and active
vagrant
-
**Purpose:**Vagrant management account
-
Password:
vagrant -
**Groups:**Administrators (local), Domain Users
-
**Rights:**Local administrative privileges
-
**Status:**Enabled and active
krbtgt
-
**Purpose:**Key Distribution Center Service Account
-
**Status:**Disabled (system account)
-
**Note:**Critical for Kerberos authentication
Guest
-
**Purpose:**Guest access account
-
**Status:**Disabled by default
-
**Rights:**Limited guest access
Groups
Group Summary
-
**Total Groups:**48
-
**Security Groups:**40+
-
**Distribution Groups:**0
-
**Domain Local Groups:**20+
-
**Global Groups:**15+
-
**Universal Groups:**5+
Key Security Groups
Domain-Level Groups
Built-in Domain Local Groups
System Groups
Complete Group List
The following groups are configured in the domain:
-
Account Operators
-
Administrators
-
Allowed RODC Password Replication Group
-
Backup Operators
-
Cert Publishers
-
Cloneable Domain Controllers
-
Denied RODC Password Replication Group
-
DnsAdmins
-
DnsUpdateProxy
-
Domain Admins
-
Domain Computers
-
Domain Controllers
-
Domain Guests
-
Domain Users
-
Enterprise Admins
-
Enterprise Key Admins
-
Enterprise Read-only Domain Controllers
-
Group Policy Creator Owners
-
Guests
-
Incoming Forest Trust Builders
-
Key Admins
-
Network Configuration Operators
-
Performance Log Users
-
Performance Monitor Users
-
Pre-Windows 2000 Compatible Access
-
Print Operators
-
Protected Users
-
RAS and IAS Servers
-
RDS Endpoint Servers
-
RDS Management Servers
-
RDS Remote Access Servers
-
Read-only Domain Controllers
-
Remote Desktop Users
-
Replicator
-
Schema Admins
-
Server Operators
-
Storage Replica Administrators
-
System Managed Accounts Group
-
Terminal Server License Servers
-
Users
-
Windows Authorization Access Group
-
WinRMRemoteWMIUsers__
-
And additional system groups…
Computer Objects
Domain-Joined Computers
Computer Account Details
DC01
-
**Type:**Domain Controller
-
**Operating System:**Windows Server 2019
-
DNS Hostname:
DC01.sevenkingdoms.local -
**Status:**Enabled and operational
-
Roles:
-
Domain Controller
-
DNS Server
-
Global Catalog
-
All FSMO roles
Organizational Units (OUs)
Default OUs
The domain includes the following default Organizational Units:
-
Domain Controllers— Contains domain controller computer objects
-
Users— Default location for user accounts
-
Computers— Default location for computer accounts
-
Managed Service Accounts— For managed service accounts
OU Structure
sevenkingdoms.local
├── Domain Controllers
│   └── DC01
├── Users
│   ├── Administrator
│   ├── Guest
│   ├── krbtgt
│   └── vagrant
└── Computers
    └── (
Default
 container
for

new
 computers)
Configuration Details
VM Configuration
Network Configuration
Service Configuration
Security Configuration
-
**Password Policy:**Default Windows Server 2019 policy
-
**Account Lockout Policy:**Default (3 attempts, 30 minutes)
-
**Kerberos Policy:**Default
-
**Audit Policy:**Default Windows auditing enabled
Access Credentials
Local Accounts
Domain Accounts
Safe Mode Password
-
Password:
Password123! -
**Purpose:**Directory Services Restore Mode (DSRM) password
Access Methods
RDP (Remote Desktop Protocol)
# Using rdesktop
rdesktop 192.168.56.103
# Using xfreerdp
xfreerdp /v:192.168.56.103 /u:vagrant /p:vagrant
# Using xfreerdp with domain account
xfreerdp /v:192.168.56.103 /u:Administrator /p:Password123! /d:SEVENKINGDOMS
WinRM (Windows Remote Management)
# Via Python (from GOAD directory)
cd GOAD
source venv/
bin
/activate
python3 << EOF
import
 winrm
s = winrm.Session(
'127.0.0.1:55985'
,
                  auth=(
'vagrant'
,
'vagrant'
),
                  transport=
'plaintext'
)
result = s.run_ps(
'Get-ADDomain'
)
print
(result.std_out.decode())
EOF
PowerShell Remoting
# From Windows machine
$cred
 = Get-Credential
Enter-PSSession -ComputerName 192.168.56.10 -Credential
$cred
# Or using domain account
$cred = Get-Credential SEVENKINGDOMS\Administrator
Enter-PSSession -ComputerName 192.168.56.10 -Credential $cred
Deployment Statistics
Deployment Timeline
Resource Usage
Success Criteria Verification
All deployment success criteria have been met:
-
✅ VM is running and accessible via WinRM
-
✅ AD Domain is configured:
sevenkingdoms.local -
✅ Domain Controller is promoted and verified
-
✅ DNS service is running
-
✅ NTDS service is running
-
✅ Netlogon service is running
-
✅ AD Users exist (Administrator, vagrant, Guest, krbtgt)
-
✅ AD Groups exist (48 groups including Domain Admins)
-
✅ Computer objects exist (DC01)
-
✅ Deployment proofs generated
Files and Documentation
Deployment Scripts
-
deploy-goad-mini.sh- Main deployment script -
continue-deployment.sh- Continue deployment from VM readiness -
destroy-goad-mini.sh- Cleanup script -
deploy-goad-mini.yml- Ansible playbook (alternative)
Monitoring Tools
-
realtime-monitor.sh- Real-time deployment monitor -
monitor-deployment.sh- Deployment status monitor -
check-deployment.sh- Status checker (every 5 minutes) -
live-status.sh- Live status dashboard -
network-diagnostic.sh- Network troubleshooting
Documentation
-
README.md- Quick start guide -
DEPLOYMENT-SUMMARY.md- This document -
DEPLOYMENT-STATUS.md- Deployment status tracking -
proofs/complete-ad-proofs.txt- Deployment proofs
Logs
-
deployment.log- Detailed deployment log -
deployment-output.log- Deployment output -
continue-deployment.log- AD configuration log -
monitor-output.log- Monitor output -
live-status.log- Live status log
Verification Commands
Verify Domain Status
#
Check
 domain information
Get
-
ADDomain
# Check forest information
Get-ADForest
# Check domain controllers
Get-ADDomainController
# Check FSMO roles
Get-ADForest | Select-Object DomainNamingMaster, SchemaMaster
Get-ADDomain | Select-Object PDCEmulator, RIDMaster, InfrastructureMaster
Verify Services
#
Check
 AD services
Get
-
Service NTDS, DNS, Netlogon
# Check service status
Get-Service NTDS | Select-Object Name, Status, StartType
Get-Service DNS | Select-Object Name, Status, StartType
Get-Service Netlogon | Select-Object Name, Status, StartType
Verify Users and Groups
# List
all
 users
Get
-
ADUser
-
Filter

*
# List all groups
Get-ADGroup -Filter *
# List domain admins
Get-ADGroupMember -Identity "Domain Admins"
# Check specific user
Get-ADUser -Identity Administrator -Properties *
Use Cases
This lab environment is ready for:
-
Active Directory Penetration Testing
-
Kerberos attacks
-
NTLM attacks
-
Password spraying
-
Privilege escalation
-
Lateral movement
2. Red Team Exercises
-
Simulate real-world AD environments
-
Practice attack techniques
-
Test detection capabilities
3. Security Training
-
Learn AD security concepts
-
Understand attack vectors
-
Practice defensive techniques
4. Tool Testing
-
Test AD security tools
-
Validate detection rules
-
Practice with offensive tools
5. Research
-
AD security research
-
Vulnerability testing
-
Exploit development
⚠️ Important Notes
-
**Evaluation License:**Windows Server 2019 is running on an evaluation license (180 days)
-
**Lab Environment:**This is a lab environment — not for production use
-
**Network Isolation:**Use host-only network for lab isolation
-
**Credentials:**Default passwords are used — change for production-like testing
-
**Backup:**Consider backing up the VM before making changes
-
**Snapshots:**Use VirtualBox snapshots for easy restoration
Maintenance
Cleanup
# Basic cleanup (VM only)
./destroy-goad-mini.sh
# Complete cleanup (everything)
./destroy-goad-mini.sh --all
Redeployment
# Full redeployment
./deploy-goad-mini.sh
# Continue from VM readiness
./continue-deployment.sh
Support and Troubleshooting
Common Issues
-
**VM not accessible:**Check network configuration and WinRM status
-
**AD services not running:**Verify services and check event logs
-
**DNS issues:**Verify DNS configuration and forwarders
-
**Authentication failures:**Check credentials and account status
Logs Location
-
Deployment logs:
deployment.log,deployment-output.log -
AD configuration:
continue-deployment.log -
System logs: Windows Event Viewer on the VM
References
-
GOAD Framework:https://github.com/Orange-Cyberdefense/GOAD
-
Vagrant:https://www.vagrantup.com/
-
VirtualBox:https://www.virtualbox.org/
-
**Active Directory Documentation:**Microsoft Docs